
Introducing Direct to SwiftUI
 Direct to SwiftUI
is an adaption of an old
WebObjects
technology called
Direct to Web.
This time for Apple’s new framework:
SwiftUI.
Instant
CRUD
apps, configurable using
a declarative rule system,
yet fully integrated with SwiftUI.
Direct to SwiftUI
is an adaption of an old
WebObjects
technology called
Direct to Web.
This time for Apple’s new framework:
SwiftUI.
Instant
CRUD
apps, configurable using
a declarative rule system,
yet fully integrated with SwiftUI.
The Direct to Web framework is a configurable system for creating WebObjects applications that access a database.
If you are brave enough to look at Web 1.0 web page designs, the Direct to Web Guide is a great introduction to the concepts. Using the “cross platform” capabilities of SwiftUI, Direct to SwiftUI (D2S) is bringing those concepts to native apps running on Apple Watches, iPhones and the Mac itself.
So what exactly does Direct to SwiftUI do?
It uses a Swift ORM
(ZeeQL)
to connect to a database
(e.g. PostgreSQL or SQLite)
and reads the database catalog.
It then relies on a set of rules to assemble prefabricated
SwiftUI Views into a native CRUD application.
The developer can then add additional rules to customize the appearance and
behaviour.
Unlike other RAD
tools, it fully integrates with
SwiftUI.
Embed D2S Views in your own Views, or use own Views to replace any of the D2S
Views.
You should have some minimal experience with SwiftUI before you continue. WWDC Session 204, Introducing SwiftUI is a nice one.
Still no idea? By adding this View to your fresh SwiftUI app project:
struct ContentView: View {
  var body: some View {
    D2SMainView(adaptor   : PostgreSQLAdaptor(database: "dvdrental"),
                ruleModel : [])
  }
}
you get this watchOS app when connecting to a Sakila aka DVD Rental demo database:
And if you paste exactly the same thing into an iOS SwiftUI project:
Without applying any rules, you’ll essentially get a simple database browser and
editor, for all SwiftUI targets.
When using Direct to SwiftUI, this is what you start with,
a complete CRUD frontend.
You then use rules to tweak the frontend, and potentially replace whole generic
D2S Views. Or mix & match.
Rules
We’ve been mentioning “rules” a few times, what is that? Rules allow you to program your application declaritively. In traditional imperative programs, your program is essentially a sequence of statements which are executed one after another. With rules, you declare outcomes based on conditions (if you know Make, you are well prepared). The rule engine is then responsible for figuring out what to do 🤓
D2S uses a rule engine called SwiftUI Rules which we introduced in another blog entry. You might want to read that now, or later.
An example. The film database table has a rating column
which may come in as a VARCHAR, that is a String in Swift.
When Direct to SwiftUI generates the UI to edit that column, it’ll produce
a simple TextField containing the rating string:
We can add a rule to change that, and make D2S display a different
field editor View:
\.propertyKey == "rating" && \.task == "edit"
              => \.component <= EditRating()
This says: If we are in edit mode (task is “edit”),
and the current property is “rating”,
set the component View to EditRating.
In this example EditRating is a custom SwiftUI View
(part of our DVDRental
demo app).
As explained in SwiftUI Rules, a rule is composed of three parts (and an optional priority):
predicate => environment key <= rule-value
All parts of the rule evaluate against the SwiftUI
Environment,
which is usually accessed using the
Swift KeyPath
syntax (those weird backslashes).
For example \.propertyKey grabs the current value of the propertyKey in
the environment.
In our case \.propertyKey == "rating" && \.task == "edit" is the
predicate, it says whether a rule applies for a given situation.
\.component is the environment key affected by our rule.
Finally EditRating() is the rule-value which gets used if the rule
matches.
The order of the rules in a rule model has no effect. If multiple rules match, the rule with the highest complexity is selected. If that is still ambiguous, a
priorityneeds to be attached.
ZeeQL Terminology
Before we jump into creating our own Direct to SwiftUI application, a little ZeeQL terminology. ZeeQL is the Swift ORM we use to access the database.
ZeeQL is heavily inspired by EOF and uses its naming of things, which happens to match what it is used in ER Modelling. CoreData is essentially a deflated version of EOF, so if you know CoreData, you are well prepared. In short:
- Model: Just a collection of Entities,
- Entity: Those usually map to database tables (like “film”), other ORMs often call those “models” 🙄,
- Entity Property: Either an Attribute, or a Relationship, where:
- Attribute: maps to database columns (like “release_date”), and
- Relationship: represents relationships between Entities, for example the address of a customer. Represented by foreign keys in the database.
Creating a Direct to SwiftUI Application
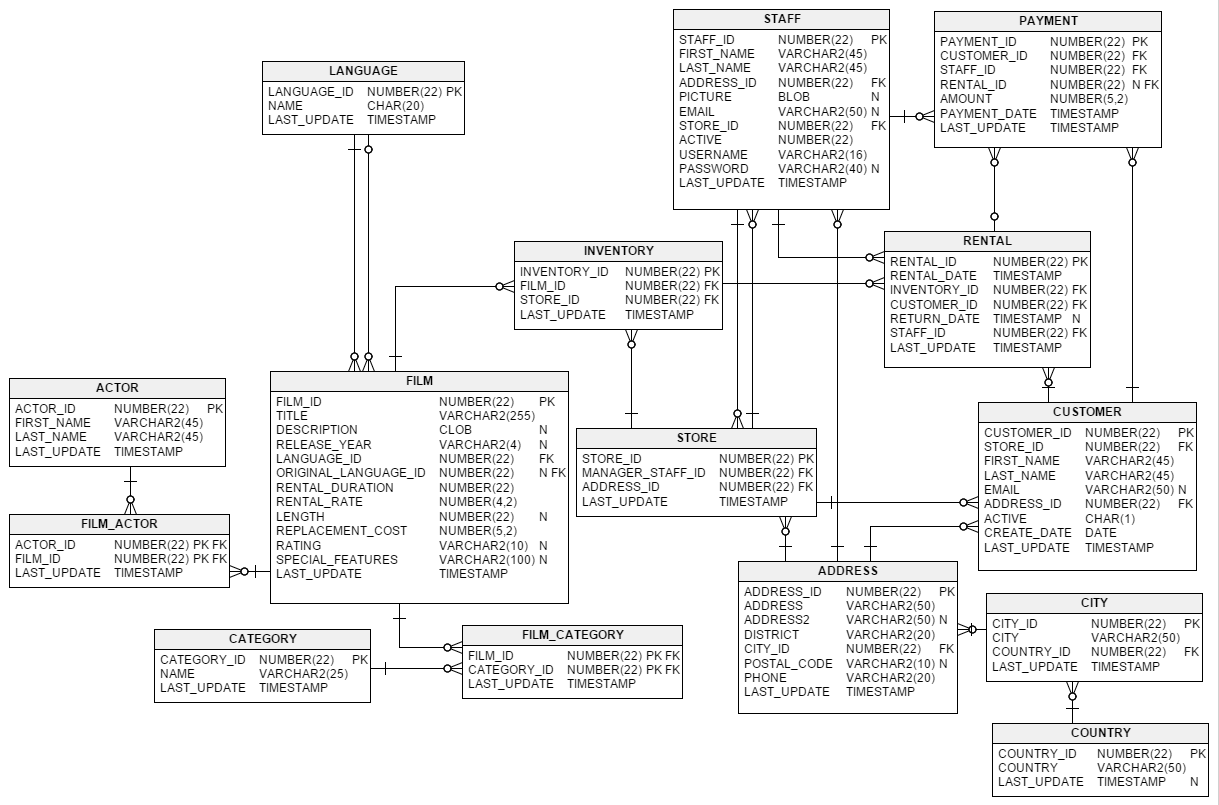
OK, one more thing: A test database. If you already have an existing database w/ some data, you can use that (as usual: on your own risk! 🤓), but the sample is built around the Sakila database. It models the data required to run a DVD 📼 rental store, here is the ER diagram:
Installing PostgreSQL and Loading Sakila
If you haven’t already, install PostgreSQL. Don’t be afraid, it is only a few MB in size. Using Homebrew (Postgres.app is a fine option as well):
brew install PostgreSQL
brew services start postgresql # start at computer start
createuser -s postgres
To load the Sakila a.k.a. “dvdrental” database (schema & data):
curl -o /tmp/dvdrental.zip \
  http://www.postgresqltutorial.com/wp-content/uploads/2019/05/dvdrental.zip
mkdir -p /tmp/dvdrental && cd /tmp/dvdrental
tar zxf /tmp/dvdrental.zip
tar xf  /tmp/dvdrental.tar # crazy, right?
createdb dvdrental
pg_restore -h localhost -U postgres -d dvdrental .
That’s it.
Creating the Xcode 11 Project
If you are lazy, you can checkout the preconfigured “empty” project:
git clone -b branches/01-default-rulemodel \
  https://github.com/DirectToSwift/DVDRental.git
And if you want to skip ahead to the finished app:
git clone -b branches/10-customized \
  https://github.com/DirectToSwift/DVDRental.git
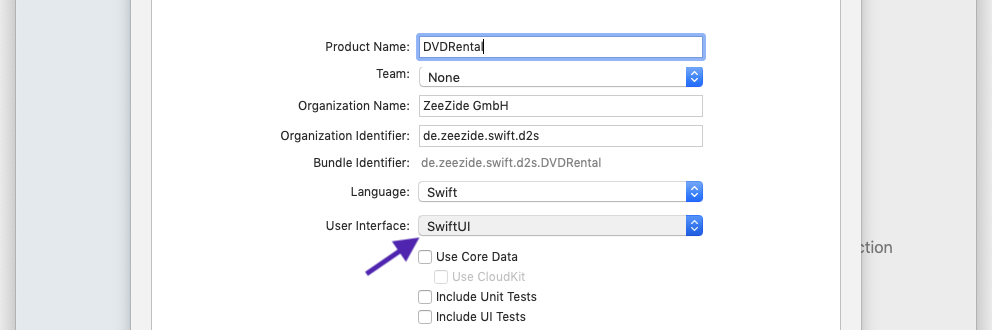
So, Cmd-Shift-N (File / New / Project …), select “iOS”, “Single View App”:

Make sure to select “SwiftUI” in the “User Interface” popup:
Next we need to add the packages required, select the project and then the “Swift Packages” tab in Xcode:
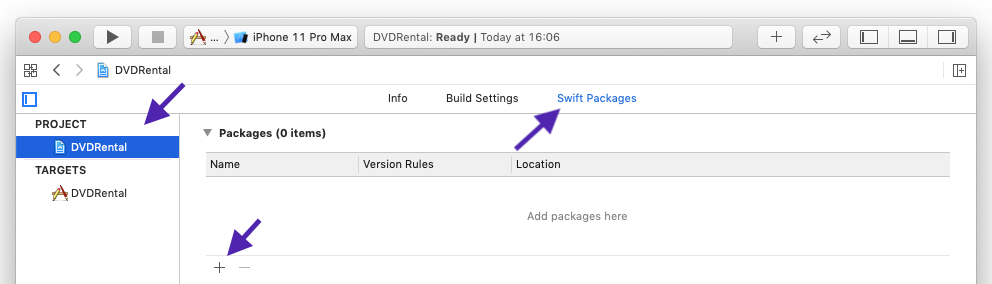
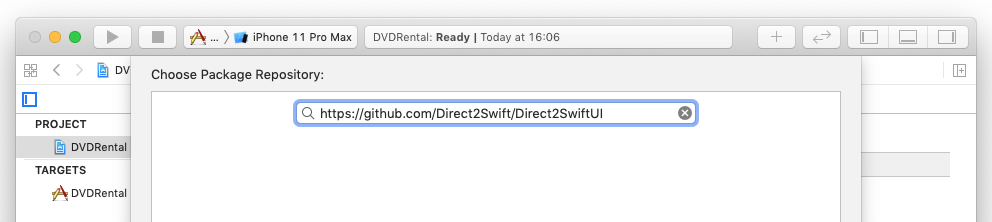
Press “+”, and add: https://github.com/DirectToSwift/DirectToSwiftUI
Repeat the process for the database driver we are going to use:
https://github.com/ZeeQL/ZeeQL3PCK

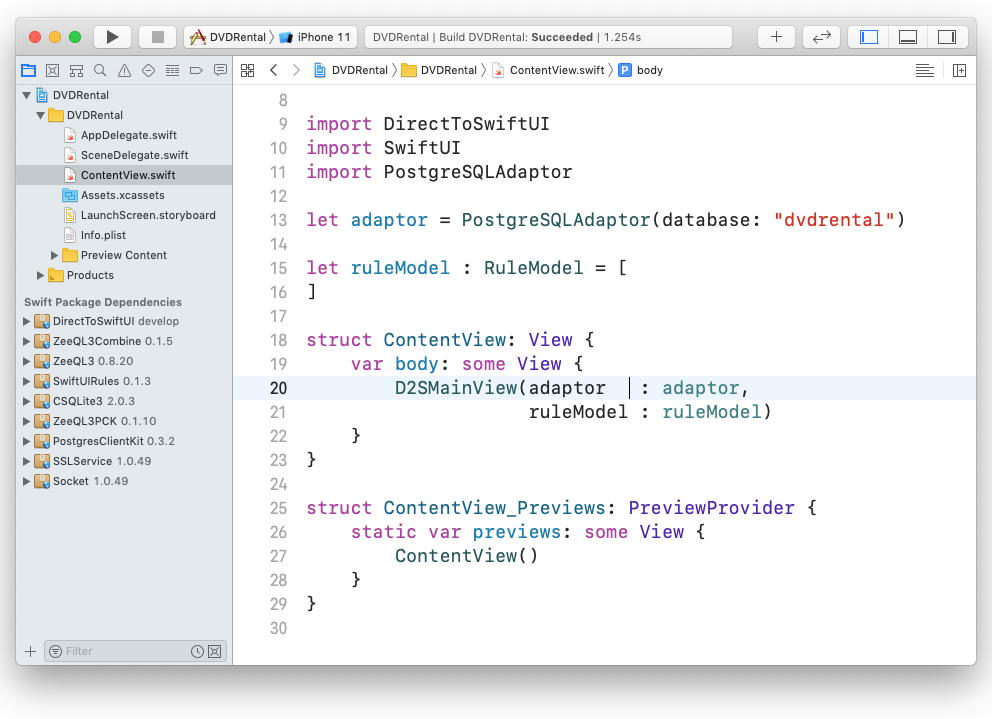
Finally, open ContentView.swift and adjust it to import the
PostgreSQLAdaptor
and
DirectToSwiftUI modules.
Add the lines to create the adaptor, the empty rule model
and change the ContentView to embed the Direct to SwiftUI D2SMainView.
Here is the code:
import DirectToSwiftUI
import PostgreSQLAdaptor

let adaptor = PostgreSQLAdaptor(database: "dvdrental")

let ruleModel : RuleModel = []

struct ContentView: View {
    var body: some View {
        D2SMainView(adaptor   : adaptor,
                    ruleModel : ruleModel)
    }
}
Should look like this:
That’s it! Compile and run, and you should end up with an app able to browse and edit your database as shown above:
You can download this state using:
git clone -b branches/01-default-rulemodel \
  https://github.com/DirectToSwift/DVDRental.git
This is using only the builtin rules, shows all the entities (tables) in the database schema, and all the properties. Feel free to add watchOS or macOS targets, they can use all the same source code.
Anatomy of a Direct to SwiftUI Application
Before we can customize the application, we need to understand how the
D2SMainView entry point works.
Use this
AnyViewinfested framework to build SwiftUI database applications in 0 time. Every time a property is selected a 🐶 dies.
The first thing D2SMainView does is connect to the database using the given
ZeeQL adaptor and fetch the Database Model.
ZeeQL does this by running queries against the
database catalog,
which contains information about the available tables, their columns and
the foreign key constraints between them.
It also runs a Fancyfier over the Model, which produces nice names for the
columns (e.g. last_name becomes lastName,
a film_id primary key becomes just id, etc.)
There is no requirement to construct the ZeeQL Model by fetching it from the database. ZeeQL provides various ways to setup a Model. Use Swift classes to declare them, there is a Codable option, and it is even possible to load an existing CoreData model.
The other thing passed to D2SMainView is the Rule Model.
The rule model is an array of our own rules, right now it is empty:
let ruleModel : RuleModel = []
Those are just the custom rules, D2SMainView also hooks up the builtin
Direct to SwiftUI rule model:
DefaultRules.swift
(much of D2S itself rule driven).
Once the database is up, the D2SMainView makes the database, the model
and the rule context available to the SwiftUI Environment.
It then asks the rule system for the firstTask and shows the page
associated with that.
Tasks and Pages
Tasks are an abstraction over the pages an application might show, they map to the CRUD operations: “list”, “inspect”, “edit”, etc. In Direct to SwiftUI those “tasks” are assigned pages using the rule system:
\.task == “edit” => \.page <= D2SEditPage()
If the task environment key is “edit”, the page to use is
D2SEditPage.
Pages are just regular SwiftUI Views. You can build your own:
\.task == “inspect” && \.entity.name == “Film”
       => \.page <= FancyMovieView()
Tasks also control the “flow” through the application. Using “firstTask” you select the first page to be shown. E.g. to enable the builtin login page:
.firstTask <= “login”
Using “nextTask” you select the logicial next page to be shown. For example if you are on a page listing the movies:
\.task == “list” && \.user.login == “sj”
                 => \.nextTask <= “edit”
\.task == “list” => \.nextTask <= “inspect”
If the user is SJ, the list will jump directly to the edit page when clicking a record, while other people first get to the page associated with the “inspect” task.
Summary:
D2SMainViewfirst queries thefirstTaskkey, which returns “query” by default.- It then assigns the “query” value to the
taskkey in the SwiftUI environment. - Next it asks the environment for the
Viewassociated with thepagekey, this is going to be theViewit displays to the user. - When the rule system is asked for that
pagekey, it’ll check the rule model and find that:\.task == "query" => \.page <= BasicLook.Page.EntityList(). So it is going to return aViewwhich displays a list of entities.
Most pages are setup like this:
  ┌──────────────┐
┌─┤ Page Wrapper ├──────────────┐
│ └──────────────┘   ┌────┐     │
│  ┌─────────────────┤Page├──┐  │
│  │  ┌────┐         └────┘  │  │
│  │ ┌┤Row ├───────────────┐ │  │
│  │ │└────┘ ┌───────────┐ │ │  │
│  │ │       │ Property  │ │ │  │
│  │ │       └───────────┘ │ │  │
│  │ └─────────────────────┘ │  │
│  │  ┌────┐                 │  │
│  │ ┌┤Row ├───────────────┐ │  │
│  │ │└────┘ ┌───────────┐ │ │  │
│  │ │       │ Property  │ │ │  │
│  │ │       └───────────┘ │ │  │
│  │ └─────────────────────┘ │  │
│  └─────────────────────────┘  │
└───────────────────────────────┘
The builtin ones usually loop over some set of objects. The entities list page loops over the entities in the database model, the query list page loops over the results of a database query, the inspect and edit pages loop over the properties of an entity.
We are going to ignore the Page Wrapper & Row Views here, check the
README
in the source if interested.
Components
While pages are kinda like the top most Views in the hierarchy,
components are the leaf Views.
They either display or edit a single Attribute (~ table column) or Relationship
(~ foreign key).
Those are three editor components shown by the edit page:
The default Direct to SwiftUI rule model already has rules to select various property editors based on the database type of the attribute. The above shows a number editor (w/ a currency formatter attached), an own custom editor to edit the ranking, and a date field editor. This is the builtin rule to select the Date editor:
\.task == "edit" && \.attribute.valueType == Date.self
       => \.component <= BasicLook.Property.Edit.Date()
and we’ve shown the one for the EditRating custom component before:
\.propertyKey == "rating" && \.task == "edit"
              => \.component <= EditRating()
How does a component View know what it has to display or edit, what to validate,
how does it even get to the value?
Again they receive their values using the SwiftUI Environment. There are various
environment keys
a component can query, including:
propertyKey(e.g. “lastName”)displayNameForProperty(e.g. “Last Name”)formatter(in case one is attached, e.g. a date or currency FormatterpropertyValue(e.g. “Duck”)entityattribute(the Attribute object containing the DB info)
A trimmed down version of a component to display a Bool property:
struct DisplayBool: View {
  @EnvironmentObject var object : OActiveRecord
  @Environment(\.propertyValue) private var propertyValue

  public var body: some View {
    Text((propertyValue as? Bool) ?? false ? "✓" : "⨯")
  }
}
Summary: Components are used by the pages to display properties of objects. They get passed in the active property information using the environment.
Customizing the Application
Which brings us to the fun part: Ruling the app.
Entity List
Usually the first thing to be modified are the entities (think “tables”) shown
on the first page. By default it just shows all tables, let’s restrict them
to a few which make sense.
This is done by configuring the visibleEntityNames environment key:
\.visibleEntityNames <= [
  "Customer", "Actor", "Film", "Store", "Staff"
]
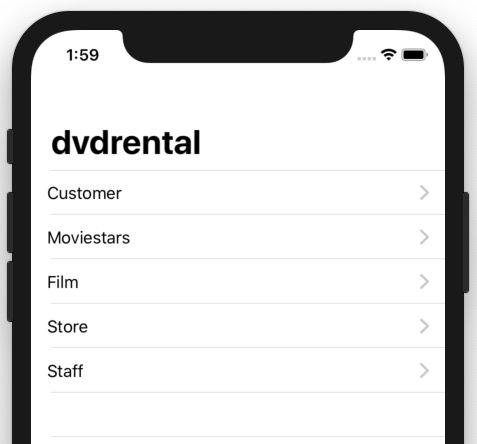
it can also be used to change the order of the displayed entities. The screenshot shows another change, we renamed the “Actor” entity to “Moviestars”:
\.entity.name == "Actor"
              => \.displayNameForEntity <= "Moviestars"
Another useful entity level environment key is readOnlyEntityNames,
it disables the editing of all objects:
\.readOnlyEntityNames <= [ "Staff" ]
This is the implementation of the entity list page: EntityList.swift.
Properties
We looked at those property components shown in an editor page before:
Formatters
By default D2S will detect “replacementCost” as a Decimal number and would
show a simple number editor when it is displayed.
How do we get the $ in front, and the cent formatting?
First we setup a regular Swift currency formatter:
let currencyFormatter : NumberFormatter = {
  let formatter = NumberFormatter()
  formatter.numberStyle             = .currency
  formatter.generatesDecimalNumbers = true
  return formatter
}()
and then we tell the rule system to use it using the formatter environment key:
\.propertyKey == "replacementCost"
              => \.formatter <= currencyFormatter
All properties which are named replacementCost will use that formatter,
for display and editing (we could restrict the formatter to display by
adding a “\.task != "edit"” rule).
Display Properties and Relationships
When the customer list is opened, it shows all attributes of the customer in a “summary”:
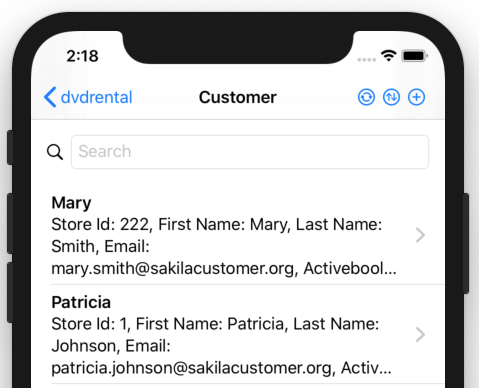
This is a friendly neighbourhood store, so we just want to show the customers first name and their phone number:
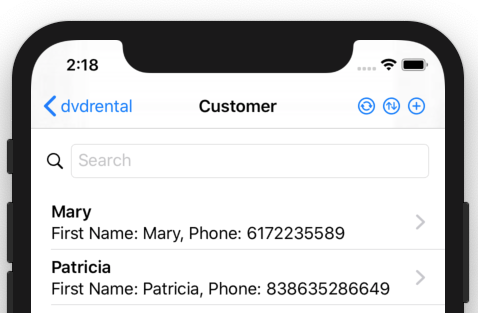
This is a little more involved than it looks. The phone number is not stored in the “Customer” entity, but in the “Address” entity (in the Sakila DB). In SQL you would do it like this:
dvdrental=# SELECT first_name, phone FROM customer
              LEFT JOIN address USING (address_id) LIMIT 2;
 first_name |    phone
------------+--------------
 Mary       | 6172235589
 Patricia   | 838635286649
(2 rows)
Luckily ZeeQL allows you to fetch related entities using an easy
“keypath syntax”,
in this case we use “address.phone” to tell Direct to SwiftUI to show the
“phone” value of the “address” related to the current customer:
\.task == "list" && \.entity.name == "Customer"
       => \.displayPropertyKeys <= [ "firstName", "address.phone" ],
\.propertyKey == "address.phone"
       => \.displayNameForProperty <= "Phone",
displayPropertyKeys is the environment key which tells the D2S page what
property keys to show. When we are on a list page (\.task == "list") and
if that is showing the Customer entity (\.entity.name == "Customer").
displayNameForProperty is used to change the display name of a property,
in here we shorten “Address.phone” to just “Phone”
(trick 17: use an empty “” string to hide the label, will also remove the “:”).
Extra Builtin Property Components
Got a field which represents an email, and want to make it clickable so that the mail compose panel opens?:
\.propertyKey == "email" && \.task == "inspect"
       => \.component <= D2SDisplayEmail()
Got a longish string attribute, say a movie description? To use a multiline editor for edits:
\.propertyKey == "description" && \.task == "edit"
              => \.component <= D2SEditLargeString()
Your database doesn’t have a bool type and you need to store your bools
in INT columns? Explicitly tell D2S (one could also map that in the database
model)
\.propertyKey == "active" && \.task == "edit"
              => \.component <= D2SEditBool(),
\.propertyKey == "active"
              => \.component <= D2SDisplayBool()


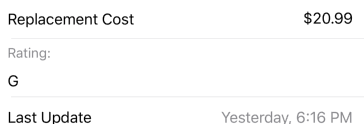
Custom Property Component
So far we have shown how to select and configure the prefabricated
Direct to SwiftUI Views.
But sometimes one might want a more complex View to show a property,
e.g. the “rating” in here:
Injected into Direct to SwiftUI using:
\.propertyKey == "rating" && \.task == "edit"
              => \.component <= EditRating()
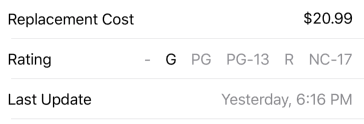
This is when D2S becomes most fun. Being directly integrated into SwiftUI, it is super easy to do this:
let nilRating = "-"
let ratings   = [ nilRating, "G", "PG", "PG-13", "R", "NC-17" ]

struct EditRating: View {

  @EnvironmentObject var object : OActiveRecord

  @Environment(\.displayNameForProperty) var label

  var body: some View {
    HStack {
      Text(label)
      Spacer()
      ForEach(ratings, id: \.self) { ( rating: String ) in
        if (self.object.rating as? String == rating) ||
           (self.object.rating == nil && rating == nilRating)
        {
          Text(rating)
            .foregroundColor(.black)
        }
        else {
          Text(rating)
            .foregroundColor(.gray)
            .onTapGesture {
              self.object.rating = rating == nilRating ? nil : rating
            }
        }
      }
    }
  }
}
This View gets all the contextual information passed in using the
SwiftUI Environment.
Object based Rules
So far the rule values have been mostly static.
The Environment also provides access to the current object the application
is working on using the object environment key.
For example to set the “title” (means different things depending on context) to the customers last name:
\.entity.name == "Customer"
              => \.title <= \.object.lastName
Or to just disable editing of Steve customers:
\.object.firstName == "Steve"
                   => \.isObjectEditable <= false
In the demo we work with a dynamically fetched ZeeQL database model, hence the objects are untyped and generic (i.e. use
Anyfor values). More specifically we use theOActiveRecordwhich is like an observable dictionary containing the properties related to a database row.
That is not the only way. You can also construct the database model out of Swift types and get statically typed.
Object based rules allow pretty complex setups, e.g. it can be used
to model a workflow application that switches Views based on the workflow
state:
\.object.state == "started"  => \.page <= AcceptPage(),
\.object.state == "accepted" => \.page <= ReportProgressPage(),
\.object.state == "finished" => \.page <= FinishedPage(),
\.object.state == "finished" => \.isObjectEditable <= false
...
Authn and Authz
A stock Direct to SwiftUI setup provides unlimited access to the connected
database.
Well, you need to know the credentials to the database 🔓.
Many databases contain some form of user authentication table,
and so does the Sakila database (“staff” table).
It predefines two users: “Mike” and “Jon”. The password of both is the
combination on
President Skroob’s
luggage.
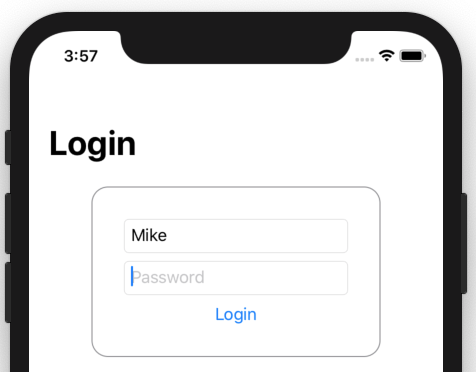
To enable the login panel (pretty simple, needs some love), set the first task to “login”:
\.firstTask <= “login”
This is just another task which maps to a builtin login page:
Or your own, if you direct D2S to use another one:
\.task == "login"
       => \.page <= MyFancyKeychainEnabledLogin()
The login page does some magic to locate the right user database entity (searches for entities that have login/password attributes), though you can also point it to the right one:
\.task == "login" => \.entity <= UsersEntity
When the login succeeds, the login page will populate the SwiftUI Environment
with the user key.
And with that you can do all sorts of per user configurations.
Restrict the entities Mike can see:
\.user?.username == "Mike" => \.visibleEntityNames <= [
  "Actor", "Film"
]
Allow Mike to edit all customer records, but not the one of his ex-girlfriend Penelope:
\.user?.username == "Mike" && \.object.firstName == "Penelope"
                           => \.isObjectEditable <= false
Since the user record is just a regular database record, you can also build rules on other properties of the record:
\.user?.isAdmin != true => \.readOnlyEntityNames = [
  "staff"
]
Combine object predicates and user predicates:
\.object.ownerId != \.user?.id && \.entity.name == "Document"
                 => \.isObjectEditable = false
Complex things can be done.
That’s it for the Demo
You can clone the finished version with a lot of demo customizations from over here:
git clone -b branches/10-customized \
  https://github.com/DirectToSwift/DVDRental.git
A rule model with plenty of demo customizations for the Sakila DB: RuleModel.

Another video of the customized application:
And the watchOS app:
Debugging
There are two things you often want to see:
SQL logs and contextual information in the SwiftUI Views.
To enable SQL logs, set the ZEEQL_LOGLEVEL environment variable to “info”
or “trace” in the run scheme of your application.
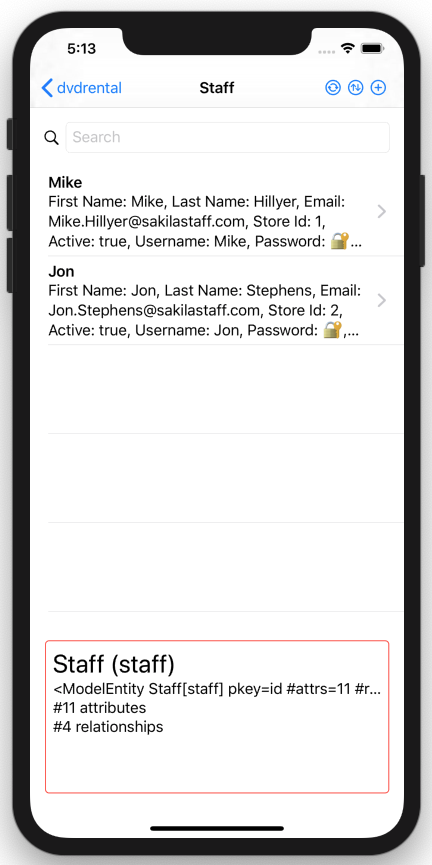
Environment info Views can be enabled using the debug environment key:
\.debug <= true
Looks like this:
Own debug Views can be written and activated by setting up rules which
configure the debugComponent environment key.
Limitations
Direct to SwiftUI, designed as a stress test for SwiftUI.
macOS Limitations
Originally this was mostly planned as a macOS application.
Unfortunately the macOS SwiftUI implementation is still quite
buggy/incomplete in the current Catalina beta.
The main window runs, but as of today, opening a View (e.g. inspect)
in a new window crashes.
There are other inconveniences, e.g. the List rows do not seem to be
set to have a flexible height.
ZeeQL Limitations
ZeeQL is working quite well, but it is fair to say that it is still work in progress. The API needs a bump from Swift 3 API naming conventations, it needs a proper EditingContext (aka NSManagedObjectContext), and probably a larger rewrite around Combine. Quite a few open ends.
A standalone MySQL adaptor would be nice too (currently requires mod_db to be setup).
Previews
Does it work w/ Xcode Previews? No idea, patches welcome! 😀
Design
Like Direct to Web, Direct to SwiftUI is indeed easy to theme,
it provides the look environment key for that purpose.
D2S only comes w/ a very simple theme which is based mostly on
SwiftUI List components.
Halp! Are you good in UI design and want to provide some great looking views?
You would be very welcome!
Outlook
CoreData to SwiftUI
Direct to SwiftUI is connecting SwiftUI and ZeeQL. CoreData to SwiftUI should be a low hanging fruit. Clone the repo, replace ZeeQL things w/ CoreData types. Done.
Update: CoreData to SwiftUI, DVDRental for CoreData.
Direct to Web Services
WebObjects had a variety of “Direct to” technologies, not just Direct to Web (“Direct to Java Client” was a thing!)
One of them was “Direct to Web Services”. Instead of generating a UI, this would generate a WebService API (was it SOAP/WSDL?). Rules would be used to select visibility of entities and properties, access control, etc. The same could be done for Swift, a rule driven REST API on top of a ZeeQL schema.
Access HTTP API Servers
The demo above directly accesses a SQL database, which is kinda unusual nowadays … But this is not necessarily a problem, one could write a ZeeQL adaptor which uses OpenAPI (or GraphQL 🤦♀️) to create a model dynamically and fetch from the HTTP endpoints.
Note: While ZeeQL itself is not built to be asynchronous, D2S actually wraps it in Combine. So the UI is indeed running asynchronously already.
Live Rule Editing
Currently the rules are defined in just regular Swift code. They are statically typed and the program needs to be recompiled when they are changed. That wasn’t necessary w/ Direct to Web. In Direct to Web you had the D2W Assistent app in which you could change the rule model on the fly.
Technically this would also be possible w/ D2S. It already supports KVC (aka dynamic) qualifiers and a parser for KVC based rules is included.
TBD. Once this is working, one could modify a running app and see how changes to the rules affect the setup!
Closing Notes
SwiftUI summarised for 40s+ people. pic.twitter.com/6cflN0OFon
— Helge Heß (@helje5) June 7, 2019
Going full circle.
Links
- Direct to SwiftUI
- Direct to Web Guide PDF
- SwiftUI
- ZeeQL
- NeXT Computer DevDocuments Archive
- DVD Rental / Sakila Database
- PG Tutorial load sample DB
- PG Sakila DB Zip
- Sakila
- SQLite Schema
- SQLite Data
- Postgres.app
Contact
Hey, we hope you liked the article and we love feedback!
Twitter, any of those:
@helje5,
@ar_institute.
Email: me@helgehess.eu.
Slack: Find us on SwiftDE, swift-server, noze, ios-developers.
Want to support my work? Buy an app! You don’t have to use it! 😀