
Deploying Swift on AWS Lambda
![]() Instead of the overdue announcement of “iCloud functions”,
Apple’s
Tom Doron
was
showing
Swift deployment on
AWS Lambda
at WWDC 2020.
We’ll explain how Lambda can be used and introduce
Instead of the overdue announcement of “iCloud functions”,
Apple’s
Tom Doron
was
showing
Swift deployment on
AWS Lambda
at WWDC 2020.
We’ll explain how Lambda can be used and introduce
swift lambda deploy.
Intro: Amazon Web Services (AWS) Lambda is a so called FaaS offering (Function as a Service), to build a serverless architecture. Buzzwords: ✓
Why is that interesting? For small shops: No devops required and a very generous free tier, essentially allowing you to deploy your server side Swift app for free (and reasonable prices once it is popular). For large shops: 🤷♀️
TLDR:
brew install SPMDestinations/tap/swift-lambda,
setup & configure AWS account,
develop Swift package,
swift lambda deploy,
done.
Ready to run sample:
express-simple-lambda.
MacroLambda
The things shown are framework agnostic and build on top of Swift Package Manager. For the demo we use Macro, a small, unopinionated Swift web framework, with a Node.js/Express like API. MacroLambda adds the Lambda support. Example:
import MacroLambda

let app = Express()
app.use(bodyParser.text())

app.post("/hello") { req, res, next in
  res.send("Client sent: \(req.body.text ?? "~nothing~")")
}

app.get { req, res, next in
  res.send("Welcome to Macro!\n")
}

Lambda.run(app)
It can be built by calling:
$ swift lambda build
Fetching https://github.com/apple/swift-log.git
Fetching https://github.com/apple/swift-nio.git
Fetching https://github.com/AlwaysRightInstitute/mustache.git
...
[25/28] Compiling NIOConcurrencyHelpers NIOAtomic.swift
...
[42/42] Linking HelloWorld
… and deployed using:
$ swift lambda deploy
… and invoked using any HTTP client:
$ curl https://282727272.execute-api.eu-west-3.amazonaws.com/hello
Welcome to Macro!
And yes, it looks exactly like a regular Macro Express application,
just with the app.listen(port) replaced with Lamda.run.
But before we dive in, what is AWS Lambda?
Lambda’s
The core idea of Lambda is that instead of maintaining an own cloud server
infrastructure
(whether real, VM or Docker containers, with load balancers, K8s
etc), the developer just configures “functions” within the Lambda
service.
Like postMessage, searchContacts, deleteArticle.
The input of the functions is JSON, and so is the output.
No long running server the developer has to deal with.
To fill those functions with live the developer attaches an implementation to it. A function can be written in pretty much any language (even bash). When called, it gets passed the JSON sent by the caller and returns the result as JSON.
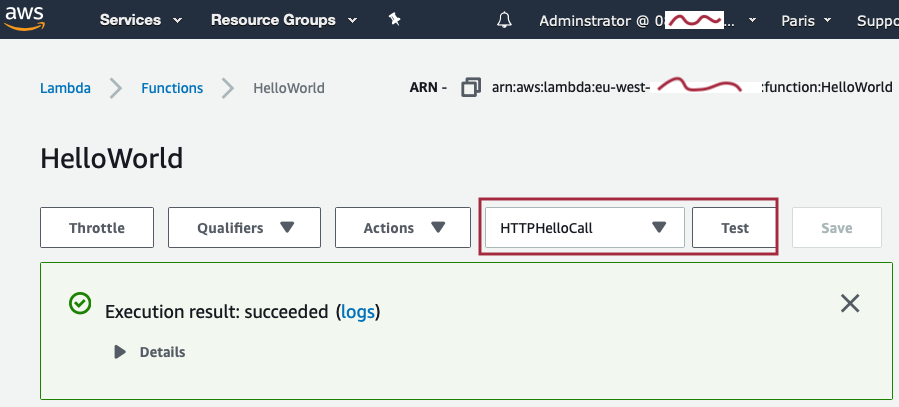
By itself the functions are internal within AWS and can be triggered by various means. For testing a function the dashboard contains a simple test runner to trigger the function:
The trigger we are going to use is the
API Gateway,
which provides an endpoint on the public web
(a host like 282727272.execute-api.eu-west-3.amazonaws.com),
and when receiving calls, invokes the internal Lambda function.
There are various other ways to invoke functions, e.g. using time based triggers for cron like jobs. I.e. functions don’t have to be HTTP endpoints, though that’s what we are interested in here.
When a client invokes such an endpoint, Lambda will run the function within an Amazon Linux container. When 100.000 clients invoke the endpoint, Lambda will run the function within many containers. And so on (within configurable concurrency limits). Once the calls are done, Lambda will stop the container (i.e. the host is not long-running).
All the running, scaling and host management is done by Lambda, the developer only provides the actual implementation of the endpoint. Most importantly: The developer is billed just for the actual runtime of the function (no 💶 lost on idle servers). With a generous free tier (1m requests, 3m seconds runtime), making it essentially free for small deployments.
Lambda doesn’t start a new Linux container for each and every invocation, it keeps the container running for a while until no more requests arrive.
However, while a container can run many invocations in sequence, only one is ever processed at a time. The function “owns” its container while it runs.
Still with us? Excellent.
Tom Doron’s WWDC 2020 talk
“Use Swift on AWS Lambda with Xcode”
covers how to write such lambdas.
We are going to do something slightly different:
Use the AWS API Gateway.
AWS API Gateway
Wait a minute, in the introductionary example we’ve shown a full Express application running as a Lambda. Didn’t we just say that the Lambda service just calls single functions? How does that work?
It works by coupling the Lambda with another AWS service, the API Gateway. The API Gateway is an HTTP edge server which can convert incoming HTTP requests into a JSON representation and pushes that as the input into Lambda functions.
MacroLambda takes those “JSON HTTP” requests and feeds them through its Express stack. The ‘HTTP JSON’ looks like this (APIGateway.V2.Request in the Swift AWS Runtime):
{
  ...
  "requestContext":{
    ...
    "http":{
      "path":"/hello",
      "userAgent":"OmniWeb/1.0.0 (NeXTstep 3.3)",
      "method":"GET",
      "protocol":"HTTP/1.1"
    },
    "time":"24/Apr/2020:17:47:41 +0000"
  },
  "headers":{
      "host":"hello.test.com",
      "user-agent":"OmniWeb/1.0.0 (NeXTstep 3.3)",
      "content-length":"0"
  }
}
The API Gateway supports more Lambda invocation styles than just “HTTP-over-JSON”, e.g. REST and WebSockets.
Fabian Fett provides some instructions on how to configure the API Gateway in his blog:

Instead of hosting a single “function” in a Lambda, the goal here is to host an Express application in Lambda. With all the routing, support for multiple endpoints, templating, middleware and so on. Welcome:
Server Side Swift as a Function
The “API Gateway” provides the glue to make that happen by turning arbitrary HTTP requests into JSON POST calls.
The code to fill it can be as simple as:
import MacroLambda

let app = Express()

app.get { _, res, _ in
  res.send("Hello!")
}

Lambda.run(app)
Deploy by running swift lambda deploy, and the
app will be available under an AWS URL, like:
$ curl https://282727272.execute-api.eu-west-3.amazonaws.com/hello
Hello!
What do we need to get there. We need to install swift lambda and
create our Swift package,
then we have to set it up in the AWS dashboard.
swift lambda
swift lambda
are just a few shell scripts backed by a
SwiftPM
cross compilation toolchain
(called a “destination” in SPM terminology).
Installation is easy using Homebrew:
$ brew install SPMDestinations/tap/swift-lambda
It’s a pretty big download at over 1GB (binary host & target Swift toolchains from Swift.org and the AWS CLI).
The scripts take care of three tasks:
- Building an Amazon Linux binary for a Swift package,
- Bundling the binary and resources into a Lambda “zip” for deployment, and
- Deploying that “zip” to Lambda.
Feel free to skip the description of what the steps do in detail,
invoking swift lambda deploy is all you need to build & deploy to AWS:
skip.
Fabian Fett did a great job documenting all the required steps to get started with the Swift AWS Lambda Runtime: Part 1 and Part 2.
Those steps felt way too complicated, hence:swift-lambda.
1. Building an Amazon Linux binary for a Swift package
As Swift developers we are likely using Xcode on macOS to develop our service. That produces Apple silicon binaries (or macOS Intel ones on legacy hardware). Nothing we can run on the Amazon cloud which is using Amazon Linux on Intel.
Prior swift lambda, the state of the art was using
Docker
to spin up an Amazon Linux instance locally and build the Swift code within
that.
Note that no Docker image is used for Lambda deployment.
The approach is workable but has several disadvantages.
But most importantly: it is unnecessary.
Few know this, but Swift always ships as a cross compiler, i.e. it can produce binaries for all supported CPU architectures! Back in early 2017 Johannes Weiß from Apple added support for cross compilation toolchains to Swift Package Manager. Which is widely used in the Raspberry Pi Swift community, even as part of a course at Harvard.
To build a package for a different target platform
swift build is simply invoked with the --destination argument:
$ swift build --destination \
     /tmp/swift-5.3-ubuntu16.04.xtoolchain/destination.json
This will produce an Intel Ubuntu Linux binary, right on your Mac.
A cross compilation toolchain consists of three parts:
- A Swift host compiler (runs on the Mac, but can emit binaries for the target),
- Swift libraries matching that specific compiler, but for the target system,
- System headers and libraries for the target system itself.
Building such toolchains used to be a somewhat annoying process involving a shell script to fetch and assemble the various components. SPMDestinations makes this process easy for the developer. Getting X toolchains is a simple Homebrew install:
$ brew tap SPMDestinations/tap
$ brew install spm-dest-5.3-x86_64-ubuntu16.04
Unfortunately Swift 5.2.4 as shipping with Xcode 11 has a bug breaking destinations. That bug is fixed in 5.3 - i.e. to be able to use this, the Xcode 12 beta is required. The xtoolchain itself can contain different Swift versions, in fact AWS currently requires a 5.2 one.
Going back to AWS Lambda’s: SPMDestinations also includes a Swift 5.2 toolchain for Amazon Linux. Swift packages can be compiled for that target using:
$ brew install spm-dest-5.3-x86_64-amazonlinux2
$ swift build --destination \
     /usr/local..../swift-5.3-amazonlinux2.xtoolchain/destination.json
Very well, this allows the production of Amazon Linux binaries right on macOS, no Docker required.
2. Bundling into a Lambda “zip”
Next we need to get the binaries into a format we can use as a Lambda.
You’d think that Lambda’s are deployed as Docker images, but they are not.
Instead all things required are uploaded to Lambda as an old school zip file.
It has to contain an executable called bootstrap, which is what Lambda
will execute if a request arrives.
(It can contain any other resources you might need).
Those two steps - building the Swift package for Amazon Linux and bundling it as
a proper zip - are done by the swift lambda build script:
$ swift lambda build
It triggers swift build with the right destination and flags, and
bundles the result into a Lambda .zip, ready for deployment.
3. Deployment: swift lambda deploy
There are various ways to get the .zip into Lambda:
- Simple upload in the Lambda dashboard, just choose “upload zip” in your Lambda configuration and select the zip file (as shown by Fabian in his blog).
- Upload using the AWS Command Line Interface. The CLI can perform all tasks related to AWS from the shell, including Lambda uploads.
- Using AWS SAM (Serverless Application Model), this is kinda similar to Docker Compose, quite powerful and the recommended option for real deployments (example template).
Options 2 and 3 are supported by swift lambda deploy. It takes the zip
produced by swift lambda build and uploads it to AWS using either the aws
tool or sam deploy.
It also runs swift lambda build (unless requested otherwise),
so if you have a simple Lambda:
$ swift lambda deploy
… is all that is needed to build and deploy a function (whether the Swift project is a simple function or a complex Express app).
Building a Small Express Lambda
OK, finally some actual coding after all those concepts. Let’s make this quick, spin up your shell and do:
mkdir HelloWorld && cd HelloWorld
swift package init --type executable
open Package.swift # opens Xcode
In the Package.swift we need to adjust two things:
- Add a
platformrequirement (this step will go away via PR #156), - Add
MacroLambdaas a dependency.
The Package.swift should look like this afterwards:
// swift-tools-version:5.2
import PackageDescription

let package = Package(
  name         : "HelloWorld",
  platforms    : [ .macOS(.v10_13) ], // <== add this
  dependencies : [ // and add this dependency ↓
    .package(url: "https://github.com/Macro-swift/MacroLambda.git",
             from: "0.1.3"),
    .package(url: "https://github.com/AlwaysRightInstitute/cows.git",
             from: "1.0.0") // optional but fun
  ],
  targets: [
    .target(name: "HelloWorld",
            dependencies: [ "MacroLambda", "cows" ])
  ]
)
Fill in the code in the main.swift:
import MacroLambda

let app = Express()
app.use(bodyParser.text())

app.post("/hello") { req, res, next in
  res.send("Client sent: \(req.body.text ?? "~nothing~")")
}

app.get { req, res, next in
  res.send("Welcome to Macro!\n")
}

// Lambda.run(app) // Not Yet
app.listen(1337) {
  console.log("server running on http://localhost:1337/")
}
Build and run in Xcode, it’ll build all the dependencies and start the app
as a regular HTTP server (app.listen).
It can be tried out by opening
http://localhost:1337/hello in Safari,
or by curling it:
$ curl -i http://localhost:1337/hello
$ curl -X POST -d "Hi!" -H "Content-Type: text/plain" \
       -i http://localhost:1337/hello
Works? Excellent! To get it into Lambda an AWS account needs to be setup, and the access tokens need to be configured. If you know how to do this already, you can skip the following section.
Setting up an AWS Lambda Environment
Amazon Web Services
is a HUGE array of service offerings, Lambda being just one of many.
There is the well known S3 service for BLOB storage,
various database services, virtual machines, DNS services, messaging things,
and many many more.
It is so much, it is really hard to navigate 🤓
This won’t go into the exact details, but we’ll mention the very basic things required to get started. What we’ve learned when reading Fabian’s blog entries (recommended for more details: Part 1, Part 2). In general the AWS documentation is really good too, it just is a LOT as well.
Those are the things that need to be done:
- Setup of an AWS account, and a so called IAM account.
- Setup and configuration of a Lambda function.
- Setup and configuration of the API Gateway.
It should only take about 5-10 minutes, finding the right places is the hard part.
1. Account Setup
The key thing to understand here is the difference between a “root account” (or “root user”) and an “IAM” account. While you can use a “root account” for everything, it is highly discouraged, don’t do this.
A “root account” is the primary account of you/your-company with AWS. You attach the billing to that, address and all the other stuff they want (or need) to know. You should not use this account for API access, not even for day-to-day administration. Essentially, don’t touch it ever again after creating an IAM user 😬
If you don’t have a root account yet (we happened to have one from ages ago), follow these AWS instructions: How do I create and activate a new AWS account? (just a few steps).
Next, create an IAM “Administrator” account (you can and should have multiple for different developers). As the name suggests, that account will be given broad API access. Again just follow the AWS instructions: Creating an Administrator IAM User (again just a few steps).
At the end of this process you’ll get the two things we are after:
- The “Access key ID”.
- The “Secret access key”.
On this final panel:
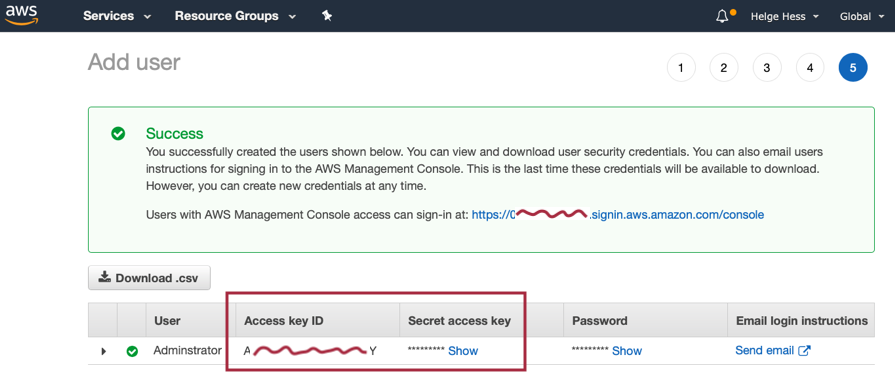
Keep them secret and safe! Never include them in git commits!
Open a terminal and run aws configure:
$ aws configure
AWS Access Key ID [None]: [enter the "Access key ID"]
AWS Secret Access Key [None]:  [enter the Secret access key]
Default region name [None]: eu-west-3 (or whatever region you use)
Default output format [None]: json
This writes the configuration into the ~/.aws/ directory.
The
awstool should have been installed as part of theswift lambdainstall. If it is missing:brew install awscli.
2. Lambda Setup
The function is configured in this part. It has a name and a few configuration options, like the level of “concurrency” (how many instances of the function can run at the same time).
To setup the Lambda, find the “AWS Management Console”, and the “Console Home”, it looks like this:
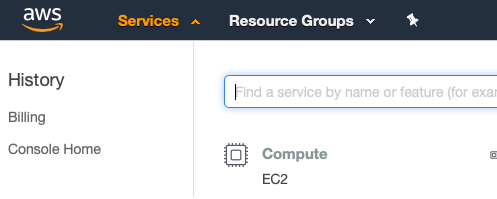
Search for “lambda” and make sure not to use the “blue print”. It looks like this:

In the “Basic Information” section,
give the function a name (HelloWorld) and
select “Provide your own bootstrap” as the “Runtime”.
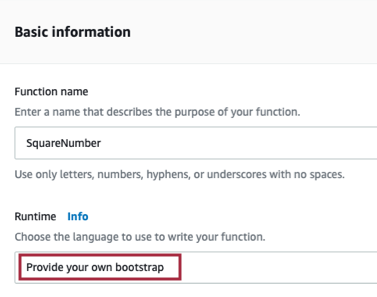
“Provide your own bootstrap” says that we are going to upload a custom executable (called
bootstrap) as the implementation of the function. It is going to be our Swift binary, which has the necessary “Swift AWS Runtime” builtin.
Other options are script language environments, in those case you upload the source of your script and Lambda provides the script runtime.
Do not forget this step: The function needs at least a concurrency of “1” to be able to run:
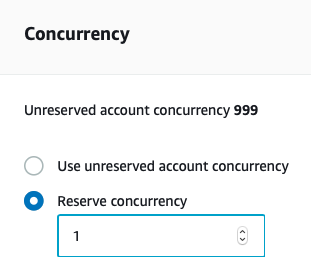
At this point you could upload a Swift lambda.zip manually (in the “Actions” menu). There is also “Test” functionality at the top, which is very convenient to check whether a deployment was successful.
3. Setup API Gateway
Nice, almost done. The final step is configuring the API Gateway. That is what exposes the Lambda as a regular HTTP service on the public web.
Go back to your AWS console. This time enter “API” instead of “Lambda”, select “API Gateway” and choose “Create”:
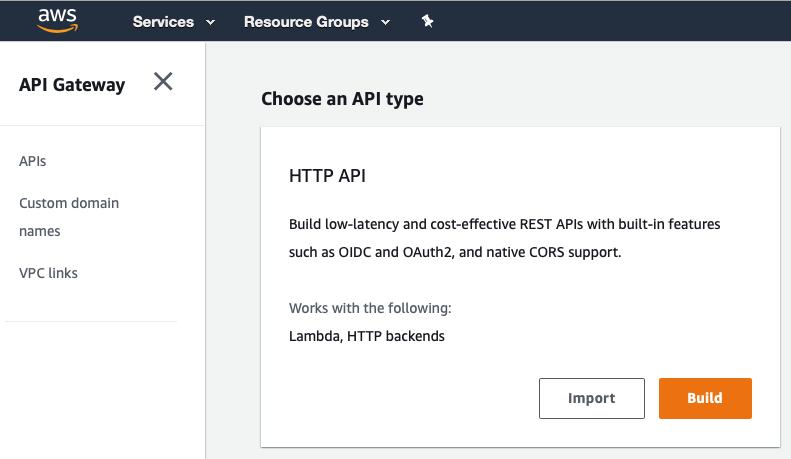
Select the “HTTP” option, which will bring you to this:
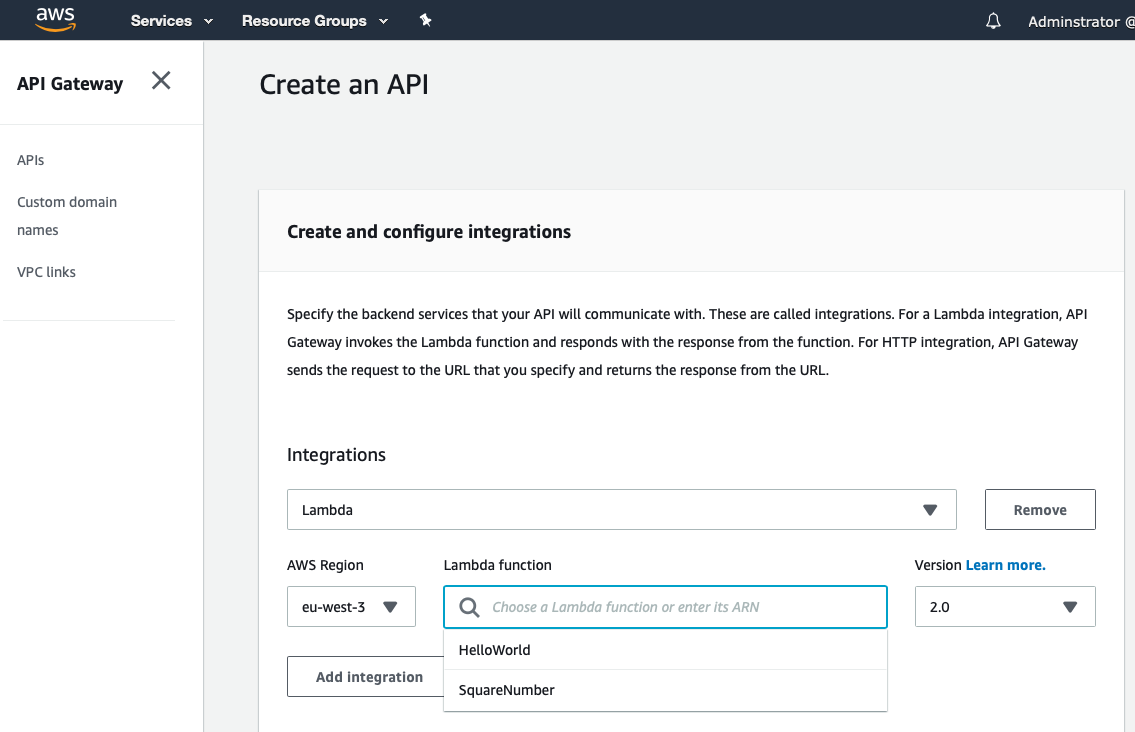
Select “Lambda” as the integration and our HelloWorld lambda as the backend.
Finally setup the route:
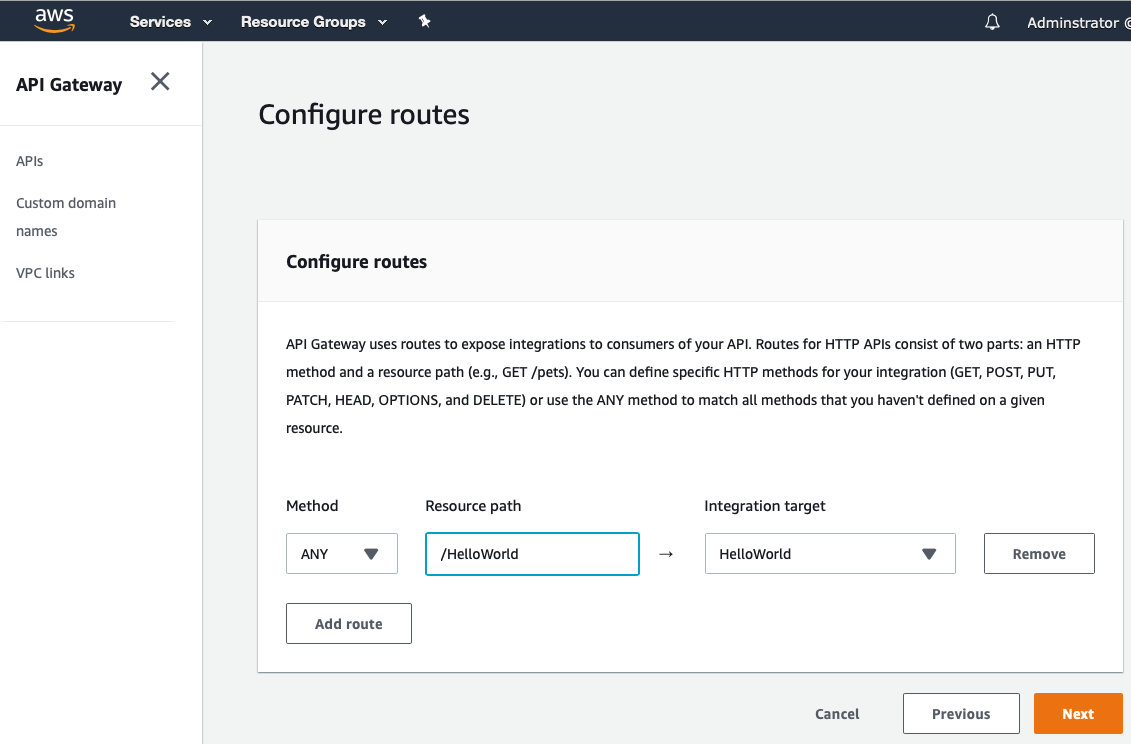
That’s it, the AWS URL is now available:
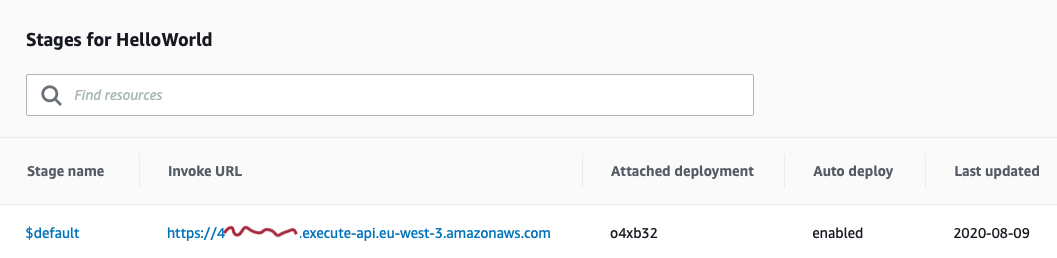
Deploying the Swift App
The AWS (IAM) Adminstrator account credentials are configured locally using
aws configure,
the HelloWorld Lambda is configured in AWS,
and the Lambda is exposed to the public web using the API Gateway
configuration.
Let’s finally deploy our application!
Go back to the main.swift and enable the Lambda.run.
Since we still want to debug using the regular server,
only use Lambda when it is actually running within AWS:
if process.isRunningInLambda {
  Lambda.run(app)
}
else {
  app.listen(1337) {
    console.log("server running on http://localhost:1337/")
  }
}
Finally:
swift lambda deploy
And invoke it using the URL from the API Gateway configuration, for example:
$ curl https://282727272.execute-api.eu-west-3.amazonaws.com/hello
Welcome to Macro!
A ready-to-run, more complex example with cows and forms and Mustache templates can be found over here: express-simple-lambda. It looks like this:

Closing Notes
The blog entry got a little longish again due to the configuration steps
necessary.
Once the basics are setup it’s a snap to add and deploy new Swift Lambda’s
using swift lambda deploy.
Using Macro’s Express only a single function is really needed for a whole application backend, as it allows the configuration of the actual endpoints and routing within the Express app itself. Or split it up into many, whatever suits your needs!
Does something not work? Please file issues. Need help? Feel free to contact me!
Why use Swift for this?
Probably the number one reason to use Swift on the server side is just that you might like the language and develop in it anyways. It has a reasonably nice IDE w/ Xcode and great performance analysis tools with Instruments. There are plenty of other languages one can develop Lambda functions in, all have their pros and cons.
There is no point in doing specific performance comparisons (and Swift might loose 😬), but let’s mention a few things which make Swift particularily suitable for Lambda’s:
- Swift is compiled (and optimized) ahead of time (AOT). This provides for fast application startup times. When a Swift Lambda starts the user code immediately runs. A scripted application first needs to load and parse all the scripts, which is suboptimal as Lambda’s start and stop often. It can easily take longer than the actual runtime of the Lambda function.
- There is no shipping of source code (your IP!) to the cloud provider, that never has to leave your house. No matter how much you trust your provider, there still can be hacks and leaks, so why risk it? 🤓
- Swift is memory efficient. The less memory the Lambda uses, the cheaper it’ll be!
There are also a few disadvantages, but we won’t mention them over here …
Issues & Caveats
- There is no “direct” Xcode support yet, i.e. the package needs to be
created using a
Package.swift(vs create a new tool project in Xcode). We might address that and even provide a SwiftXcode style Lambda Xcode template. Direct deployment from within Xcode should be possible. - C++ support seems b0rked right now. Regular C code compile just fine (e.g. SwiftNIO includes some).
swift lambda buildhas some support for static linking already builtin, but it doesn’t fully work yet. To be fixed. (static linking reduces the size of the zip and further improves Lambda startup time).- The X toolchains only have the packages that seemed necessary. If someone needs additionals ones please file an issue (the toolchains can carry lots of dev packages, that’s perfectly fine).
- Unlike Noze.io, Macro actually links Foundation. We might want to get rid of that to safe on the zip size, it’s not really required for Macro.
Thanks go to …
Particular thanks go to Fabian Fett for AWS setup help, his blog articles and working on the Swift AWS Runtime, and Johannes Weiß for laying the grounds for cross compilation support in SwiftPM.
And all the other people involved, of course!
Links
- swift lambda
- SPMDestinations
- MacroLambda
- Amazon:
- AWS Lambda homepage
- Amazon Web Services API Gateway
- Apple:
- WWDC 2020: Use Swift on AWS Lambda with Xcode
- Swift Blog: Introducing Swift AWS Lambda Runtime
- Swift AWS Lambda Runtime
- SwiftNIO
- Tutorials by Fabian Fett:
- Optical Aberration: Messing with Swift AWS Lambda Runtime
Contact
Feedback is warmly welcome: @helje5, me@helgehess.eu.
Want to support my work? Buy an app! You don’t have to use it! 😀