
Testing Linux Swift 2.2 on MacOS via VirtualBox
So you are living on MacOS but you want to try the Linux port of Swift. What to do? Since the Swift Linux port doesn’t work on a Pi (buhh Apple! Even Windows 10 does!), the easiest way is to install Linux in a virtual machine. If you are anything like the people at the world renowned ARI - you refused to pay Parallels $50 just for the 10.11 update. So the ARI gave VirtualBox a try.
Hence the following is a more about the steps required to install a Linux env in VirtualBox than Swift on Linux. Talk about misleading blog titles!!
Let’s go: Install VirtualBox and Ubuntu
First grab & install the VirtualBox package for OSX (“VirtualBox 5.0.10 for OS X hosts amd64”). Size is about 90MB:
Also download some Ubuntu version, I chose 15.10 Server (this is about 660MB):
Start the VirtualBox Manager application (the installer puts this into
/Applications/VirtualBox.app).
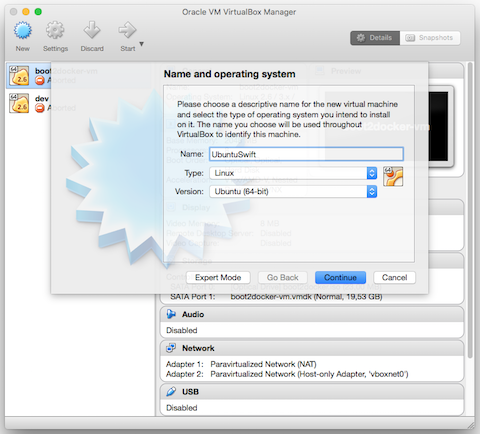
Press the New button to create a new virtual machine,
choose Type: Linux and Version: Ubuntu (64-bit):
Follow the standard flow, start the virtual machine. If you didn’t select the downloaded Ubuntu ISO file, you’ll get something like this:
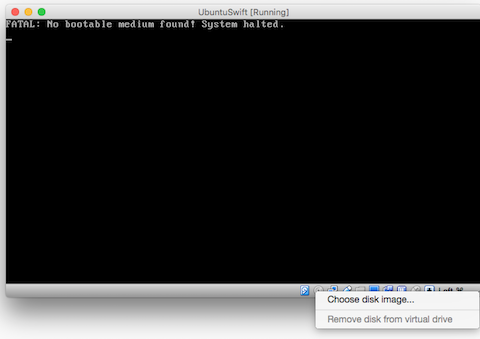
If so, press the small CD button at the bottom and select the downloaded
Ubuntu ISO file. Reboot the VM.
Next you should end up in the Ubuntu installer:
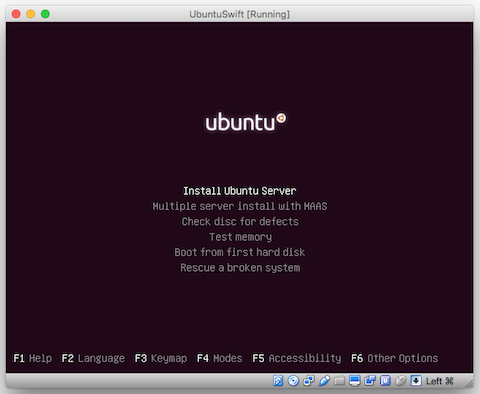
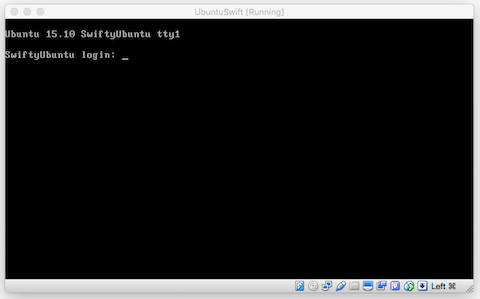
Again, follow along with the installer, no big choices to make. I didn’t use LVM in the partitioning menu, selected no proxy server, told it to install OpenSSH (and PostgreSQL just because), and told it to install Grub. Installation takes about 5 minutes and should take you to a prompt:
Next you probably want to switch the VirtualBox networking from NAT to
Bridged Adapter. This way the VM will appear with a regular IP address on your
network:
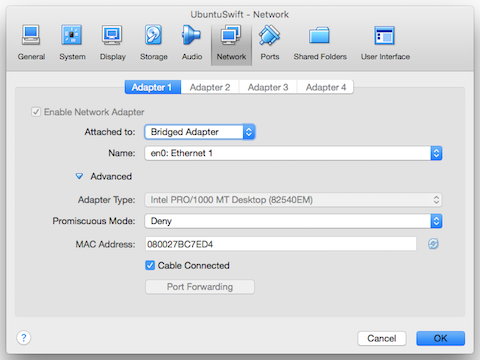
You might need to reboot the VM to let Ubuntu pick up an IP via DHCP. Then
log into the terminal, run ifconfig -a | grep inet | grep -v 127.0.0 to get
the VM’s IP address and connect to that VM via ssh/Terminal.app (ssh
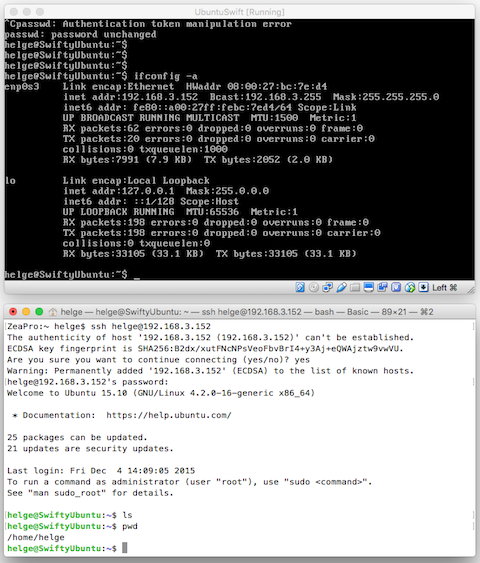
OK. VirtualBox and Ubuntu are installed and running. We can put the VM into the background as we have proper Terminal.app ssh access.
Install Swift into the Ubuntu VM
Installing the Swift package provided by Apple is pretty simple. It is just a
dull binary tarball containing a usr directory with most of the required
stuff in it.
Let’s do this:
cd ~
mkdir swift-not-so-much
pushd swift-not-so-much

wget https://swift.org/builds/swift-2.2-release/ubuntu1510/swift-2.2-RELEASE/swift-2.2-RELEASE-ubuntu15.10.tar.gz

tar zxf swift-2.2-RELEASE-ubuntu15.10.tar.gz
export PATH="${HOME}/swift-not-so-much/swift-2.2-RELEASE-ubuntu15.10/usr/bin:$PATH"
popd
Apple says we also need to install clang, so let’s do this as well:
sudo apt-get install clang
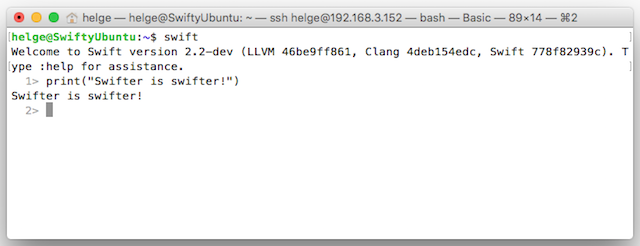
That’s it, afterwards we can run the interactive swift tool and execute some
awesome Swift code:
You probably want to persist the PATH export in your ~/.profile:
export EDITOR=vi
export PATH="${HOME}/swift-not-so-much/swift-2.2-RELEASE-ubuntu15.10/usr/bin:$PATH"
export LD_LIBRARY_PATH="/usr/local/lib:${LD_LIBRARY_PATH}"
Note that /usr/local/lib is added to the shared library lookup path too. This
can be right :-)
Grand Central Dispatch
A lot of Swift code requires GCD (Grand Central Dispatch) aka libdispatch. Including the package you love most: SwiftSockets. As part of the Swift OpenSource release Apple also happens to provide the code of libdispatch on GitHub.
Let’s compile that as well. First we need to install a few build tools and some kqueue stuff:
sudo apt-get install autoconf libtool pkg-config \
                     libblocksruntime-dev \
                     libkqueue-dev \
                     libpthread-workqueue-dev \
                     systemtap-sdt-dev \
                     libbsd-dev libbsd0 libbsd0-dbg
Then we can do:
cd ~/swift-not-so-much
git clone --recursive https://github.com/apple/swift-corelibs-libdispatch.git
cd swift-corelibs-libdispatch
sh autogen.sh
./configure \
  --with-swift-toolchain=$HOME/swift-not-so-much/swift-2.2-RELEASE-ubuntu15.10/usr \
  --prefix=$HOME/swift-not-so-much/swift-2.2-RELEASE-ubuntu15.10/usr
make -s
make install
This installs GCD into the Swift release directory, including a
/usr/lib/swift/linux/x86_64/Dispatch.swiftmodule
Let’s try it:
$ swift
Welcome to Swift version 2.2 (swift-2.2-RELEASE). Type :help for assistance.
  1> import Dispatch
module 'Dispatch' requires feature 'blocks'could not build Objective-C module 'Dispatch'
Argh no, so close, why??? OK, turns out this can be fixed.
The blocks runtime needs to be enabled using some magical flags:
-Xcc -fblocks -Xlinker -ldispatch
$ swift -Xcc -fblocks -Xlinker -ldispatch
Welcome to Swift version 2.2 (swift-2.2-RELEASE). Type :help for assistance.
  1> import Dispatch
  2> let Q = dispatch_get_global_queue(DISPATCH_QUEUE_PRIORITY_DEFAULT, 0)
Q: dispatch_queue_t = 0x00007ffff4144a00
  3> dispatch_async(Q, { print("Hello!"); })
  4> import Glibc
  5> sleep(5)
Hello!
$R0: UInt32 = 0
Very well, that seems to work!
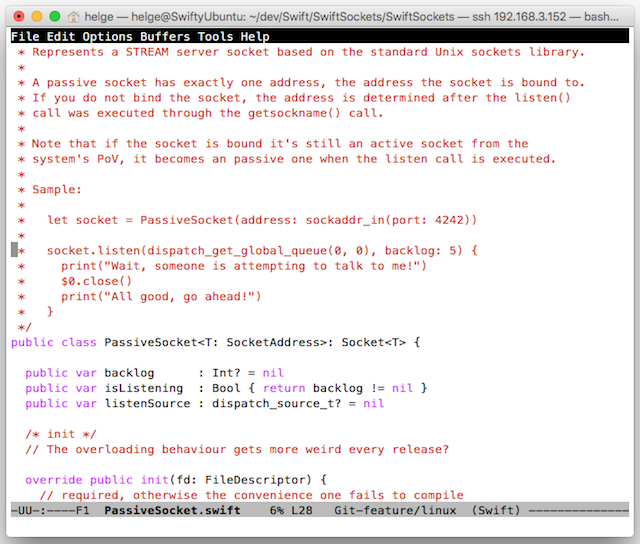
Emacs
But wait, we are not quite done yet. What about Emacs? Everyone needs Emacs! Let’s install Emacs, and IAmLeeg’s Swift mode.
sudo apt-get install emacs

mkdir -p ~/.emacs.d/lisp
pushd ~/.emacs.d/lisp
wget https://raw.githubusercontent.com/iamleeg/swift-mode/master/swift-mode.el
popd
vi ~/.emacs
Add this:
(add-to-list 'load-path "~/.emacs.d/lisp/")
(require 'swift-mode)
Much better:
Makefiles
Some say we are supposed to use swift build. Some say the right thing to do
is to use make. We say maximum confusion can be accomplished by using both!
For your project, create a Package.swift, a config.make, a rules.make and
a GNUmakefile. GNUmakefile? Yes, just because. If you are on BSD you are
free to use Makefile instead. But this wouldn’t be right.
Sample config.make:
# GNUmakefile

UNAME_S := $(shell uname -s)

ifeq ($(UNAME_S),Darwin)
  SWIFT_TOOLCHAIN_BASEDIR=/Library/Developer/Toolchains
  SWIFT_TOOLCHAIN=$(SWIFT_TOOLCHAIN_BASEDIR)/swift-latest.xctoolchain/usr/bin
else
  OS=$(shell lsb_release -si | tr A-Z a-z)
  VER=$(shell lsb_release -sr)
  SWIFT_SNAPSHOT=swift-2.2-RELEASE-$(OS)$(VER)
  SWIFT_TOOLCHAIN_BASEDIR=~/swift-not-so-much
  SWIFT_TOOLCHAIN=$(SWIFT_TOOLCHAIN_BASEDIR)/$(SWIFT_SNAPSHOT)/usr/bin
  SWIFT_BUILD_FLAGS += -Xcc -fblocks -Xlinker -ldispatch
endif

ifeq ($(debug),on)
  SWIFT_INTERNAL_BUILD_FLAGS += -c debug
else
  SWIFT_INTERNAL_BUILD_FLAGS += -c release
endif

SWIFT_BUILD_TOOL=$(SWIFT_TOOLCHAIN)/swift build $(SWIFT_BUILD_FLAGS)
SWIFT_CLEAN_TOOL=$(SWIFT_TOOLCHAIN)/swift clean
SWIFT_BUILD_DIR=$(PACKAGE_DIR)/.build/debug
Sample rules.make:
# GNUmakefile

all : $(SWIFT_BUILD_DIR)/$(PACKAGE)

clean :
	(cd $(PACKAGE_DIR); $(SWIFT_CLEAN_TOOL))

$(SWIFT_BUILD_DIR)/$(PACKAGE) : *.swift
	(cd $(PACKAGE_DIR); $(SWIFT_BUILD_TOOL))
Sample GNUmakefile:
# GNUmakefile

PACKAGE_DIR=.
PACKAGE=SwiftSockets

include config.make

include rules.make

run: $(SWIFT_BUILD_DIR)/$(PACKAGE)
	$<
When in Emacs, you can do M-x compile and all is awezome:
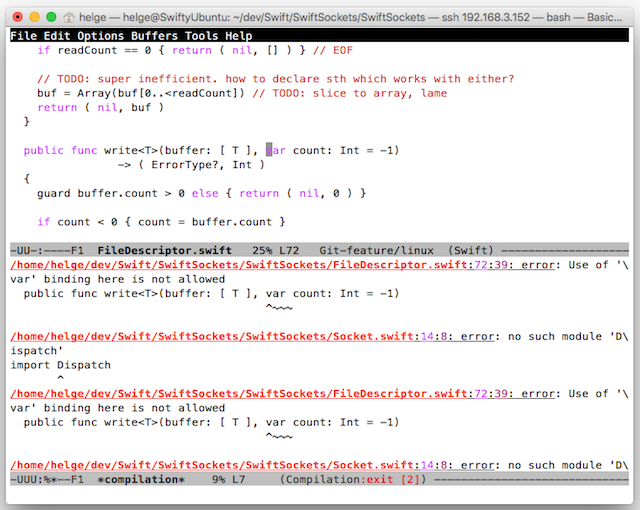
(Well, kinda awezome. Of course Swift got another subminor version and fails to compile existing code.)
To be continued…
Summary
All the above was non-sense of course, the ARI was just kidding. The next step is to drop the virtual machine you just created because you don’t need it anymore. Instead just use Swifter!
Swifter is a programming language in active development (not), which is wicked fast. It compiles swiftly and executes even swifter. Swifter promises to be the Objective-Z without the Z, but with a C.
No one wants a C++ in disguise.