
Instant “SwiftUI” Flavoured Slack Apps
 Slack can be enhanced by 3rd party developers with
interactive dialogs and dynamic, self-updating, messages.
With Buttons, Pickers, TextFields and more.
Slack can be enhanced by 3rd party developers with
interactive dialogs and dynamic, self-updating, messages.
With Buttons, Pickers, TextFields and more.
Using SwiftBlocksUI
these widgets can be built declaratively,
“SwiftUI style”.
SwiftBlocksUI implements all the necessary Slack endpoints to build Slack “applications”, in a simple and straightforward Swift API. A sample declaration of a Slack dialog:
struct ClipItView: Blocks {

  @State(\.messageText) var messageText
  @State var importance = "medium"

  var body: some Blocks {
    View("Save it to ClipIt!") {
      TextEditor("Message Text", text: $messageText)

      Picker("Importance", selection: $importance) {
        "High 💎💎✨".tag("high")
        "Medium 💎"  .tag("medium")
        "Low ⚪️"     .tag("low")
      }

      Submit("CliptIt") {
        console.log("Clip:", messageText, importance)
      }
    }
  }
}
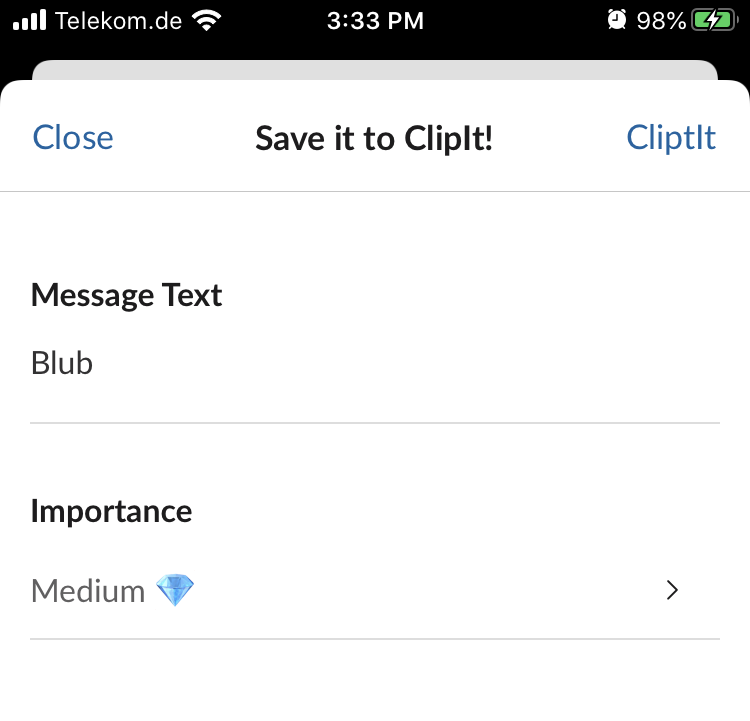
The result:
| iOS | Web Interface |
|

|
It contains a multiline plain
TextField,
a Picker with three
Options
and
a Submit
button which has an action block attached.
Once “ClipIt” is pressed the action block will run,
the @State properties prefilled with the respective field values.
The missing pieces to turn it into a full app (which can be run as a single file script via swift-sh, or as a Swift tool project in either Xcode or SwiftPM):
#!/usr/bin/swift sh
import SwiftBlocksUI // @SwiftBlocksUI ~> 0.8.0

dotenv.config()

struct ClipIt: App {

  var body: some Endpoints {
    Use(logger("dev"), bodyParser.urlencoded(),
        sslCheck(verifyToken(allowUnsetInDebug: true)))

    MessageAction("clipit") {
      ClipItView()
    }
  }
}

try ClipIt.main()
That’s all which is needed!
Note that
@maindoesn’t yet work with Swift Package Manager, which is why the app needs to be started explicitly.
The MessageAction endpoint clipit returns the ClipItView to Slack
when it gets triggered using the context menu.
It also registers the ClipItView itself as an endpoint, so that actions
invoked from within can be routed back to the respective action handlers within
it (in this case the one attached to the
Submit
button). In the Electron app it appears in this context menu (similar on iOS):

There are various ways to trigger dialogs or interactive messages from within
the client.
Can be
Message Actions
(also called “Message Shortcuts”) which appear
in the message context menu as shown,
Global Shortcuts
which appear in the ⚡️ menu in the message compose field,
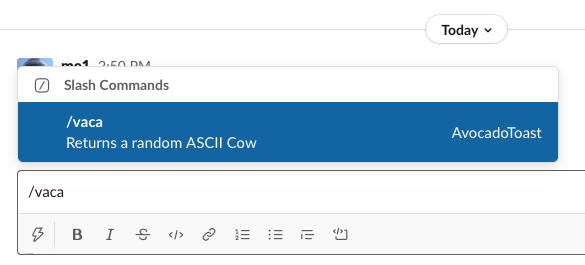
Slash Commands
which are triggered when the user sends a message starting with a slash
(e.g. /vaca)
or
the Home tab.
An application can send out interactive messages any time it wants, say a “lunch order” message every day at 11:45am. Or if some other out of band event occurs, like a purchase order being entered in SAP. Slack can also call into the app on certain events (e.g. a user joins the workspace) using the Events API.
An application cannot open modals in the client arbitrarily, modals require that the user clicks in an interactive message/hometab or uses the shortcut / message menu (opening modals requires a trigger which SwiftBlocksUI handles automagically).
Slack has one of the best documented open APIs and SwiftBlocksUI builds on top of it to make it even easier to rapidly build Slack applications. We’ll walk you through it in this article.
Article Outline
This article is a little longish, mostly because there is some (not much!) setup to do with screenshots and all. If only interested in code (and demo movies), jump straight to the Cows example.
The sections:
- A small Technology Overview: What is Block Kit, what are Slack applications, SwiftUI.
- Development Environment Setup: How to do an HTTP tunnel so that Slack can access our machine. Also required: a Slack workspace, a Slack app configuration.
- First app: Cows: A slash command, and interactive, self-updating, messages. Plus cows. (GIST)
- 🥑🍞 Avocado Toast: Shortcut with an interactive dialog, form elements. (Repo)
- The ClipIt! app: Working with and on other messages. (GIST)
- Closing Notes
The article is also going to be available as separate documentation pages within the project itself.
Technology Overview
Before building an own Slack application, let’s review the technologies involved.
Slack “Block Kit”
In February 2019 Slack introduced the new “Block Kit”, an “easier way to build powerful apps”. Before Block Kit, Slack messages were composed of a trimmed down markdown message text and an optional set of “attachments” (the attachments not being files, but small “widget blocks” with a fixed, predefined layout).
Block Kit goes away from those simple text chat “markdown messages” to a message representation which is a little like HTML 1.0 (actually more like WML), but encoded in JSON. Instead of just styling a single text, one can have multiple paragraphs, images, action sections, input elements, buttons and more.
Slack provides the Block Kit Builder web app which is a great way to play with the available blocks. This is a message (not a dialog):
[ { "type": "section",
    "text": {
      "type": "mrkdwn",
      "text": "Pick a date for the deadline."
    },
    "accessory": {
      "type": "datepicker",
      "initial_date": "1990-04-28",
      "placeholder": {
        "type": "plain_text",
        "emoji": true,
        "text": "Select a date"
      }
    }
  }
]
Produces:

In SwiftBlocksUI one doesn’t have to deal with those low level JSON representations, “Blocks” will generate it. The above as Blocks declarations:
Section {
  "Pick a date for the deadline."
  Accessory {
    DatePicker("Select a date", selection: $date)
  }
}
The key thing to understand is that Slack “messages” are not simple chat
style text(/markdown) messages anymore.
They are more like like small web pages, with form elements,
which can be updated by an application.
And those “web widgets” are built using “Blocks JSON”,
hence the name “SwiftBlocksUI”.
Slack “Applications”
It’s a little confusing when Slack talks about “applications”, which even have an AppStore like catalog. It makes you think of iOS apps, but they aren’t anything like that.
Slack “applications” are HTTP servers, i.e. “web applications”. They can send content (HTML, in this case blocks JSON) to the Slack client if it requests it (using a Shortcut or Slash command). Unlike HTTP servers, they can also proactively push content (interactive messages) into the client. For example based on time (11:45am lunch message with inline ordering controls), or when an event occurs in some external system (say SAP purchase order approved).
A common misconception is that Slack applications run as little JavaScript snippets within the Electron client application. This is (today) not the case. The Slack client doesn’t even contact the app directly, but always only through the Slack servers as a negotiator making sure the app is legit.
There are two parts to a Slack application:
- The HTTP endpoint(s) run by the developer, i.e. the implementation of the application (in our case using SwiftBlocksUI).
- The definition of the application which has to be done within the Slack Admin UI, this includes the permissions the app will have (represented by a Slack API token), and the Shortcuts, Message Actions and Slash Commands it provides.
One starts developing an application in an own Slack workspace, but they can be (optionally) configured for deployment in any Slack workspace (and even appear in the Slack application catalog, with “Install MyApp” buttons).
Writing 2020 Slack applications feels very similar to the ~1996 Netscape era of the web. The Slack client being the Netscape browser and the applications being HTTP apps hosted on an Netscape Enterprise Server.
The apps can’t do very much yet (they are not in the AJAX/Web 2.0 era just yet), but they are way more powerful than oldskool dead text messages.
Also - just like in Web 1.0 times - 🍕 ordering is the demo application 👴
As mentioned the Slack
documentation
on how to write applications is awesome.
But the mechanics to actually drive an app involves a set of endpoints and
response styles (response URLs, trigger IDs, regular web API posts).
SwiftBlocksUI consolidates those into a single, straightforward API.
Abstracted away in
Macro.swift
middleware, like this endpoint definition from the example above:
MessageAction("clipit") {
  ClipItView()
}
Things shown here are using MacroApp declarative middleware endpoints. The module below SwiftBlocksUI (BlocksExpress) also supports “Node.js middleware” style:
express.use(messageAction { req, res ...}).
Apple’s SwiftUI
If you found this page, you probably know basic
SwiftUI
already.
If you don’t, those WWDC sessions are good introductions:
Introducing SwiftUI and
SwiftUI Essentials.
In short SwiftUI is a new UI framework for Apple platforms which allows
building user interfaces declaratively.
SwiftUI has that mantra of
“Learn once, use anywhere”
(instead of
“Write once, run anywhere”).
SwiftBlocksUI does not allow you to take a SwiftUI app
and magically deploy it as a Slack application.
But it does try to reuse many of the concepts of a SwiftUI application,
how one composes (“declares”) blocks,
the concept of an environment (i.e. dependency injection),
even @State to some degree.
Differences, there are many.
In SwiftUI there is a tree of Views.
While Blocks also have a (different) concept of Views
(a container for modal or home tab content),
Slack Block Kit blocks aren’t nested but just a “vstack” of blocks.
Basic Structure
A simple example which could be used within a modal dialog:
struct CustomerName: Blocks {      // 1

  @State var customerName = ""     // 2

  var body: some Blocks {          // 3
    TextField("Customer Name",     // 4
              text: $customerName) // 5
  }
}
- User Interfaces are defined as Swift
structs which conform to theBlocks, protocol. You can reuse those structs in other structs and thereby reuse UIs which have similar looks. - Properties can be annotated with
“property wrappers”.
In this case it is an
@Statewhich is required so that the value sticks while the Blocks structs get recreated during API request processing (the do not persist longer!). - The sole requirement of the
Blocksprotocol is that the struct has abodyproperty which returns the nested blocks. The specialsomesyntax is used to hide the real (potentially long) generic type. - The builtin
TextField, Blocks is used to produce a plain text input field, aTextFieldcan be two-way. That is send an initial value to the client, and also push a value send by the client back into the Blocks struct. - To be able to push a value back into the
customerNameproperty, SwiftBlocksUI uses aBinding, which can be produced using the$syntax on the@Statewrapper. Bindings can nest, e.g.$store.address.streetworks just fine.
Note how it’s always the plural Blocks. That got chosen because those Blocks
structs are used to build a set of API blocks (instead of a single “View”).
Block Nesting
A special thing in SwiftBlocksUI is that it can synthesize a valid Block Kit structure. For example, Block Kit requires this structure to setup a TextField:
View {
  Input {
    TextField("title", text: $order.title)
  }
}
In SwiftBlocksUI just the TextField is sufficient, it’ll auto-wrap:
TextField("title", text: $order.title)
As mentioned, Block Kit blocks do not nest. This Section-in-Section is invalid:
Section {
  "Hello"
  Section { // invalid nesting
    "World"
  }
}
SwiftBlocksUI will unnest the blocks and print a warning.
Development Environment Setup
The environment setup looks like much,
but it can actually be done in about 10 minutes.
It involves:
Creating a workspace,
registering a Slack app,
getting public Internet access,
configuring the Slack app to point to it.
It is a one-time thing, a single app registration can be used to test out
multiple Shortcuts, Slash commands etc.
If you just want to see the code, directly jump to: Cows and AvocadoToast.
Create Development Workspace & Register App
Unfortunately there is no way to build Slack apps using just local software, a real Slack workspace is required. Fortunately it is super easy to create an own Slack workspace for development purposes, follow: Slack Create Workspace.
Just four steps (takes less than 5 minutes):
- Enter your email
- Slack sends a 6 digit code, enter that
- Enter a unique name for your workspace (like “SBUI-Rules-27361”)
- Enter an initial channel name (like “Block Kit”)
Now that we have that, we need to register our application, again super easy, just click: Create New App, then enter an app name and choose the development workspace just created.
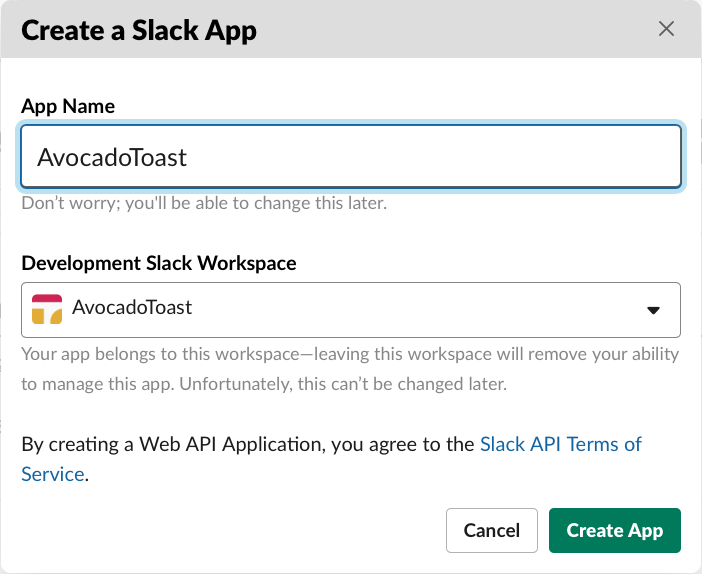
Congratulations, you’ve registered your first Slack app! Slack will show you a bigger web page with lots of buttons and options. You can always find the way back to your apps by going to: https://api.slack.com/apps.
Giving Slack access to your development machine
Remember that Slack “apps” are just HTTP endpoints, i.e. web apps.
The next hurdle is finding a way to let Slack connect to your local
development machine, which very likely isn’t reachable on the public
Internet.
There are various options, we’ll look at two:
SSH port forwarding
and
ngrok.
Important: Forwarding makes a port available to the public Internet. Only keep the tunnel up while you are developing.
ngrok
Ngrok is a service which provides port forwarding. It can be used for free, with the inconvenience that new URLs will be generated each time it is restarted. Slack also has nice documentation on how to do Tunneling with Ngrok.
Short version:
brew cask install ngrok # install
ngrok http 1337         # start
This is going to report an NGrok URL like http://c7f6b0f73622.ngrok.io that
can be used as the Slack endpoint.
SSH Port Forwarding
If SSH access to some host on the public Internet is available (e.g. a $3 Scaleway development instance is perfectly fine), one can simply forward a port from that to your local host:
ssh -R "*:1337:localhost:1337" YOUR-PUBLIC-HOSTNAME
Choose any free port you want, this sample is using 1337.
The
GatewayPorts clientspecifiedline may need to be added to the host’s/etc/ssh/sshd_configto get it to work.
Configure Application Endpoints
Now that a public entry point is available using either SSH or Ngrok, it needs to be configured in the Slack app. If you closed the web page in the meantime, you’ll find your app by going to this URL: https://api.slack.com/apps.
If you are using the free version of ngrok, you’ll have to update the endpoints every time you restart the
ngroktool.
Slack can be configured to invoke different URLs for different things,
e.g. a Slash command can be hosted on one server and interactive messages
on a different one.
With SwiftBlocksUI you can use the same URL for all endpoints, it’ll figure out
what is being requested and do the right thing.
Let’s configure two things:
- Shortcuts
- Slash Commands
Shortcuts
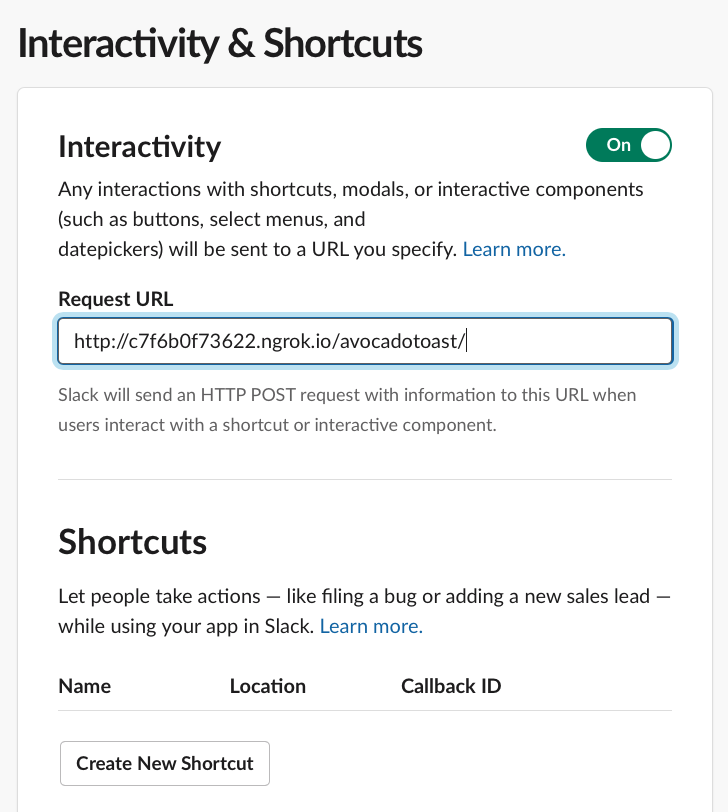
Go to the “Basic Information” section on your app’s Slack page,
and select “Interactive Components”. Turn them on.
You need to configure a Request URL. Enter your public entry point URL,
for example: http://c7f6b0f73622.ngrok.io/avocadotoast/:
Next click on “Create New Shortcut”, choose “global shortcut”. Global Shortcuts appear in the ⚡️ menu of the message compose field:
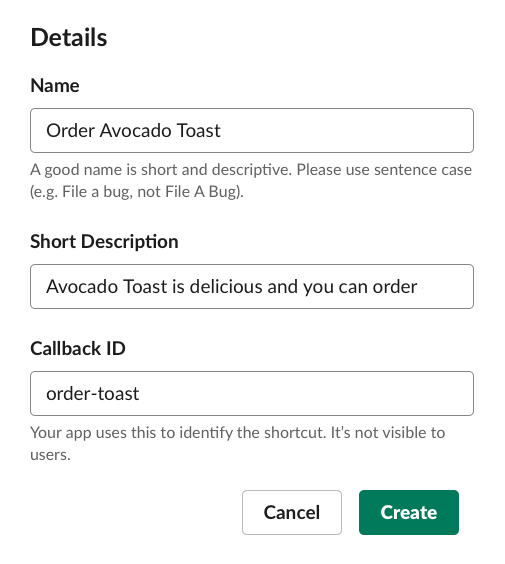
The important thing is to create a unique Callback ID, order-toast in
this case.
It’ll be used to identify the
Shortcut
on the SwiftBlocksUI side:
Shortcut("order-toast") { // <== the Callback ID
  OrderPage()
}
Let’s also create a Message Action while we are here. Again click “Create New Shortcut”, but this time choose “On messages”.
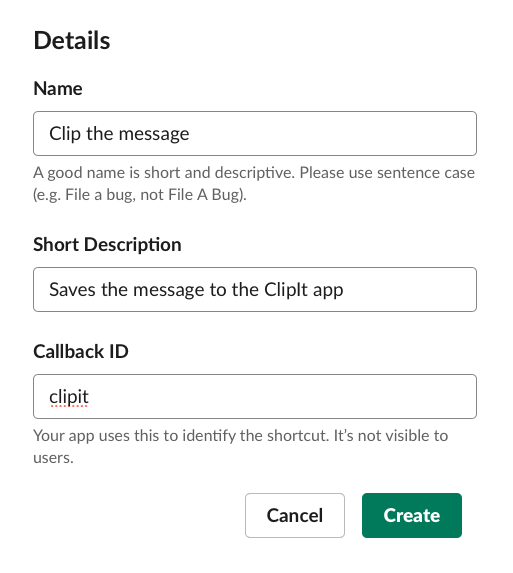
Again, make sure the Callback ID is unique: clipit in this case.
It’ll pair with the
MessageAction
endpoint:
MessageAction("clipit") {
  ClipItView()
}
on our application side.
The “Select Menus” section can be ignored, they are used for popups with auto-completion driven by an app. Dont’ forget to press “Save Changes” on the bottom.
Slash commands
To play with the cows, let’s also configure a Slash command. Click “Slash Commands” in the sidebar of your Slack app page, then “Create New Command”:
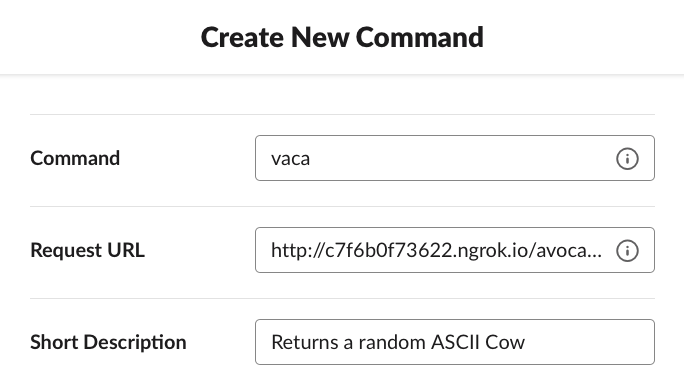
Enter the same URL as in the “Interactive Components” setup. Press “Save” to create the command.
Slash commands will be processed in the
Slash
endpoint:
Slash("vaca", scope: .userOnly) {
  Cow()
}
Other configuration
That’s all the configuration we need for now. On the same app page additional permissions are configured for the app, for example whether the app can send messages to channels, or create channels, and so on. It is also the place where “Incoming Webhooks” are configured, this is where Slack would call into our app when certain events happen. We don’t need this either.
Install the App
The final step is to install the app in the development workspace. Go to the “Basic Information” section of your app’s Slack page, and choose the big “Install your app to your workspace”:
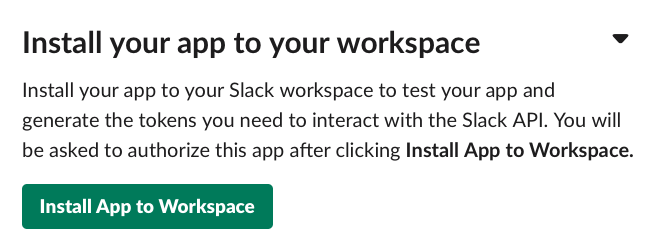
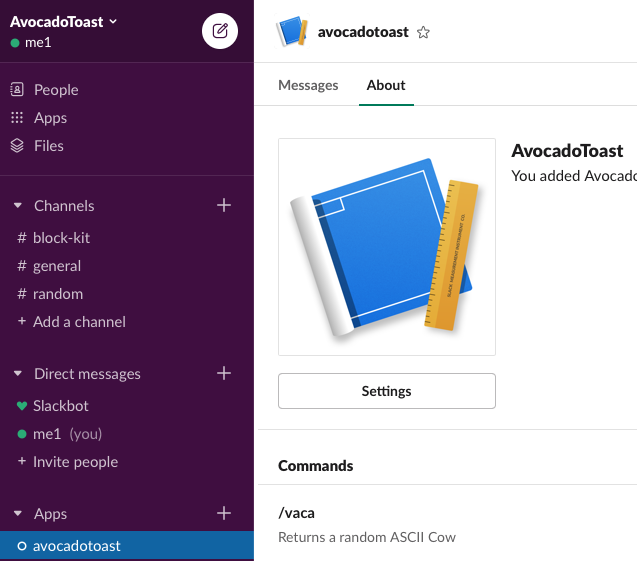
Once finished, the Slack client will show the app in the “Apps” section:
Success, finally SwiftBlocksUI coding can start!
Cows
This is what we are going to build,
the /vaca slash command which will retrieve nice ASCII cows messages,
and we’ll make the cow message itself interactive by adding buttons.
Xcode Project Setup
To get going, we need to create an Xcode tool project and add the SwiftBlocksUI and cows package dependencies.
All this can be done with any editor on any platform, the app even runs as a single file shell script via swift-sh!
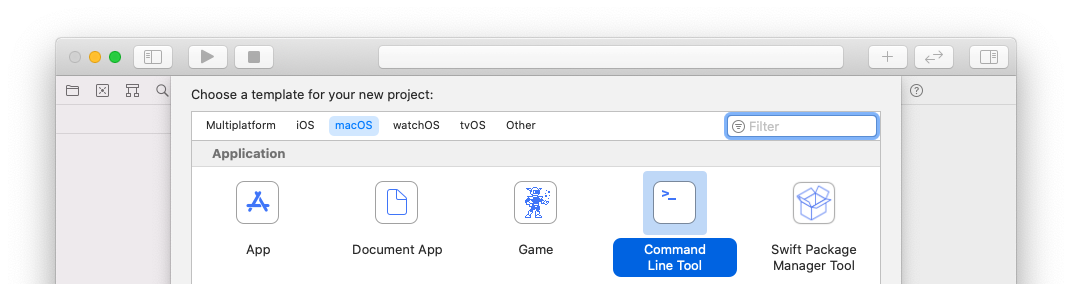
Startup Xcode, select “New Project” and then the “Command Line Tool” template:
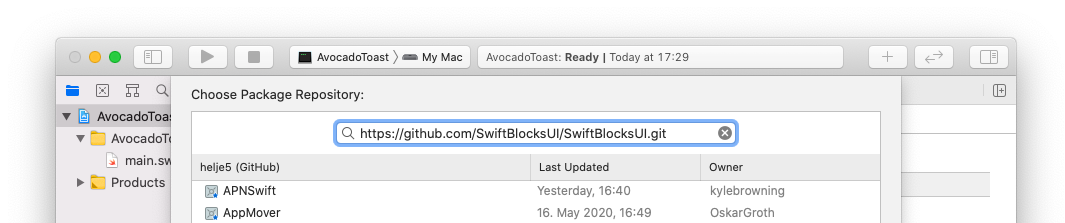
Give the project a name (I’ve choosen “AvocadoToast”) and save it wherever you like. Then select the project in the sidebar, and choose the “Swift Packages” option and press the “+” button:
In the upcoming package browser enter the SwiftBlocksUI package URL:
“https://github.com/SwiftBlocksUI/SwiftBlocksUI.git”.
In the following dialog which lists the contained products,
you can choose all you want, but SwiftBlocksUI is the one required:
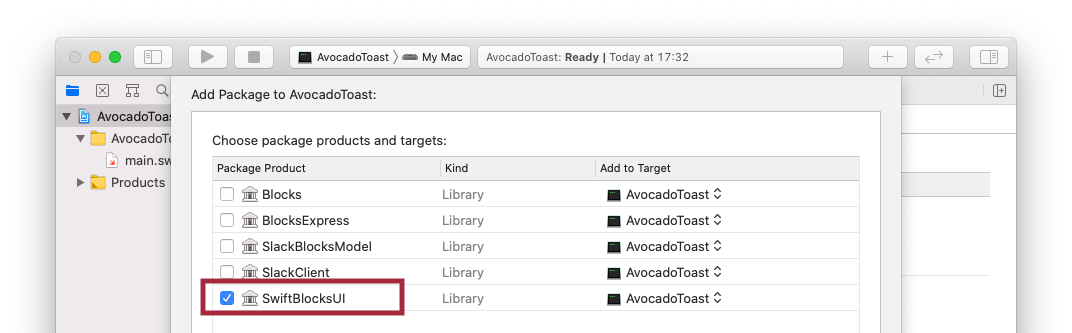
SwiftBlocksUI is the module which brings all the others together. They can also be used individually.
Repeat the process to add the
cows
package, using this url:
https://github.com/AlwaysRightInstitute/cows.git
(one can also just search for “cows” in that panel).
Xcode project ✅
App Boilerplate and First Cow
Replace the contents of the main.swift file with this Swift code:
#!/usr/bin/swift sh
import cows // @AlwaysRightInstitute ~> 1.0.0
import SwiftBlocksUI // @SwiftBlocksUI ~> 0.8.0
dotenv.config()
struct Cows: App {
var body: some Endpoints {
Group { // only necessary w/ Swift <5.3
Use(logger("dev"),
bodyParser.urlencoded(),
sslCheck(verifyToken(allowUnsetInDebug: true)))
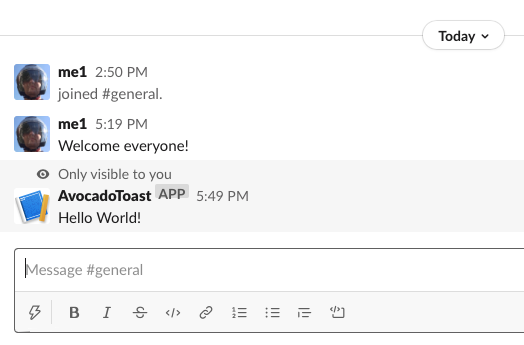
Slash("vaca", scope: .userOnly) {
"Hello World!"
}
}
}
}
try Cows.main()
It declares the Cows app,
it configures some common middleware (not strictly required)
and declares the /vaca slash command endpoint.
Start the app in Xcode and
going back to your development workspace, send the /vaca message:
If the stars align, it will show:
If it fails, most likely your tunnel configuration is not working. Try whether you can access the URLs you configured in the Slack app configuration from within Safari (or curl for that matter). Maybe you restarted the free ngrok version and the URLs are different now?
But we didn’t came here for “Hello World” but for ASCII cows!
The excellent cows module is already imported and it provides a
vaca function which returns a random ASCII cow as a Swift String:
Slash("vaca", scope: .userOnly) {
  Preformatted {
    cows.vaca()
  }
}
This introduces the
Preformatted
blocks.
It makes sure that the cows are properly rendered in a monospace font
(the same thing you get with triple-backticks in Markdown).
Restart the app and again send the /vaca command:
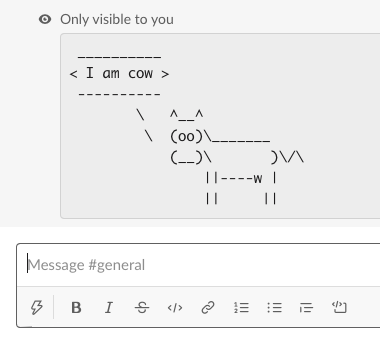
That is a proper cow, she even says so! Send /vaca as often as you like,
you’ll always get a new random cow …
To summarize:
- Earlier we configured the
vacaSlash command in the Slack Admin Panel and assigned the namevacato it. And we provided our (tunneled) endpoint URL. - In the source we declared our
CowsApp and started that using theCows().main(). - We added a
Slashendpoint in thebodyof the Cows app, which handles requests send by Slack to thevacacommand. - As the body of the Slash endpoint, we used the SwiftUI DSL to return a new message in response.
Reusable Cow Blocks
Before adding more functionality, let’s move the blocks out of the endpoint.
Into an own reusable CowMessage blocks.
struct CowMessage: Blocks {
  var body: some Blocks {
    Preformatted {
      cows.vaca()
    }
  }
}
This way we can use our Cow struct in other endpoints.
Or as a child block in other, larger blocks.
The new Slash endpoint:
Slash("vaca", scope: .userOnly) { CowMessage() }
Like in SwiftUI it is always a good idea to put even small Blocks into own reusable structs early on. Those structs have almost no runtime overhead.
Request Handling
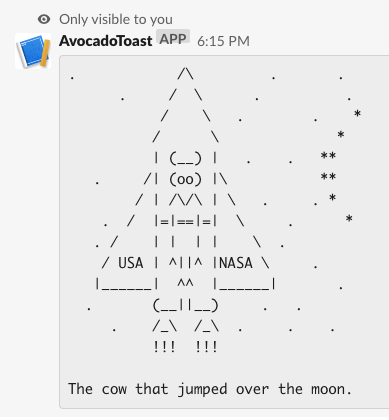
Something that would be cool is the ability to search for cows,
instead of always getting random cows.
We’d type say /vaca moon, and we’d get a moon-cow.
To do this, we need to get access to the content of the slash command message.
This is achieved using a SwiftUI
EnvironmentKey,
messageText:
struct CowMessage: Blocks {

  @Environment(\.messageText) private var query

  private var cow : String {
    return cows.allCows.first(where: { $0.contains(query) })
        ?? cows.vaca()
  }

  var body: some Blocks {
    Preformatted {
      cow
    }
  }
}
The
@Environment
propery wrapper fills our query property with the
messageText:
value in the active environment.
Since messageText is already declared as String, there is no need to provide
an explicit type.
The environment is prefilled by the endpoints. With relevant Slack context data, like the
messageTextas shown, theuserwho sent the request, what channel it is happening in and more.
Like in SwiftUI, own environment keys can be used and they stack just like in SwiftUI. One could even adjust a rule engine like SwiftUI Rules to work on top.
Then we have the computed cow property, which returns the ASCII cow to be
used. It tries to search for a cow which contains the query string, and if
it doesn’t find one, returns a random cow
(enhancing the search is left as a readers exercise).
Finally the body property, which is required by the
Blocks
protocol. It just returns the cow in a code block (Preformatted).
Unlike in SwiftUI which requires the
Textview to embed strings,Stringis declared to be Blocks in SwiftBlocksUI. This seemed reasonable, because Slack content is often text driven. TheTextblocks also exist, if things shall be explicit.
Sending the /vaca moon message now returns a proper cowsmonaut:
Interactive Message Content
All this slash-commanding still produced static messages. Let’s make them dynamic by adding a few buttons!
var body: some Blocks {
  Group { // only Swift <5.3
    Preformatted {
      cow
    }

    Actions {
      Button("Delete!") { response in
        response.clear()
      }
      .confirm(message: "This will delete the message!",
               confirmButton: "Cowsy!")

      Button("More!") { response in
        response.push { self }
      }
      Button("Reload") { response in
        response.update()
      }
    }
  }
}
The Group is only necessary in Swift 5.2 (Xcode 11), starting with 5.3
(Xcode 12beta) body is already declared as a Blocks builder proper.
We add an
Actions
block with the buttons.
We wouldn’t have to explicitly wrap the
Buttons
in one, w/o they would stack vertically
(they would autowrap in individual Actions blocks).
Actions blocks lay them out horizontally.
The delete button has a confirmation dialog attached, which is shown by the client before the action is triggered in our app (it is a client side confirmation, just like the ages old HTML/JS confirm function).
Actions
But the new thing we haven’t seen before is that the
action
closure attached to the Button has a
response parameter:
Button("More!") { response in
  response.push { self }
}
The parameter is entirely optional - if none is used,
response.end is called right after the action closure finishes.
Important: If a response parameter is used, the action must call one of the provided response functions. It doesn’t have to do so right away, an action with a response is asynchronous. E.g. it could call into an external system and only when this succeeds decide on how to respond.
The options are:
end: Close the active view in modal dialog (not necessarily the whole thing), does nothing for interactive messages.clear: This will close a modal dialog, or delete the originating messageupdate: Refreshes the a dialog or the current messagepush: For dialogs this pushes a new view on the dialog page stack, for messages it creates a new message in the same place as the origin.
After finishing the response using one of the operations, an action can still do other stuff. E.g. it could schedule
setTimeoutand do something extra later. Imagine a “respond in 30 seconds or I’ll self-destroy”. Entirely possible!
This is especially important for actions which need to run for longer than 3 seconds, which is the Slack timeout for responses. They can justendthe response right away and send a response message later (e.g. as a DM to the user).
Our finished cows app:
The full single-file source suitable for swift-sh (as GIST):
#!/usr/bin/swift sh
import cows          // @AlwaysRightInstitute ~> 1.0.0
import SwiftBlocksUI // @SwiftBlocksUI        ~> 0.8.0

dotenv.config()

struct CowMessage: Blocks {

  @Environment(\.messageText) private var query

  private var cow : String {
    return cows.allCows.first(where: { $0.contains(query) })
        ?? cows.vaca()
  }

  var body: some Blocks {
    Group { // only Swift <5.3
      Preformatted {
        cow
      }

      Actions {
        Button("Delete!") { response in
          response.clear()
        }
        .confirm(message: "This will delete the message!",
                 confirmButton: "Cowsy!")

        Button("More!") { response in
          response.push { self }
        }
        Button("Reload") { response in
          response.update()
        }
      }
    }
  }
}

struct Cows: App {

  var body: some Endpoints {
    Group { // only necessary w/ Swift <5.3
      Use(logger("dev"),
          bodyParser.urlencoded(),
          sslCheck(verifyToken(allowUnsetInDebug: true)))

      Slash("vaca", scope: .userOnly) {
        CowMessage()
      }
    }
  }
}
try Cows.main()
🥑🍞 Avocado Toast
Excellent, the basics work. Let’s bring in more interactivity using modal dialogs.
The following is inspired by the “Avocado Toast App” used to demo SwiftUI in the SwiftUI Essentials talk. Didn’t watch it yet? Maybe you should, it is about delicious toasts and more.
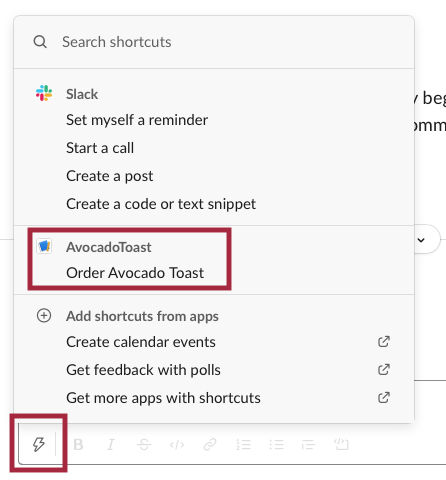
We configured an order-toast global Shortcut
in the Slack Admin Panel above.
It already appears in the ⚡️ menu of the message compose field:
API Access Token
The shortcut needs to interact with Slack using a client (we call out to Slack to open a modal, vs. just being called by Slack). For this we need to go back to our app page in the Admin Panel and grab our “Bot User OAuth Access Token”, which can be found under the “OAuth & Permissions” section in the sidebar:
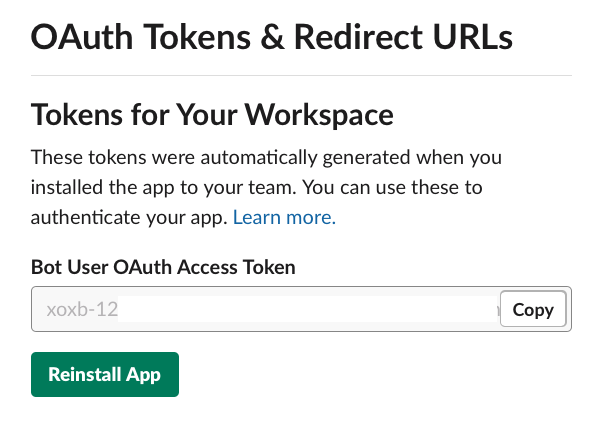
Press “Copy” to get that token.
Keep that token secure and do not commit it to a git repository!
Create a .env file right alongside your main.swift, and put your token in
there:
# Auth environment variables, do not commit!
SLACK_ACCESS_TOKEN=xoxb-1234567891234-1234567891234-kHHx12spiH1TZ9na3chhl2AA
Excellent.
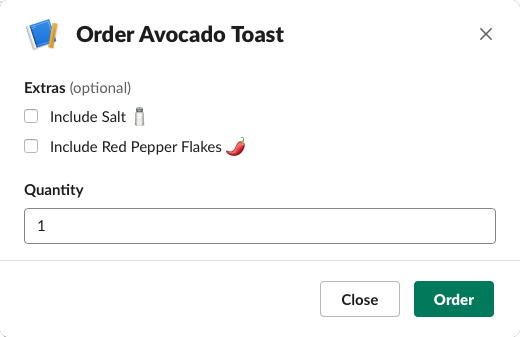
Simple Order Form
A first version of our Avocado order form,
I’d suggest to put it into an own OrderForm.swift file:
struct Order {
  var includeSalt            = false
  var includeRedPepperFlakes = false
  var quantity               = 1
}

struct OrderForm: Blocks {

  @Environment(\.user) private var user

  @State private var order = Order()

  var body: some Blocks {
    View("Order Avocado Toast") {
      Checkboxes("Extras") {
        Toggle("Include Salt 🧂",
               isOn: $order.includeSalt)
        Toggle("Include Red Pepper Flakes 🌶",
               isOn: $order.includeRedPepperFlakes)
      }
      TextField("Quantity",
                value: $order.quantity,
                formatter: NumberFormatter())

      Submit("Order") {
        console.log("User:", user, "did order:", order)
      }
    }
  }
}
This is what it looks like:
To trigger it when the ⚡️ shortcut is used, we need to hook it up as an
endpoint in the body of the app declaration:
Shortcut("order-toast") {
  OrderForm()
}
That’s it, restart the app, try the shortcut. If the order is completed, the app will log something like this in the terminal:
User: <@U012345ABC 'helge'> did order:
  Order(includeSalt: false, includeRedPepperFlakes: true,
  quantity: 12)
There are some things to discuss. First, the form declares an explicit
View.
This is only done here to give the modal a title
(“Order Avocado Toast”).
Then there are two
Checkboxes,
nothing special about those.
They use
Bindings
via the $state syntax to get and set values in our Order struct.
Note how bindings can be chained to form a path.
Toggle("Include Salt 🧂",
       isOn: $order.includeSalt)
The “quantity”
TextField
is special because it is using an Int value
alongside a (Foundation)
Formatter:
TextField("Quantity",
          value: $order.quantity,
          formatter: NumberFormatter())
The formatter will make sure that the user entered an actual number. If the user types some arbitrary content, it will emit a validation error (shown by the client).
App side validation can be done using Formatter’s or by throwing the InputValidationError from within an action.
Again we use an Environment key, user, to get contextual information.
In this case, which users ordered the toast.
Intermission: Lifecycle Phases
There are three request processing phases when dealing with requests sent by Slack:
- takeValues: If the request arrives, SwiftBlocksUI first pushes all values into the Blocks.
- invokeAction: Next it invokes an action, if there is one.
- render: And finally it returns or emits some kind of response, e.g. by rendering the blocks into a new message or modal view, or returning validation errors.
Slack has various styles on how to return responses, including things called
Response Types,Response URLs,Trigger IDs, or WebAPI client. SwiftWebUI consolidates all those styles in a single API.
@State
must be used if values need to survive between those phases, as the Blocks
will get recreated for each of them.
In SwiftBlocksUI @State does not persist for longer than a single
request/response phase!
To keep state alive, one can use various mechanisms, including
MetaData keys.
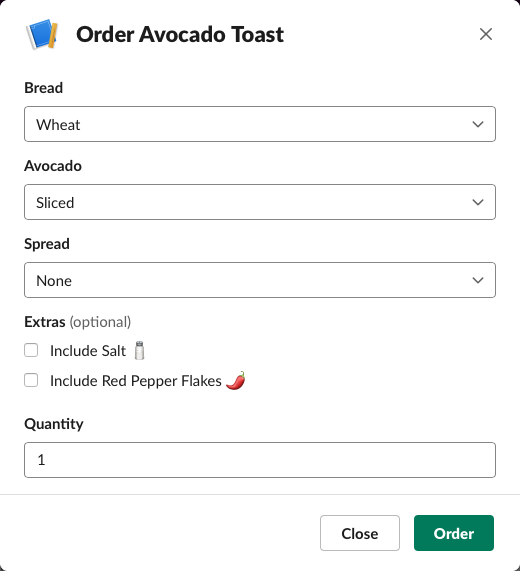
Add Ordering Options
Just Salt’n’Pepper, really? We need more options!
This is Swift, so we encode the options in proper enums,
I’d put them in a separate file ToastTypes.swift:
enum AvocadoStyle {
  case sliced, mashed
}

enum BreadType: CaseIterable, Hashable, Identifiable {
  case wheat, white, rhy

  var name: String { return "\(self)".capitalized }
}

enum Spread: CaseIterable, Hashable, Identifiable {
  case none, almondButter, peanutButter, honey
  case almou, tapenade, hummus, mayonnaise
  case kyopolou, adjvar, pindjur
  case vegemite, chutney, cannedCheese, feroce
  case kartoffelkase, tartarSauce

  var name: String {
    return "\(self)".map { $0.isUppercase ? " \($0)" : "\($0)" }
           .joined().capitalized
  }
}
Add the new options to the Order structs:
struct Order {
  var includeSalt            = false
  var includeRedPepperFlakes = false
  var quantity               = 1

  var avocadoStyle           = AvocadoStyle.sliced
  var spread                 = Spread.none
  var breadType              = BreadType.wheat
}
And the updated OrderForm:
struct OrderForm: Blocks {

  @Environment(\.user) private var user

  @State private var order = Order()

  var body: some Blocks {
    View("Order Avocado Toast") {

      Picker("Bread", selection: $order.breadType) {
        ForEach(BreadType.allCases) { breadType in
          Text(breadType.name).tag(breadType)
        }
      }

      Picker("Avocado", selection: $order.avocadoStyle) {
        "Sliced".tag(AvocadoStyle.sliced)
        "Mashed".tag(AvocadoStyle.mashed)
      }

      Picker("Spread", Spread.allCases, selection: $order.spread) { spread in
        spread.name
      }

      ...
    }
  }
}
This demonstrates various styles of
Pickers.
The first one uses an explicit ForEach to iterate over the bread types
(and add the options)
the second one uses a static set of options (the tag being used to identify
them),
and the last one iterates over an array of
Identifiable
values.
This is what we end up with. On submission the Submit action has a properly
filled, statically typed, Order object available:
As a final step, let’s send the user an order confirmation message. Notice the embedded Blocks struct to build field pairs in a consistent manner, this is a power of SwiftUI - easy composition:
struct OrderConfirmation: Blocks {

  let user  : String
  let order : Order

  struct TitledField<C: Blocks>: Blocks {
    let title : String
    let content : C

    init(_ title: String, @BlocksBuilder content: () -> C) {
      self.title   = title
      self.content = content()
    }

    var body: some Blocks {
      Group {
        Field { Text("\(title):").bold() }
        Field { content }
      }
    }
  }

  private let logo =
    Image("ZeeYou",
          url: URL(string: "https://zeezide.com/img/zz2-256x256.png")!)

  var body: some Blocks {
    Section {
      Accessory { logo }

      "\(user), thanks for your 🥑🍞 order!"

      Group {
        TitledField("Quantity") { "\(order.quantity)"     }
        TitledField("Bread")    { order.breadType.name    }
        TitledField("Style")    { order.avocadoStyle.name }

        if order.spread != .none {
          TitledField("Spread") { order.spread.name }
        }

        if order.includeRedPepperFlakes || order.includeSalt {
          TitledField("Extras") {
            if order.includeRedPepperFlakes { "🌶" }
            if order.includeSalt            { "🧂" }
          }
        }
      }
    }
  }
}
It is sent to the user as a DM by the OrderForm in the submit action:
let confirmationMessage =
  OrderConfirmation(user: user.username, order: order)

client.chat.sendMessage(confirmationMessage, to: user.id) { error in
  error.flatMap { console.error("order confirmation failed!", $0) }
}
We’ll stop here for the demo, but imagine Avocado Toast as a complete avocado toast ordering solution. The whole order flow would live inside Slack:
- There would need to be an order database, with the order keyed by user.
- The order database could keep a reference to the order confirmation message.
- When an order is submitted, the shortcut could also create an interactive
message in a
#toast-orderschannel. That message could have a “Take order” button which a fulfillment agent could press to take responsibility. If pressed, both this message and the original order confirmation message could be updated (“Adam is doing your order!”)- It could also start a timer to auto-cancel the order if no one takes it.
- All messages could have a “cancel” button to stop the process.
- Finally the Home Tab of the app could show the history of orders for the respective user (either as a customer or agent).
Would be nice to complete the sample application on GitHub to implement the whole flow.
ClipIt
This final one is loosely based on the official Slack tutorial: Make your Slack app accessible directly from a message.
What we want to do here is work on some arbitrary message the user selects. This is possible using “Message Actions” (called “Message Shortcuts” in the admin panel). We already configured a “Message Shortcut” tied to the “clipit” callback-id above, let’s bring it to life.
It is already showing up in the message context menu:
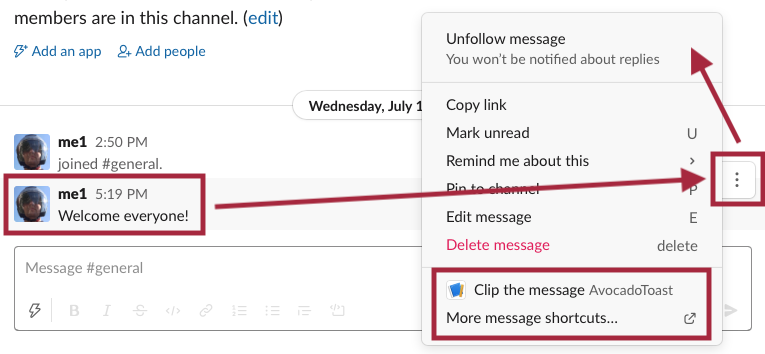
The dialog we want to show:
struct ClipItForm: Blocks {

  @State(\.messageText) var messageText
  @State var importance = "medium"

  private func clipIt() {
    console.log("Clipping:", messageText,
                "at:", importance)
  }

  var body: some Blocks {
    View("Save it to ClipIt!") {
      TextEditor("Message Text", text: $messageText)

      Picker("Importance", selection: $importance,
             placeholder: "Select importance")
      {
        "High 💎💎✨".tag("high")
        "Medium 💎"  .tag("medium")
        "Low ⚪️"     .tag("low")
      }

      Submit("CliptIt", action: clipIt)
    }
  }
}
And the endpoint:
MessageAction("clipit") {
  ClipItForm()
}
There isn’t anything new in here
(the attentive reader may spot a tiny specialty).
We use the \.messageText environment to get access to the
message we work on (similar to the Slash command in the Cows app).
There is a multiline TextField which is filled with the message text.
And a
Picker
plus a Submit button. Done.
And with this, we’d like to close for today.
Closing Notes
Hopefully this may have broadened your view on what Slack messages and dialogs can do. A LOT. And how simple it is with SwiftBlocksUI. The very first setup (tunnel, app registration) is some annoying boilerplate work, but composing messages and dialogs SwiftUI-style is a lot of fun!
Hope you like it! Got more questions? Join the AvocadoToast Slack workspace!
2020-07-15: Slack just beat me in providing a Block Kit DSL, they just released one for Kotlin: Block Kit Kotlin DSL. It’s a little different and more a 1:1 mapping to the actual blocks though.
Links
- SwiftBlocksUI
- Slack Resources
- Slack ClipIt app (message action)
- Block Kit
- Block Kit Builder
- Macro.swift
(Node.js style Server Side Swift)
- based on SwiftNIO
- SwiftUI
- SwiftWebUI (A demo implementation of SwiftUI for the Web)
- SwiftObjects (WebObjects API in Swift, WebObjects intro)
Contact
Feedback is warmly welcome:
Twitter: @helje5, email: me@helgehess.eu, AvocadoToast Slack.
Want to support my work? Buy an app! You don’t have to use it! 😀