
An Introduction to WebObjects, in Swift
 Only a few more months before the introduction of WebObjects 6 at WWDC 2019,
let’s have a look on what
WebObjects
actually is.
And more specifically how it could look like in Swift.
A small tutorial,
and an implementation of the
WebObjects API in Swift, or as we like to call it:
SwiftObjects.
Only a few more months before the introduction of WebObjects 6 at WWDC 2019,
let’s have a look on what
WebObjects
actually is.
And more specifically how it could look like in Swift.
A small tutorial,
and an implementation of the
WebObjects API in Swift, or as we like to call it:
SwiftObjects.
Note(2020-12-27): This article has some content referrering to an earlier version that used SwiftXcode, a system to use SPM packages in Xcode when it didn’t support such. Today, you can directly use Xcode to import the SwiftObjects package. However, the project templates are still useful.
Note(2020-12-27): Apple didn’t release WebObjects 6 at WWDC 2019. But it did release SwiftUI, which is in many ways a WebObjects 6 😀
Let’s jump back, 3 years, May 4th 2016: Apple officially killed one of Steve Job’s favorite projects:
“WebObjects is a discontinued product and will never be upgraded.”
So while WebObjects 5 (the Java version) can still be downloaded from Apple Downloads, it is discontinued by Apple for more than 10 years now (last version was 5.4.3, from 2008). Yet a surprising amount of web sites are still using it. Most prominently the dreaded iTunes Connect:

You can usually tell something is backed by WebObjects by looking at the URL:
/WebObjects/iTunesConnect.woa/ra/ng/app
 |          |                 |  |- custom path
 |          |                 \- WORequestHandler key (ra 🤔)
 |          \- Application Name
 \- Adapter Prefix
This literally says “WebObjects”, but the application is also named “.woa” (Web Objects Application).
Today we are going to resurrect it and have a look what made it great, and why that isn’t much relevant anymore. But before we start, we need to setup a development environment.
Raw Project Setup with Xcode 12
Since SwiftXcode is kinda outdated, this section deals with getting SwiftObjects running w/ the builtin SPM support in Xcode. It isn’t as convenient, because SwiftXcode also includes Xcode project templates for WO applications.
The setup instructions for Xcode 10 / SwiftXcode can still be found below.
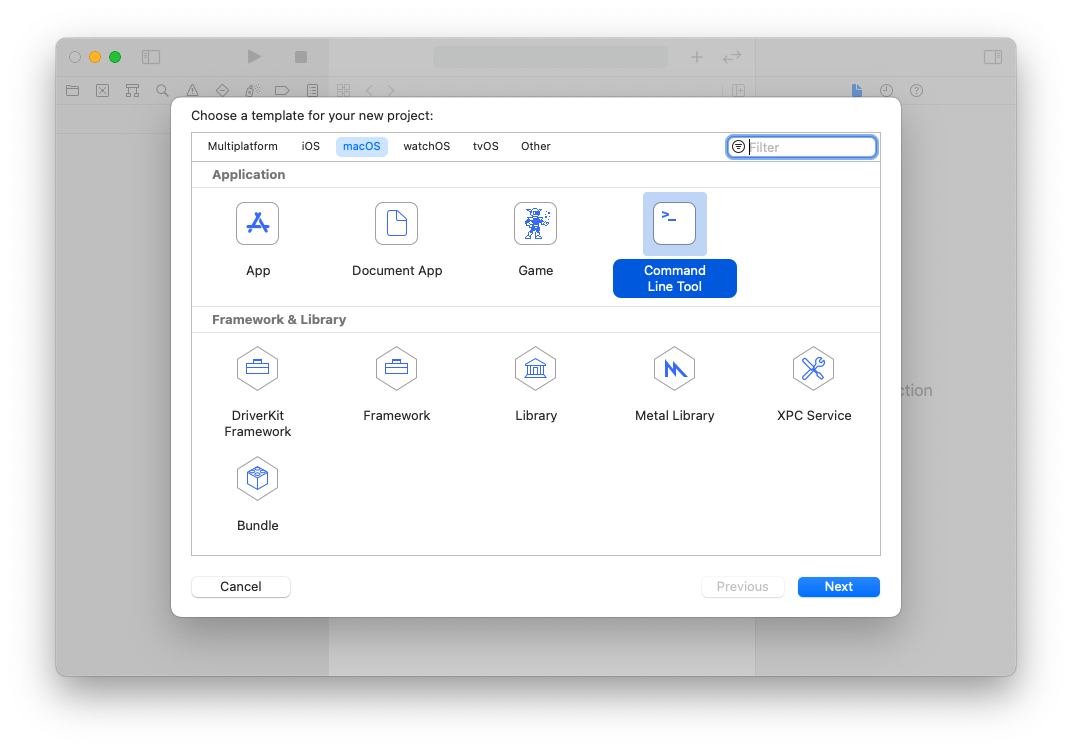
Create Xcode Tool Project
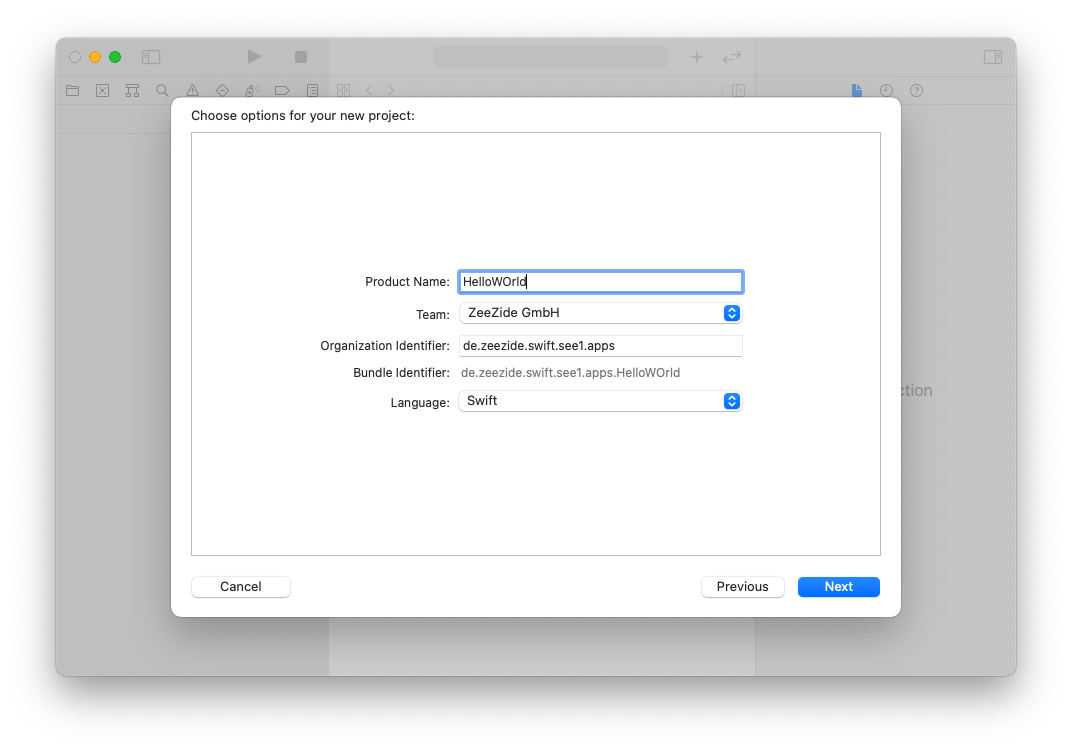
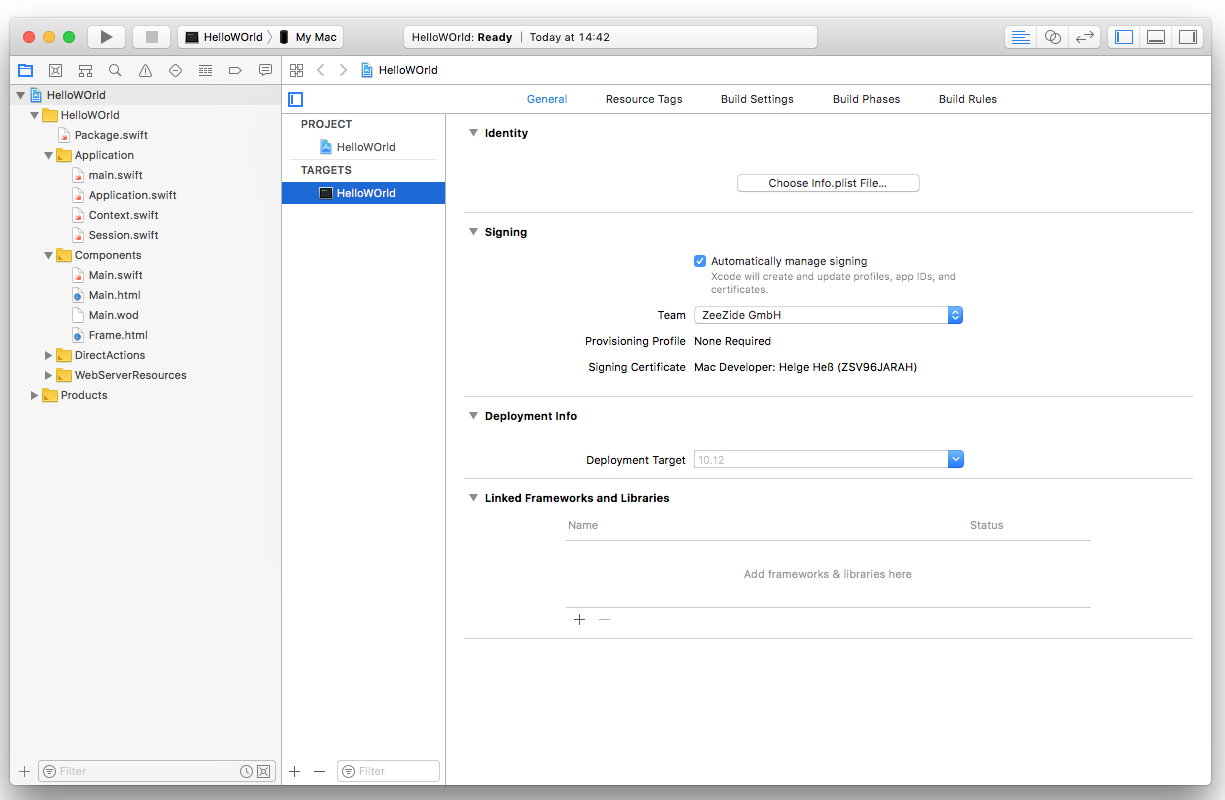
First create a “macOS / Command Line Tool” project in Xcode. Select “Swift” as the language and choose a nice project name, like “HelloWOrld”.
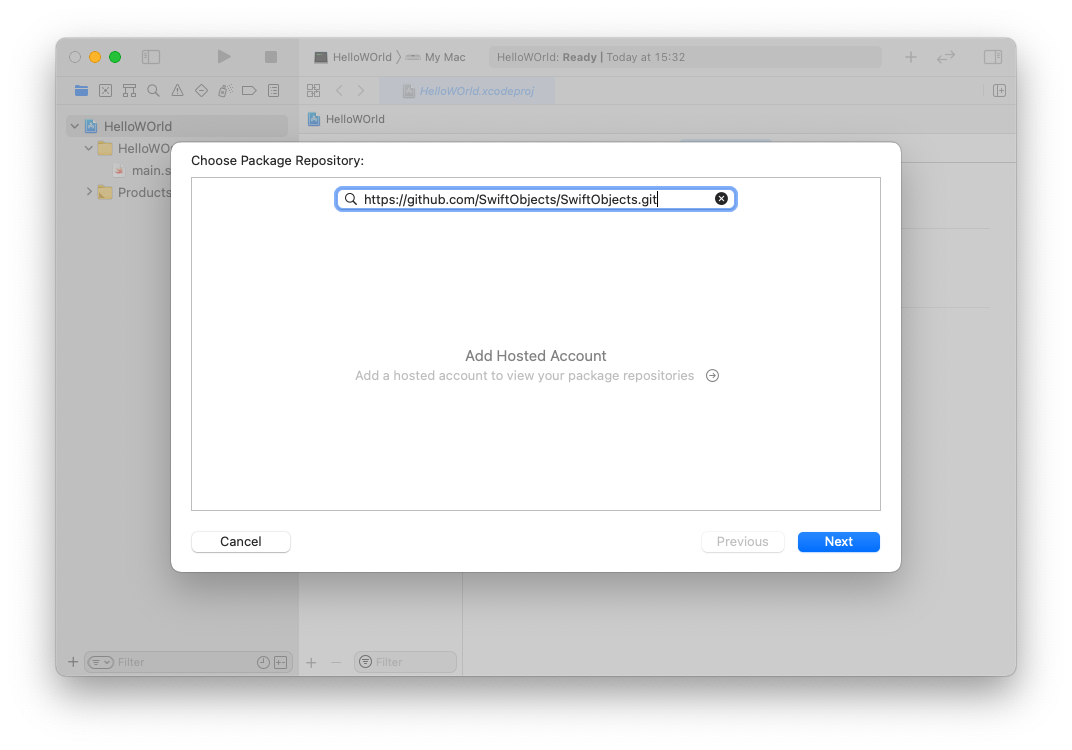
The result is an almost empty project with just a “main.swift” file. The next step is to add “SwiftObjects” as a dependency. To do this, select the “HelloWOrld” project (not the target). And within that the “Swift Packages” tab. Press the “+” button to add a dependency.

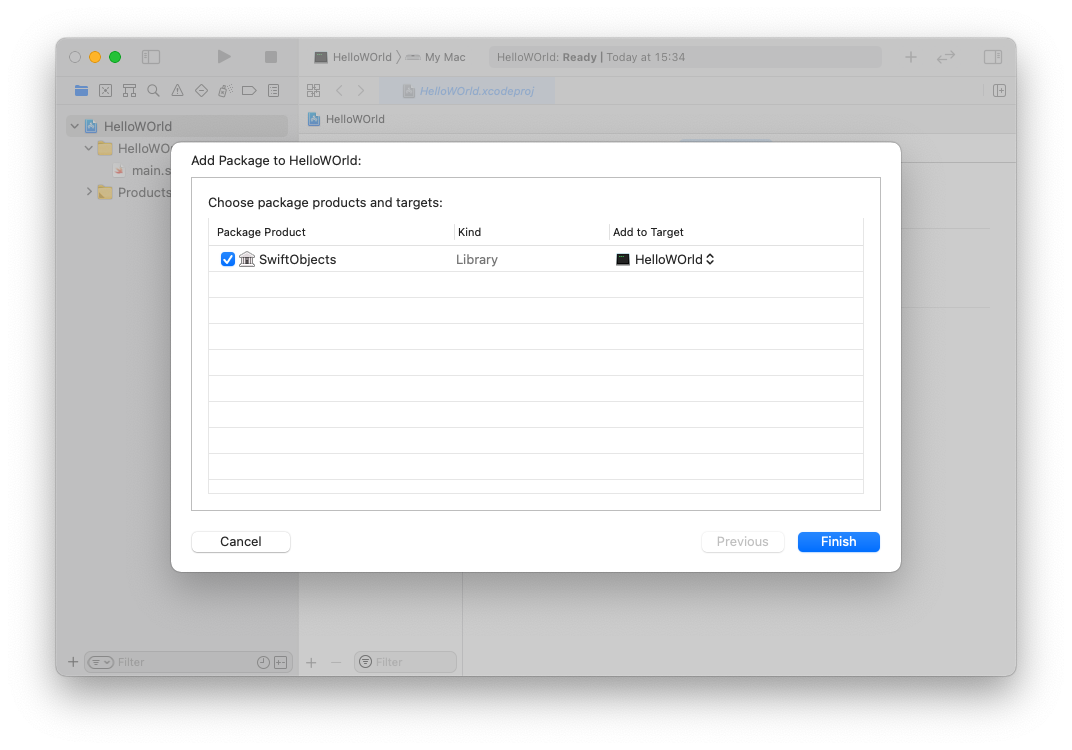
In the wizard that is shown, enter “https://github.com/SwiftObjects/SwiftObjects.git” as the package URL.
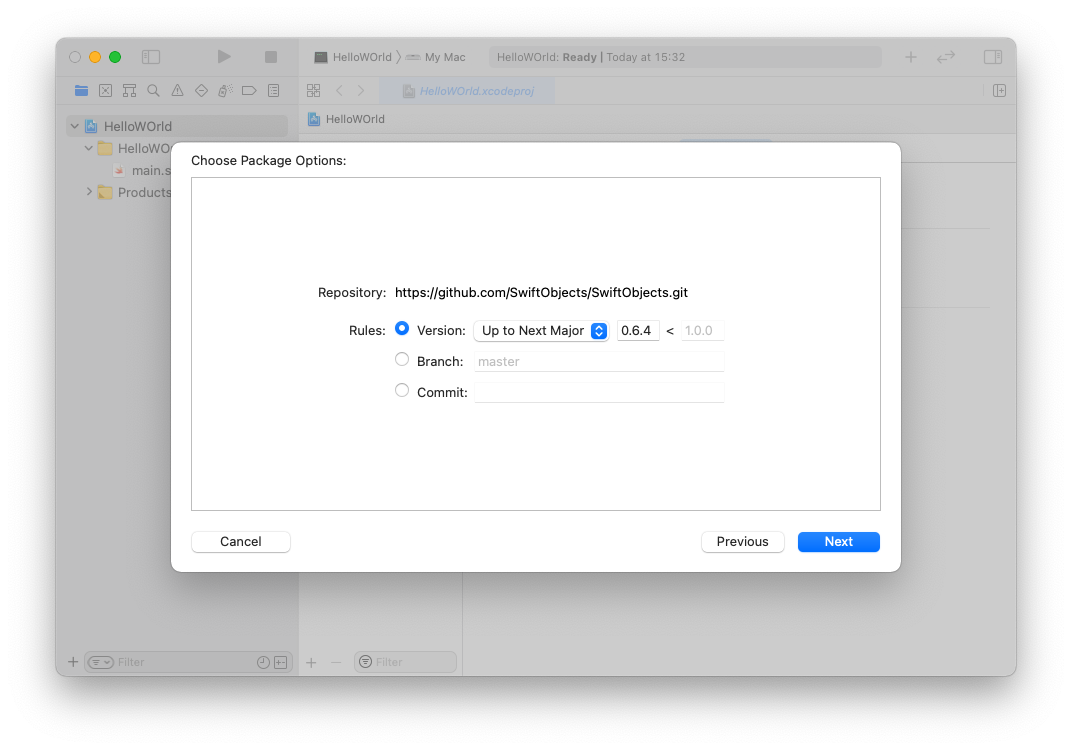
The subsequent panel allows the selection of a version, leave it the way it is and press “Next”:
Xcode is going to resolve the package and offer to add it to the “HelloWOrld” target. Approve this.
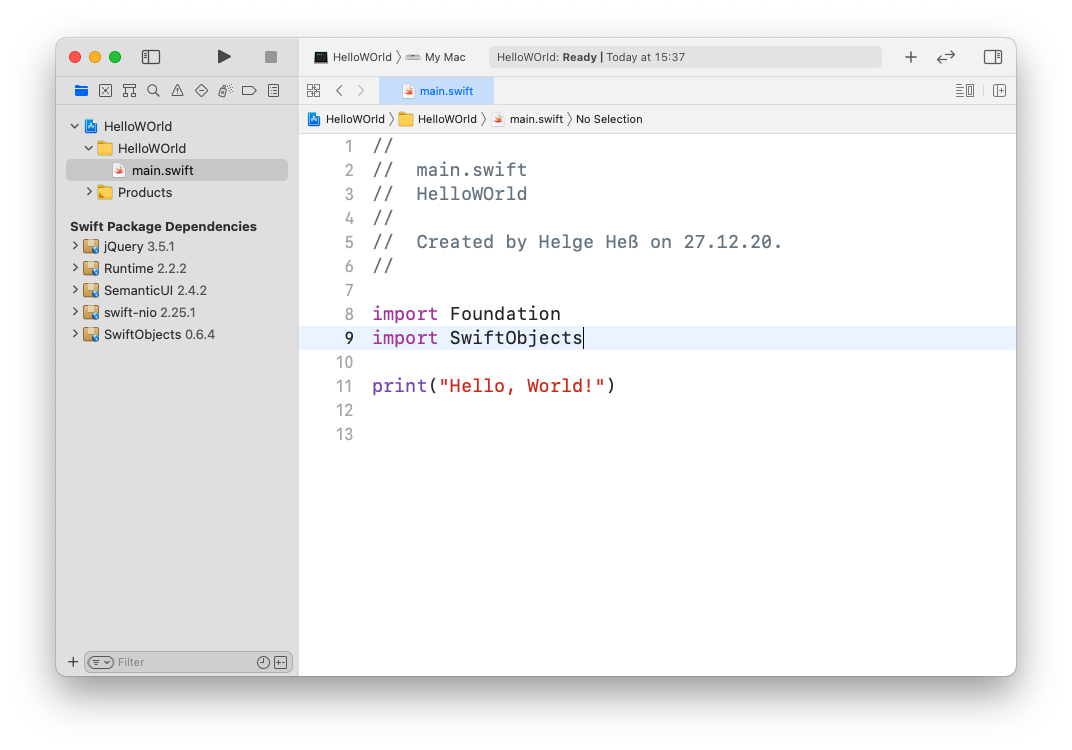
The tool project now has the SwiftObjects dependency. To try it out,
we can switch to the “main.swift” file and add import SwiftObjects,
then “build” the project in Xcode.
You’ll notice that SwiftObjects is hooked up to the excellent Swift NIO, but that doesn’t really matter here. The API can also be driven by something like mod_swift, Network.framework or whatever you prefer.
Adding the App Boilerplate
This is a step which used to be automated using SwiftXcode, which provides Xcode project and file templates to setup the boilerplate. In Xcode 12 we have to do it manually for now. It isn’t much though.
The article will go into details later, but a basic app usually starts out
with a custom Application class and a Main component.
The Application.swift should look like this:
import SwiftObjects

class Application: WOApplication {

  override init() {
    super.init()

    let rm = WODevResourceManager(
      sourceType       : Application.self,
      defaultFramework : "HelloWOrld"
    )

    rm.register(Main.self)
    resourceManager = rm
  }
}
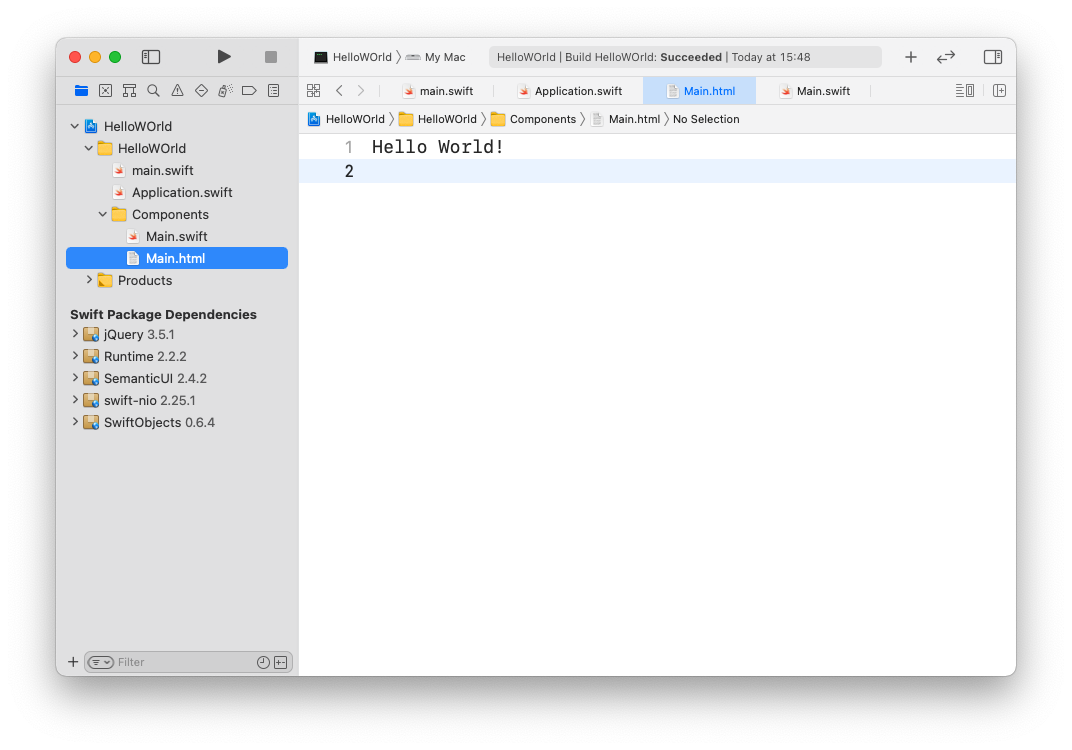
Put the Main.swift and the Main.html into a “Components” subfolder.
The component can stay empty for now:
import SwiftObjects

class Main: WOComponent {
}
But put something into the Main.html, can be arbitrary HTML code, or
just some plain text:
Hello World
Finally we need to start the app from within the tool’s main.swift:
import SwiftObjects

let WOApp  = Application()
let server = WONIOAdaptor(application: WOApp)
server.listenAndWait()
This should be enough to start the basic app and get “Hello World!”
when hitting it at http://localhost:1337 in the browser.
Project Setup with SwiftXcode (old)
Update 2019-06-25: Xcode 11 now includes some Swift Package Manager support. This may or may not work with the SwiftXcode setup described here. So for now consider this Xcode 10 only ;-)
 Instead of fiddling around with Swift Package Manager,
we use
swift xcode
to use SwiftObjects directly within Xcode.
Grab Homebrew if you don’t have it yet, and install the
SwiftObjects image
using:
Instead of fiddling around with Swift Package Manager,
we use
swift xcode
to use SwiftObjects directly within Xcode.
Grab Homebrew if you don’t have it yet, and install the
SwiftObjects image
using:
brew install swiftxcode/swiftxcode/swift-xcode-wo
swift xcode link-templates
That will take a moment to install and compile, but then we are ready to go!
You’ll notice that SwiftObjects is hooked up to the excellent Swift NIO, but that doesn’t really matter here. The API can also be driven by something like mod_swift, Kitura or whatever you prefer.
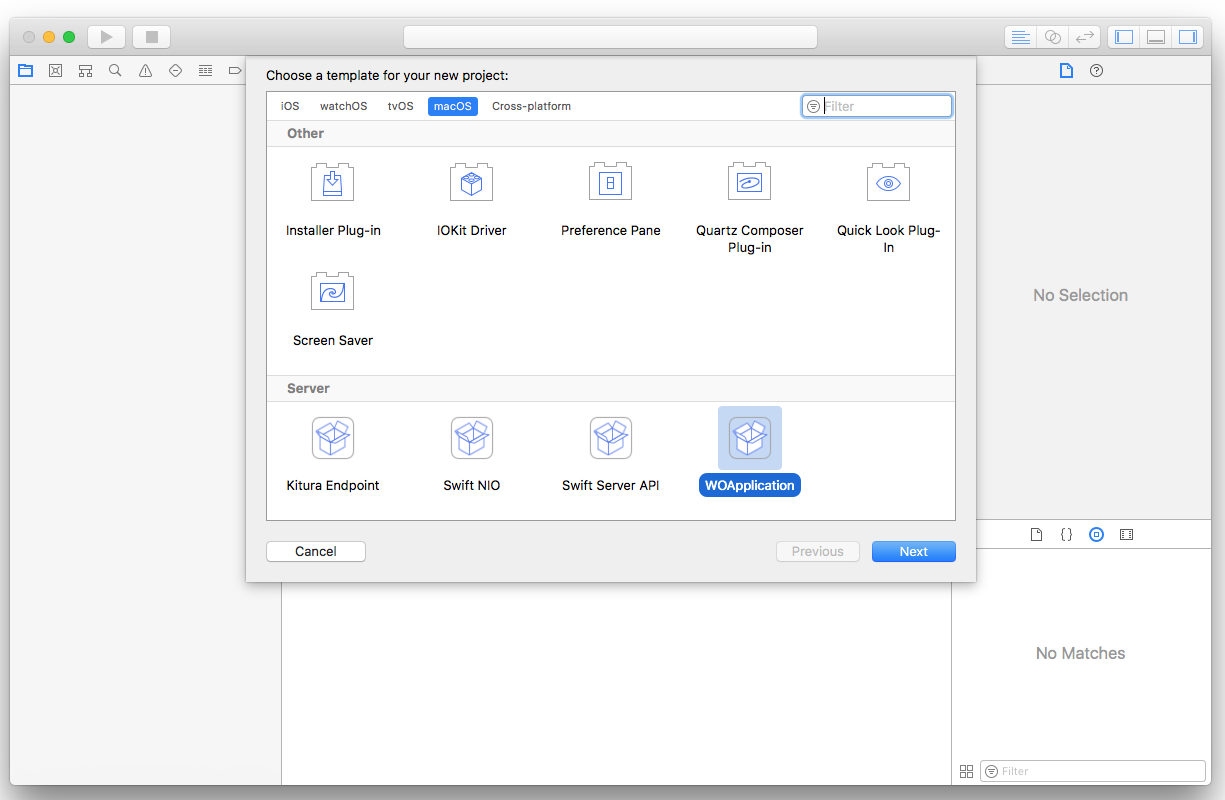
Create and Run First Project
Within Xcode, create a new project (⌘-Shift-N), go to the “macOS” section and select the “WOApplication” template, very much at the bottom of the inspector (pro tip: type “wo” in the filter field at the upper right):
Give your project a name, say “HelloWOrld” create it somewhere, and you should end up with something like this:
Press the Play/Run button to build and start the application. Open your favorite browser and navigate to http://localhost:1337/:
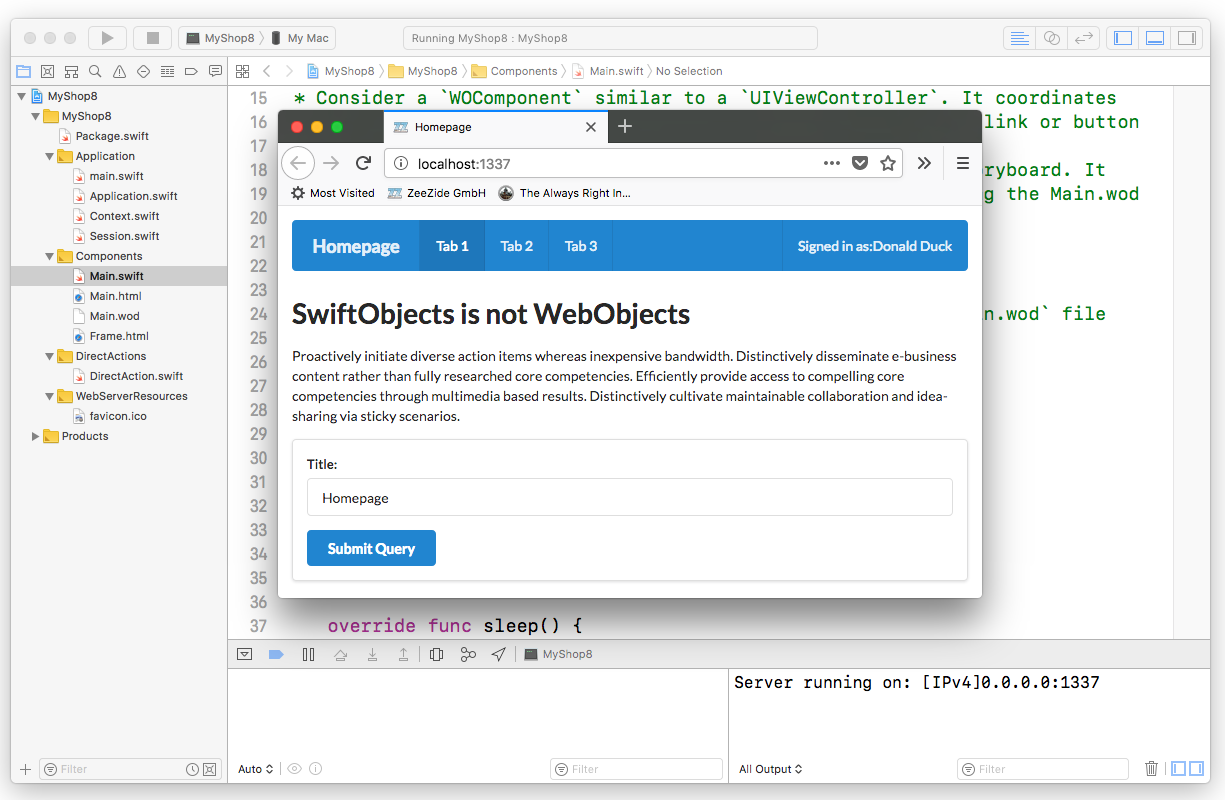
Yay. History is up and running!
As you see we got some default content in our HTML page. That it looks a little nice is because we embed the Semantic UI CSS framework. Doesn’t really matter here, you can use anything you like.
Try something: In the form at the bottom change “Homepage” to “Hello World” and press the “Submit Query button”. The title of the page will update:
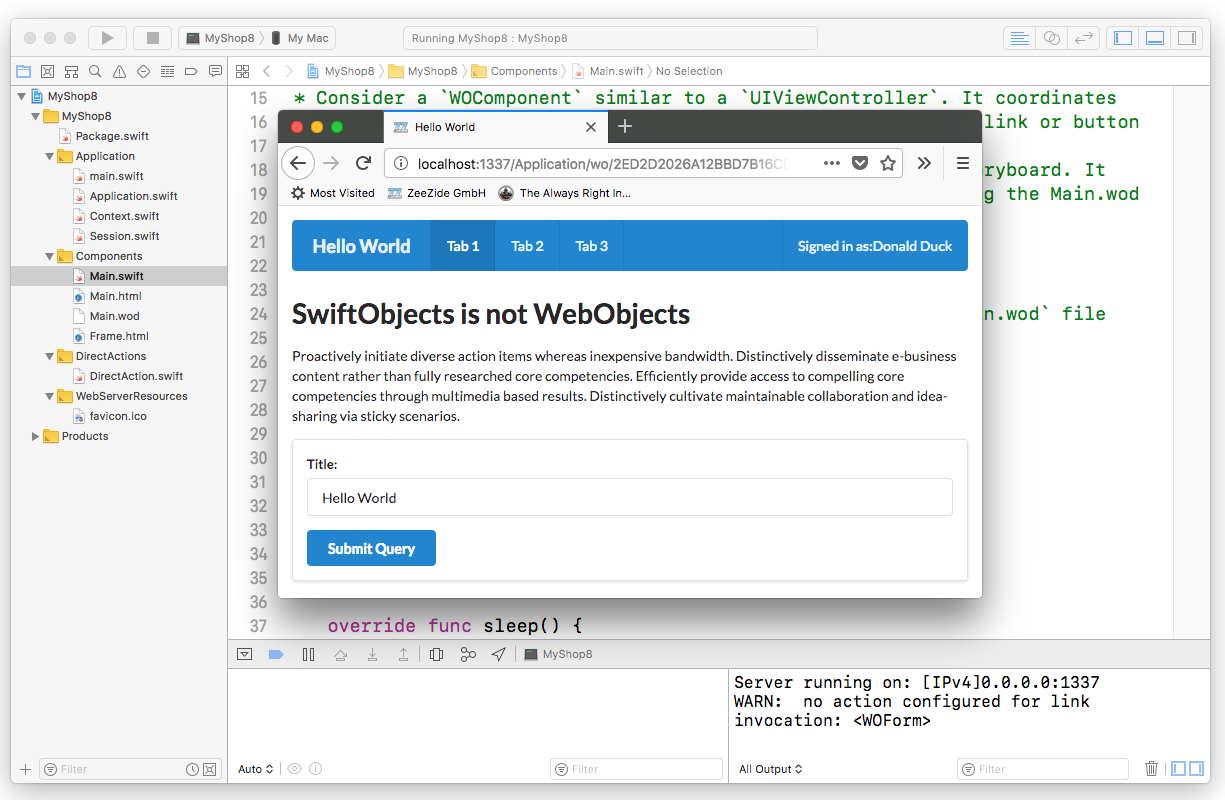
Also notice the URL in the browser, it now contains a URL generated by SwiftObjects. A so called “component action URL”. It follows the pattern we mentioned above: application name (just “Application”), request handler key (“wo” for “component action”), and extra stuff (in here, a session-id, a context-id and an element-id).
Basic Concepts
Before we continue, a small introduction on terminology and a high level overview.
WebObjects contains many cool ideas and concepts, but the key idea is to free the web application developer from having to think about low level HTTP things like “URLs”, “form parameters” or session management.
Target / Action
Consider this controller object, called a WOComponent in WebObjects:
class Main : WOComponent {
    var counter = 0

    func incrementCounter() -> Any? {
        counter += 1
        return nil // stay on page
    }
}
and this accompanying template:
<wo:a action="incrementCounter">++</wo:a>
It may display like this:
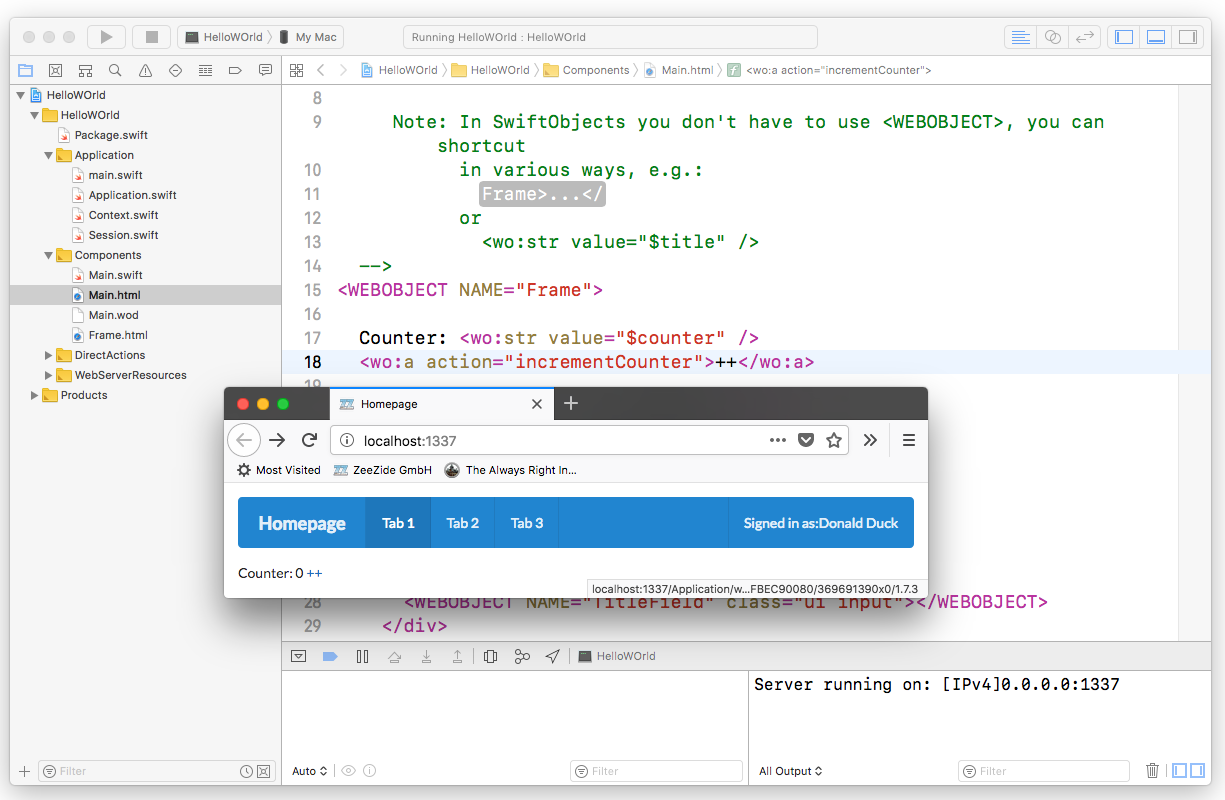
If you press the small ++ link, WebObjects will take care of everything and
call your incrementCounter
method, which increments the counter, and re-renders the page.
The
WOHyperlink
backing <wo:a> sends the component (the target) an
action (incrementCounter)
when the user clicks the link.
The WOHyperlink automatically generates a unique URL which represents the
action and preserves the state required to resurrect the component object for a
click.
Again: URL generation is automatic in WebObjects, the programmer does not have to concern himself about URLs, URL matching or anything like that! He wires up buttons to controllers using actions. Just like in UIKit!
Just like you don’t usually deal with a UIEvent in UIKit, you don’t usually have to deal with a WORequest in WO.
Model View Controller (MVC)
WebObjects generally follows the MVC paradigm.
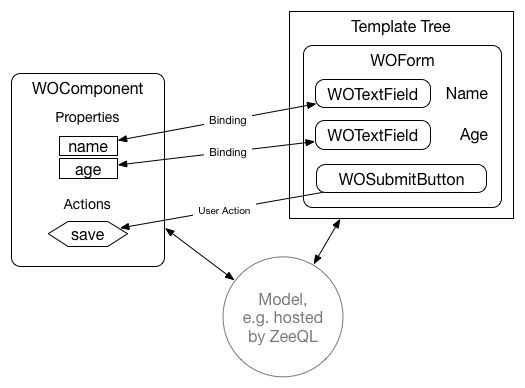
Controller
The
WOComponent
is the controller, similar to a
UIViewController.
It interacts with the view, the model and responds to user actions.
Components react to actions emitted by the controls in the view tree.
For example if the user clicks a link, a
WOHyperlink
will call an action method in the component.
Like in UIKit, a WOComponent can embed other components,
also known as controller containment.
This way you can build up a complex web page from different,
reusable components.
View
The view part is the “template”, a tree of
WODynamicElement
objects.
Unlike the “template engines” you probably know about,
a WebObjects template does not only render HTML.
It also processes input, like form values or reacts to link-clicks!
For example the
WOTextField
not only renders the <input type="text" value="abc"> HTML tag.
When a form POST request is received, it also extracts the corresponding
form value and pushes the value into the controller.
Like UIView’s, they do both, the “rendering” and the “event handling”.
Model
We don’t look at the model in this blog entry. In the original WebObjects you would usually use the Enterprise Objects Framework (EOF). Today’s CoreData is essentially a reduced version of EOF. In SwiftObjects you could use ZeeQL, or any other framework you like.
Similarities with UIKit
Let’s have a look at the WebObjects classes by looking at their UIKit counterparts. If you know UIKit, you’ll feel right at home in WebObjects.
A WODynamicElement
is like UIView, they “draw” the output (e.g. HTML)
and they handle events.
That they handle events is very different to other HTML templating frameworks.
Common elements are
WOHyperlink
(roughly a UIButton),
WOImage
(like a UIImageView),
WOTextField
(like a UITextField),
or
WOString
(like a UILabel).
WOComponents
are like UIViewControllers.
Their “view” is a template, which is just a tree of WODynamicElement’s
(just like UIViews form a hierarchy/tree).
They are the “controller” part in the MVC design pattern, and as in UIKit, you’ll have
Massive-View-Controller, if you don’t separate your concerns.
For that, like UIViewControllers (controller containment),
WOComponents can also be nested. Which means you
can build parts of a page from different components.
Note that this is again different from a simple template “include”,
in that the whole tree is also used for event processing.
The counterpart to UIEvent is essentially a
WORequest.
If the user clicks a link in the browser, the browser will emit an HTTP request.
This request is packaged in a WORequest on the WO server side.
That is usually tied to a
WOContext,
which also carries the
WOResponse,
into which the WODynamicElements are going to render their visual representation.
An application is represented as a
WOApplication
object, usually a singleton in the server.
It corresponds to the UIApplication object in iOS.
There is also a
WOAdaptor
object, which handles the HTTP protocol
(for SwiftObjects
we use SwiftNIO
to do that part).
Since a server doesn’t handle just one user but trillions, there is one extra class you
don’t have in UIKit:
WOSession,
which allows you to hold per-user information.
(Things which are “global” in UIKit like the current Locale, may needs to be done on a per
session or context basis in WO).
Summary:
UIView➜WODynamicElementUIViewController➜WOComponentUIEvent➜WORequestUIApplication➜WOApplication- ☁️ ➜
WOSession UIGestureRecognizer➜ 🤦♀️
Note(2020-12-27): Apple released SwiftUI in 2019. The concepts of SwiftUI are stunningly similar to WebObjects.
WOAssociations are essentially the same likeBindings,WODynamicElements are similar toViews w/o state,WOComponents areViews w/ state (orStateObject’s).
The setup of our example application
Now that we know the basic classes, let go back to our example and see what
the WOApplication template generated for us:

The Application group contains
the global
WOApplication
object, the thing required to start our HTTP server,
the Session and Context objects in case you want to customize them
(we won’t).
Instead let’s focus on the components. The default template contains two
components: Main and Frame. Main is rendered as the first page the
user sees when opening the application (like the initial view controller
in a storyboard). Frame is a reusable component which wraps around content of
the Main component.
Components are constructed from up to three files:
Controller: The Component.swift file
This contains the Swift controller class, treat it like a UIViewController. You can put properties and actions into that, which you can then bind to the view layer. Example:
import SwiftObjects

class Main : WOComponent {

    var title : String = "Hello World!"

    override func awake() { // kinda like `viewDidLoad()`
        super.awake()
        expose(doubleTitle, as: "doubleTitle") // a Swift wart
    }

    func doubleTitle() -> WOComponent? {
        title = title + title
        return nil // stay on this page
    }
}
Note: A component is not required to have a Swift class. Like Frame
in the boilerplate,
you can have just a template, but still access the dynamic elements from
within those!
If there is no custom Swift class, SwiftObjects will use the
WOComponent
class.
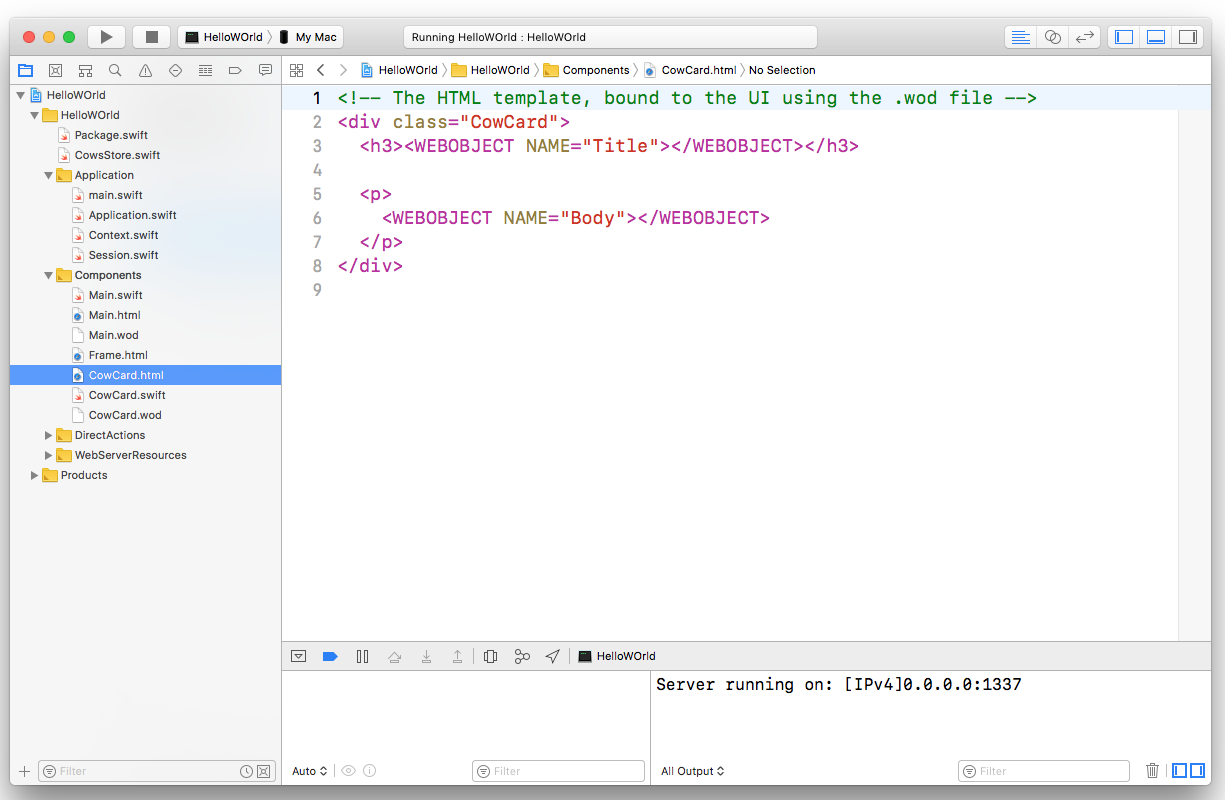
View: The Component.html file
The Component.html file contains the template associated with the controller. Remember that in WO the template is not just for rendering. It corresponds to what you do in a XIB file. You lay out the user interface and place dynamic elements into it.
<h1><WEBOBJECT NAME="Title"></WEBOBJECT></h1>
<p>
  Some text
</p>
<WEBOBJECT> tags are used to inject dynamic elements into the otherwise
static HTML content.
In original WebObjects you would only use those, but SwiftObjects also allows
you to add elements using either: <wo:Element bindings..> or
<#Element bindings ...>.
Historical sidenote: There used to be a visual design tool for WebObjects called “WebObjects Builder”. Just like in IB, you could wire up the web controls with the WOComponents. Here is a picture, and the WWDC 2000 video on how to use it.
Bindings: Component.wod
WOD stands for “WebObject Definitions”. In the template we only said we want a
WebObject called “Title”, we didn’t specify what it is and how it is configured.
This can be done in the .wod file:
Title: WOString {
  value          = title;
  valueWhenEmpty = "placeholder";
}
This says that the “Title” element is a
WOString
dynamic element (similar to a UILabel).
What follows is a set of “bindings”. The left side is a parameter supported
by the WOString, here
value
and
valueWhenEmpty.
The right side is a so called
WOAssociation,
usually either a
WOKeyPathAssociation
or a
WOValueAssociation.
The = title syntax results in a WOKeyPathAssociation.
When the WOString renders its HTML to the response, it will retrieve the
title property from the WOComponent, look above, this thing:
class Main : WOComponent {
    var title : String = "Hello World!" // ☜
    ...
}
That is, the WOString will render the text “Hello World”.
The = "placeholder" is a constant string. It is taken as-is. In this case
it means that if the title is empty, the WOString will render “placeholder”.
Template Shortcuts
When typing templates without WebObjects Builder, having to type in three files
quickly becomes annoying.
Hence SwiftObjects supports a few shortcuts. The example above can be written
without a .wod file, directly in the template:
<h1><#WOString value="$title" valueWhenEmpty="placeholder" /></h1>
Note how the $ is used to denote a keypath association.
This is another shortcut which uses a “shortname” for an element:
<h1><wo:str value="$title" valueWhenEmpty="placeholder" /></h1>
(other examples:
wo:if for WOConditional, wo:for for WORepetition,
wo:radio for WORadioButton, …)
Let’s build an own app: WOx
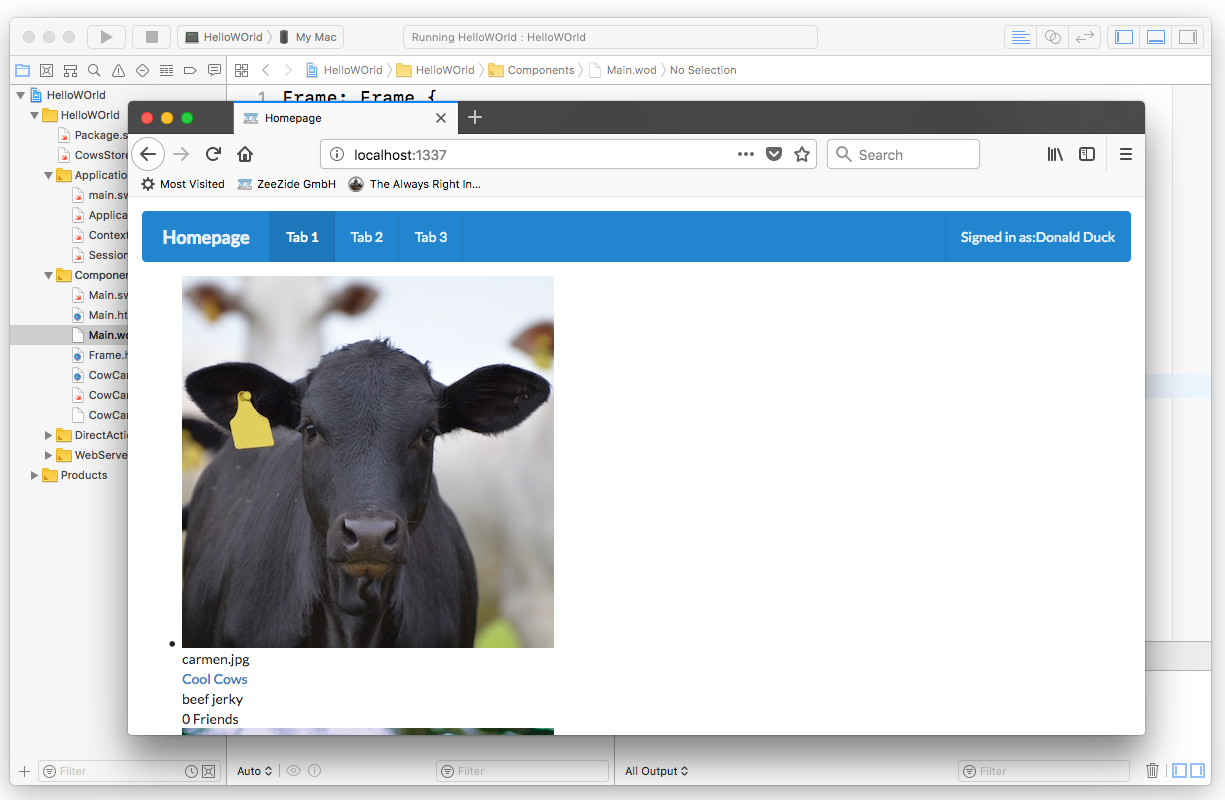
We’ll modify our application boilerplate a little. We want to use Semantic UI Cards to show a list of nice cows like that:
Step A: A store containing nice cows
First create a new Swift file called CowsStore.swift. This contains our
dummy model.
A basic Cow class, and a CowStore to maintain them:
final class Cow {
    // Shouldn't that be a struct?! No, we are demoing 90s tech!
    var info    : String = ""
    var image   : String = ""
    var friends : Int    = 0

    init(info: String = "", image: String = "", friends: Int = 0) {
        self.info    = info
        self.image   = image
        self.friends = friends
    }
}

final class CowStore {

    let urlPrefix = "http://zeezide.com/img/SquareCows/"
    static let shared = CowStore()

    var cows : [ Cow ] = [
        Cow(info: "beef jerky",
            image: "carmen.jpg", friends: 0),
        Cow(info: "CompuCow Discovers Bug in Compiler",
            image: "sowmya.jpg", friends: 1337),
        Cow(info: "This cow jumped over the Moon",
            image: "gustl.jpg", friends: 42)
    ]
}
Step B: Render the cows as a list on the Main page
Next open the Main.swift. On this page we want to show the list of our cows.
Change the title property to WOx and expose the store as a page property.
Also, add a property called cow. It should look like this:
final class Main : WOComponent {

    var title = "Homepage"
    let store = CowStore.shared
    var cow   : Cow? = nil
    ...
}
Then open the Main.html and drop everything but the Frame top-level tag.
Add this:
<!-- Main.html -->
<WEBOBJECT NAME="Frame">
    <ul>
        <WEBOBJECT NAME="CowList">
            <li><WEBOBJECT NAME="CowInfo"></WEBOBJECT></li>
        </WEBOBJECT>
    </ul>
</WEBOBJECT>
Next we need to define the objects, so open the Main.wod, drop everything
but the Frame and add:
// Main.wod
Frame: Frame {
    title = title;
}

CowList: WORepetition {
    list = store.cows;
    item = cow;
}

CowInfo: WOString {
    value = cow.info;
}
If you restart the app and connect to http://localhost:1337/, you should now see something like this:
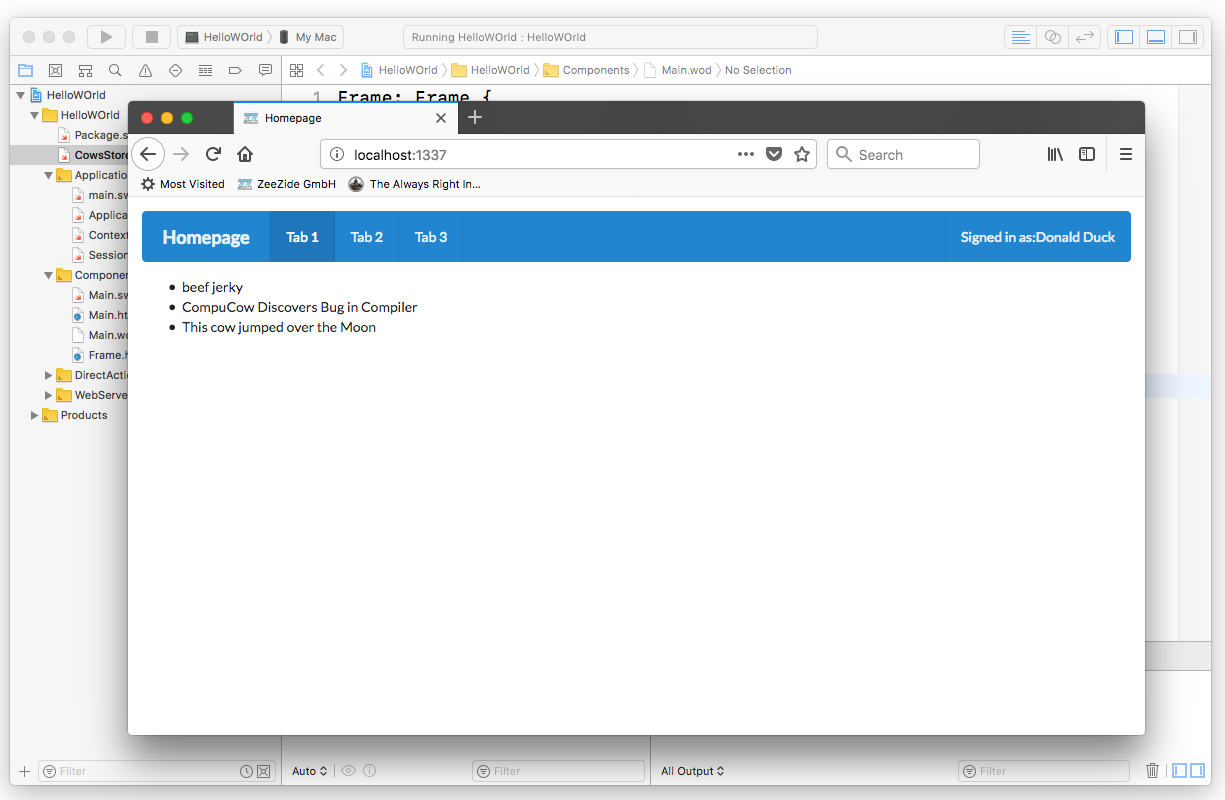
In the “view” layer we created a
WORepetition,
which kinda acts like a UICollectionView:
it displays a bunch of items. Let’s look at it:
CowList: WORepetition {
    list = store.cows;
    item = cow;
}
list and item are parameters the
WORepetition
supports. We bind the keypath store.cows to the list.
store is the CowsStore property in our Main class.
And that CowsStore has a cows property we access
(an array of Cow objects).
When the page is rendered, the repetition will loop over that array and
repeat its contents. While looping, the repetition will set the item
binding to the current item in the list.
Because we bind the item = cow, the repetition will push the current
value to the cow property in our Main class.
Now looking into what is contained in the repetition, we have a:
CowInfo: WOString {
    value = cow.info;
}
Remember, the repetition pushed the current cow into our cow property,
it contains the current cow from our cow array.
Now the
WOString
value argument is bound to the cow.info keypath.
Which grabs the info property out of the cow and renders that on screen.
Step C: A reusable Cow’mponent - CowCard.wo
Above we loop over the cows, and display a property of each using a
WOString.
This is awesome already, but we actually want to display nice
Semantic UI Cards
with all the important cow info.
To do this, we are going to create a reusable component. Select the
Components group in Xcode, then invoke the new file panel (⌘-N).
In that panel, select the WOComponent template:
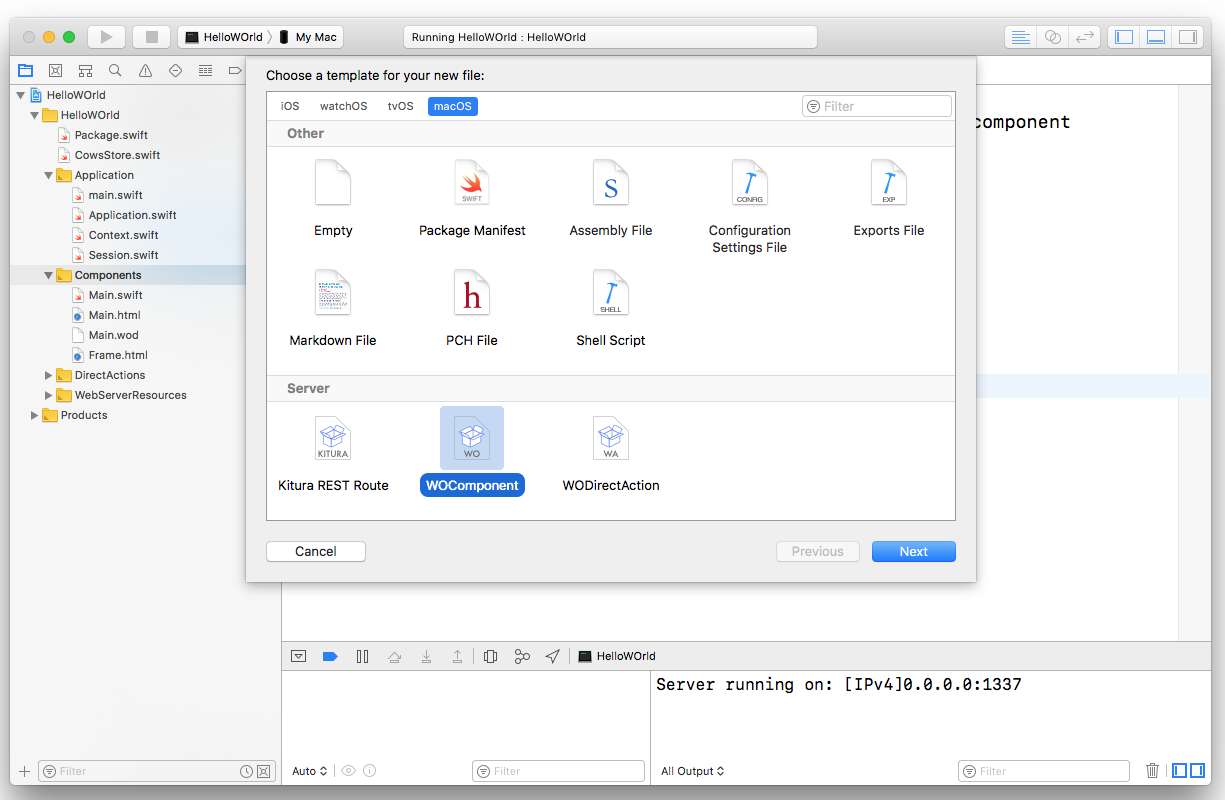
Call the file CowCard and make sure to place it in the Components folder,
you’ll end up w/ something like this:
Xcode creates a full component for you: The CowCard.swift, CowCard.html and
CowCard.wod. Open the CowCard.html and drop the whole content. Insert this
instead:
<!-- CowCard.html -->
<div class="card">
  <div class="image">
    <img src="http://zeezide.com/img/SquareCows/<wo:str value="$cow.image" />">
  </div>
  <div class="content">
    <div class="header"><wo:str value="$cow.image" /></div>
    <wo:div class="meta">
      <a>Cool Cows</a>
    </wo:div>
    <wo:div class="description"><wo:str value="$cow.info" /></wo:div>
  </div>
  <div class="extra content">
    <span>
      <wo:str value="$cow.friends" /> Friends
    </span>
  </div>
</div>
This uses the shortcut syntax we explained before. It is the boilerplate
for Semantic UI Cards,
with dynamic
WOString
items that bind to a cow key.
Edit Main.wod and change it so, that it doesn’t use a WOString anymore,
but our fresh CowCard component:
// Main.wod
CowInfo: CowCard {
    cow = cow;
}
This cow = cow looks funky. The left side cow is the parameter of the
CowCard component (the one we use in the template above).
We pass over the full, current, cow (to the WOString we just passed the
cow.info).
Restart your app and it should look like:
This looks a bit off, but notice that in our Main component we only changed
the WOString to our new CowCard, and tweaked the binding a little.
It shows how easily and quickly you can switch between components, and thereby
designs or different views on the same data.
It still looks a bit wrong, because in Main.html we put the cow cards into
a plain HTML list <ul><li>. Open Main.html and add the necessary Semantic UI
magic:
<!-- Main.html -->
<WEBOBJECT NAME="Frame">
  <div class="ui link cards">
    <WEBOBJECT NAME="CowList">
      <WEBOBJECT NAME="CowInfo"></WEBOBJECT>
    </WEBOBJECT>
  </div>
</WEBOBJECT>
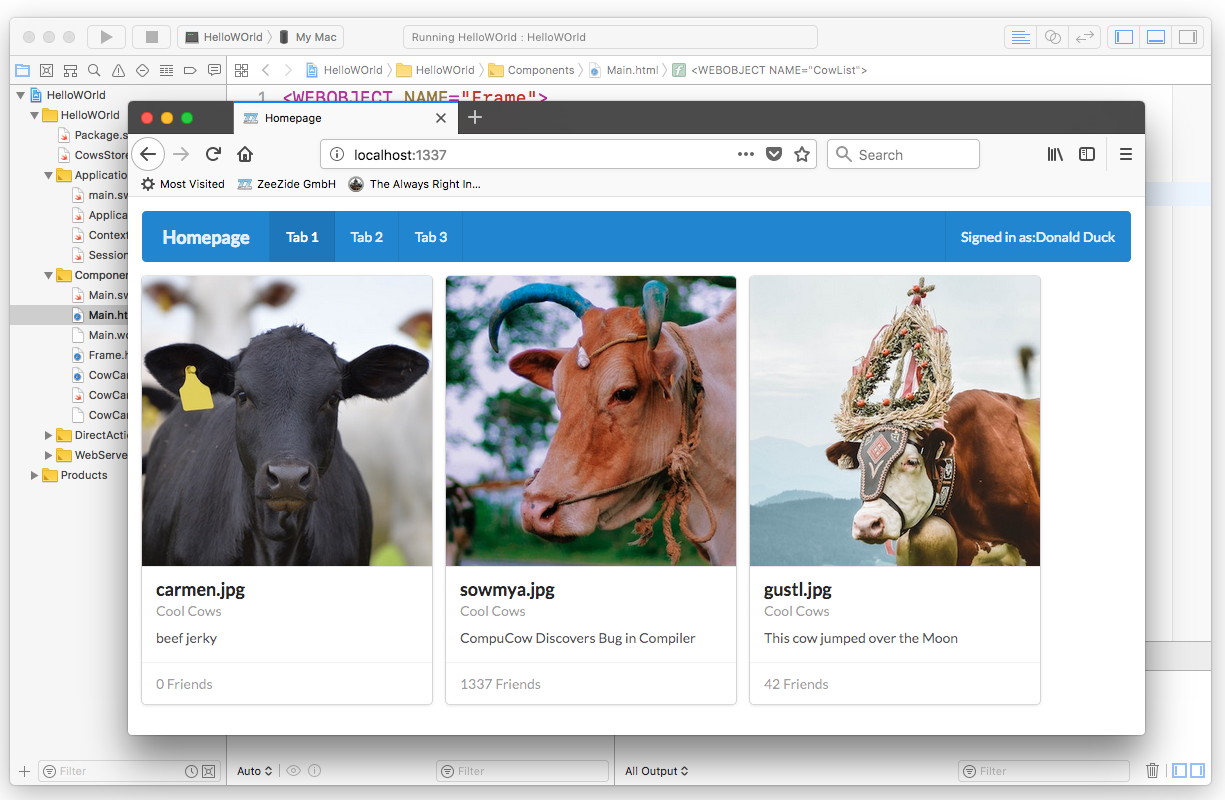
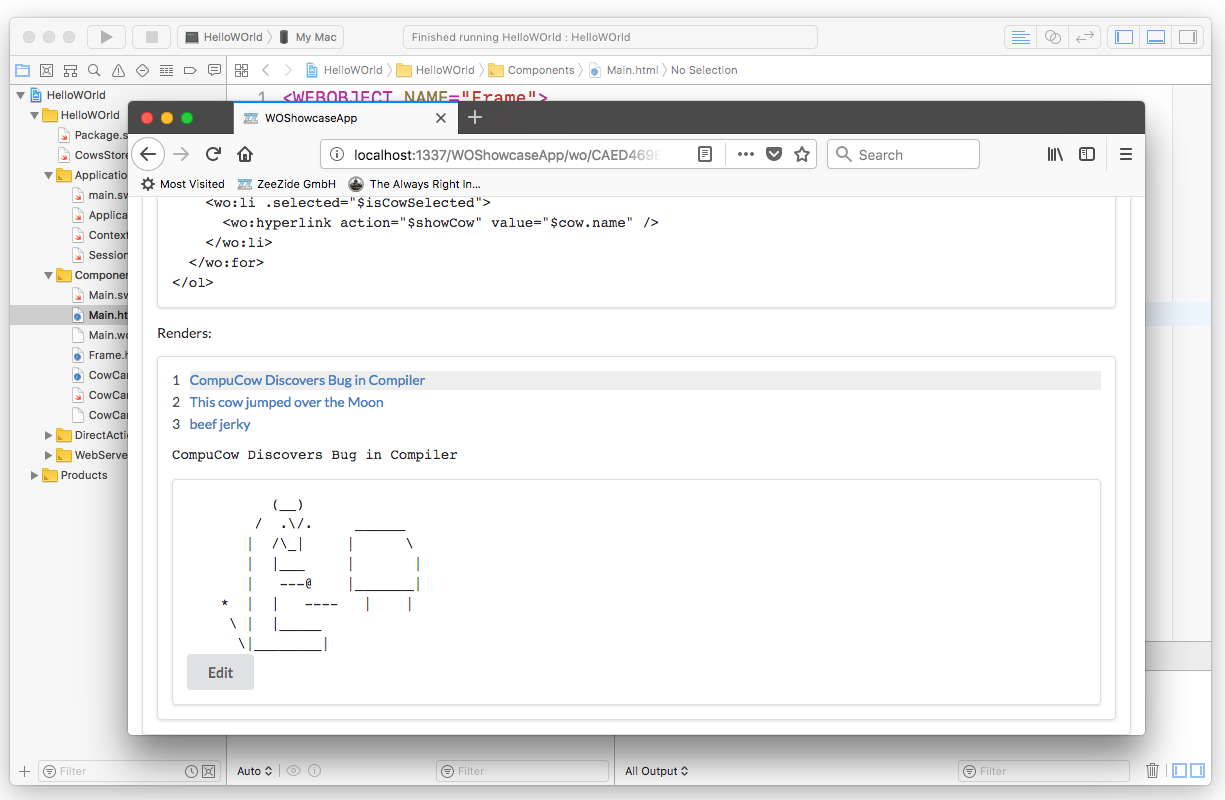
Gives:
Aren’t those nice cow cards? You can’t but admit that they are!
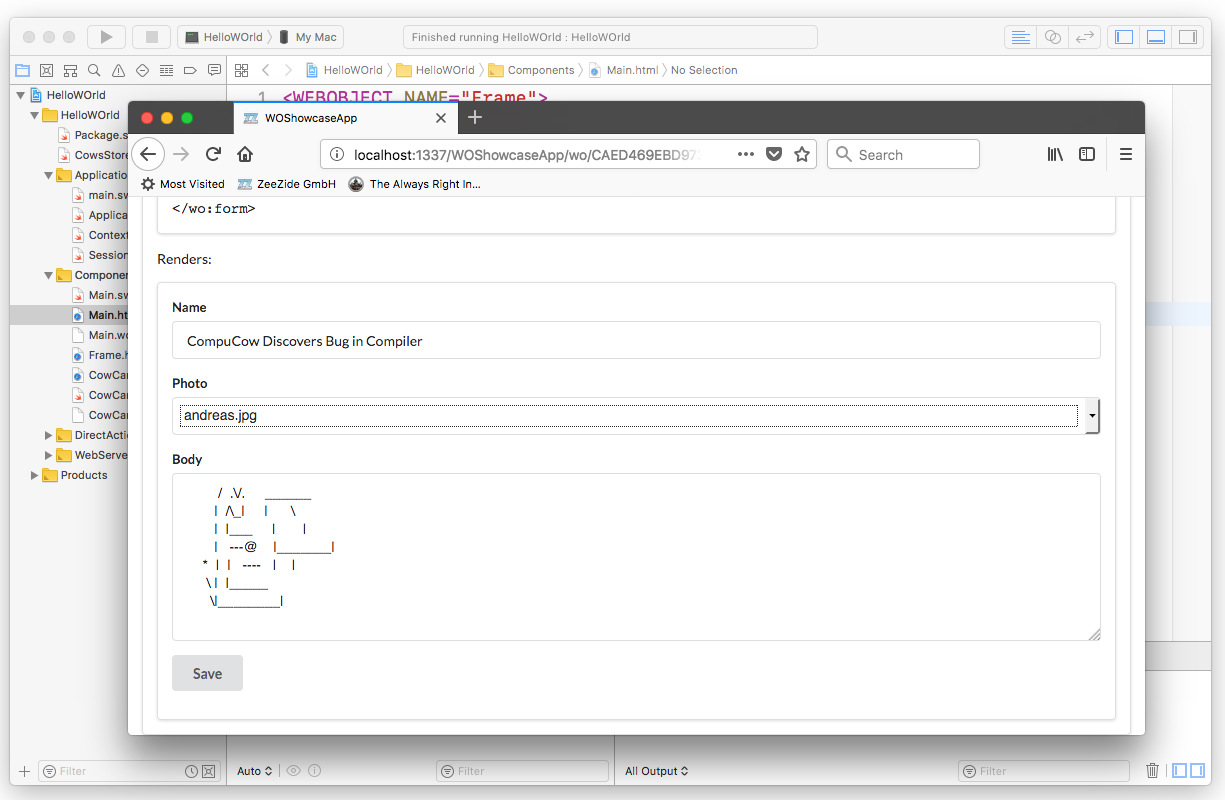
We only scratched the surface, but could hopefully pass on a feeling on how using “WebObjects” feels like. The cow demo is also part of our small WOShowcase app, which comes w/ SwiftObjects. That app also demos how to create new cows and how to edit cows, w/o having to deal with form parameters or any such HTTP annoyances:
Other WebObjects Frameworks
The WebObjects framework is just one part of the larger WebObjects “product”. WebObjects also came with other increbily powerful frameworks:
- Enterprise Objects Framework (EOF), an Object Relation Mapper (ORM). CoreData is essentially a reduced version of this. With EOF you could access arbitrary databases (say Oracle or Frontbase). (ZeeQL is our Swift take on this)
- Direct-To-Web (D2W). This is a rule evaluation system built around KVC. You can find a small intro over here SOPE Rule System and here. This seems to be a nice video about it.
- Direct-To-JavaClient (D2JC). Like D2W, this would automagically build Java Swing client applications. Duh. (Direct to SwiftUI is our Swift take on this)
- Direct-To-Web-Services. You know, when “WebServices” was the big hype ;-)
Caveats
Key value Coding
WebObjects relies heavily on KVC (Key/Value Coding), which is not available in (pure) Swift, nor are the necessary reflection capabilities. We provide workarounds, but such aren’t great.
Not having this removes a lot of the beauty of WebObjects from SwiftObjects. We very much hope that we are going to eventually have better reflection in Swift 5.
Web 2.0, AJAX and beyond
Most of the stuff shown is nice and useful for building Web 1 applications. That is, applications which would render their UI as HTML, on the server side, with little or no logic running in the browser.
This isn’t universally true, but todays application servers are mostly API endpoints for Web 2.0 applications running in the browser. I.e. the server is mostly hosting the model, and none of the UI anymore. While SwiftObjects has some features to support AJAX (e.g. page fragments via WOFragment), it is not how you usually build applications today.
Hence in BIG LETTERS: This is a demo and an experiment to see whether and how the WebObjects API might work in Swift. Do not try this at home, it is not how you write web servers nowadays!
If you like what you’ve seen and you are looking for a modern client framework
allowing for similar component reuse, I can highly recommend
Vue.js. This is a lot like WebObjects on the client side
(nesting components, bindings, and all the nice stuff).
Usecase: OpenGroupware.org
(The now kinda extinct)
OpenGroupware.org
is definitely the largest OpenSource application based on WebObjects technology
that exists. Maybe even the largest WO application ever.
If you know Basecamp (the RoR application), OGo is like a Web 1.0
predecessor of that.
It does contact, project, meeting management, todo lists, and even
includes an IMAP4 email client.
All with an old-school Web 1.0 interface, so take care of your eyes, this is how it looked:
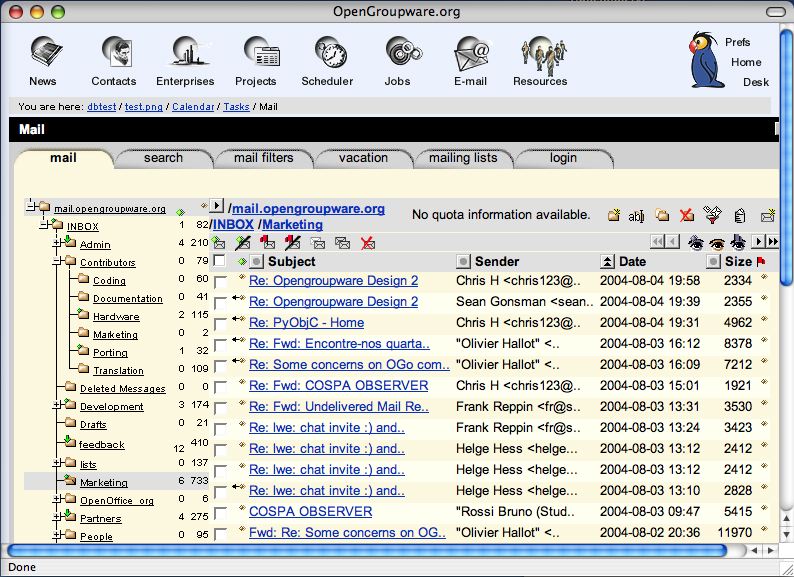
Yes, it is ugly by todays standards (and probably even back then). Yet consider the complex UI with many tabs, sortable table views, an outline tree view, and so on. This was only possible because the UI was composed from many different reusable components. Feel free to browse the sources of OGo, it is a big application with loads of components.
Today OGo is very much outdated. As a replacement with less functionality but much better scalability and REST behaviour, we wrote ScalableOGo which combines WebObjects ideas with a lot of the features/ideas of Zope 2. While ScalableOGo is still being deployed today (the code was hi-jacked by a Candian company), it is neither scalable nor modern anymore either 🤓
Links
- SwiftObjects
- WOCommunity.org
- Other cool ARI projects:
- Direct to SwiftUI
- SwiftUI Rules
- ZeeQL (an EOF/CoreData like framework for Swift)
- Macro.swift
- Swift NIO IRC (an IRC server, web client, Eliza chatbot written in Swift NIO)
- Swift NIO Redis (a Redis in-memory database server, written in Swift NIO)
- µExpress (a micro web framework for Swift NIO, Express-like API, also a tutorial on how to write this from scratch)
- SwiftXcode (use Swift Package Manager projects directly within Xcode)
- mod_swift (write Apache modules in Swift!)
- Noze.io (Node.js like, but typesafe, async-IO streams)
- Legacy
- Technologies
- Videos on WebObjects
- Other WebObjects Lookalikes
- GETobjects (Java port of SOPE)
- SOPE (Objective-C WO API and much more)
- Apache Tapestry (Java)
- GNUstepWeb (Objective-C)
- Wotonomy
- Seaside.st (Smalltalk)
- Project Wonder
- Wikipedia on WebObjects
Contact
Hey, we hope you liked the article and we love feedback!
Twitter, any of those:
@helje5,
@ar_institute.
Email: me@helgehess.eu.