
µExpress - Using the Swift Server API 0.1.0
 In
Using the Swift Server API 0.1.0
we wrote a straight Google replacement using just the
raw Swift Server API.
This time we are going to write a micro server framework wrapping that API.
Say
In
Using the Swift Server API 0.1.0
we wrote a straight Google replacement using just the
raw Swift Server API.
This time we are going to write a micro server framework wrapping that API.
Say Hello World to MicroExpress!
2018-03-01 Breaking News: The Swift Server API has been sherlocked. Checkout our follow up article: A micro tutorial on Swift NIO.
If you haven’t read Using the Swift Server API 0.1.0, we suggest you do this first. The article explains the basics of the Swift Server API.
Swift Server API Series: Part1 - Raw API ✭ Part2 µExpress ✭ Part3 µExpress/NIO
The goal. Instead of providing a low level handler function, we want to write a Swift service Express.js-like, using middleware and routing:
import MicroExpress

let app = Express()

app.get("/moo") { req, res, next in
  try res.send("Muhhh")
}
app.get("/json") { _, res, _ in
  try res.json([ "a": 42, "b": 1337 ])
}
app.get("/") { _, res, _ in
  try res.send("Homepage")
}

app.listen(1337)
We also throw in support for JSON. And all that with just a µscopic amount of code. The final package has a little more than 200 lines of code (as if that would say anything).
To get there we are going to add this to the raw Swift Server API 0.1.0:
- a response object, and an improved request object
- “middleware”
- a router that can handle predicates (match methods and paths)
- fun stuff
There is a little setup overhead before we can actually see something, but not that much - a few files, it is µ - so stick with us. And if you are really lazy and just want to follow along, you can clone the finished project at GitHub 🤓
Step 0: Prepare the package
Setup the Swift package:
$ mkdir MicroExpress && cd MicroExpress
$ swift package init --type executable
Creating executable package: MicroExpress
Creating Package.swift
Creating README.md
Creating .gitignore
Creating Sources/
Creating Sources/MicroExpress/main.swift
Creating Tests/
We are starting out w/ a
tool(executable) project, not alibraryone. We’ll change this later!
As
last time
we are going to use the
0.1.0 version of the API
(the first and only release so far),
so add this to the dependencies section of the
Package.swift
file:
dependencies: [
  .package(url: "https://github.com/swift-server/http",
           from: "0.1.0")
],
And make MicroExpress depend on it:
.target(
  name: "MicroExpress",
  dependencies: [ "HTTP" ]),
You don’t have to but most people are going to use Xcode, so let’s create an Xcode project for the package:
$ swift package generate-xcodeproj
  generated: ./MicroExpress.xcodeproj

$ open MicroExpress.xcodeproj # and Xcode should open
Excellent, we have a proper development environment.
Within Xcode make sure you select the MicroExpress scheme
(it will point to the wrong scheme by default)!
You may also need to make sure that the target is “My Mac”, not some iOS
device or simulator.
If you are on Linux or don’t want to use Xcode on macOS, you can simply build the package using
swift buildand run the resulting executable usingswift run.
Step 1: Enhanced Request/Response object
IncomingMessage
When the Swift Server API 0.1.0 receives a request,
it passes over a
HTTPRequest
struct.
We are going to wrap that in an own IncomingMessage class.
The primary enhancement of this class is the userInfo
storage. The storage can later be used by middleware to pass along
data to subsequent middleware.
When creating the file
IncomingMessage.swiftin Xcode, make sure it goes intoSources/MicroExpressand make sure to select the proper target:MicroExpress(again Xcode defaults to the wrong one).
GitHub: IncomingMessage.swift
// File: IncomingMessage.swift - create this in Sources/MicroExpress

import HTTP

public class IncomingMessage {

  public let header   : HTTPRequest // Swift Server API
  public var userInfo = [ String : Any ]()

  init(header: HTTPRequest) {
    self.header = header
  }
}
Why are we wrapping this instead of just using the API struct? For one, as a struct,
HTTPRequestcannot be extended with additional stored properties (yet?). Which we need to associate more data w/ the request. Also, we are going to pass the request around a lot. Passing it around by reference is cheaper than copying the struct all the time. Finally:HTTPRequestrepresents just the HTTP header, not the actual HTTP message (i.e. not the body).
This is how you get the HTTP method, the request URL, and the User-Agent:
print("Method: \(request.header.method)")
print("URL:    \(request.header.target)")
print("UA:     \(req.header.headers["User-Agent"] ?? "-")")
(Feel free to add convenience properties/functions/subscripts to
IncomingMessage,
for this we want to keep it µ.)
ServerResponse
In the
v0.1.0 iteration
of the Swift Server API,
its
HTTPResponse
struct doesn’t really serve a purpose
within the API and isn’t actually used by the
HTTPResponseWriter.
So we skip it altogether and just wrap the
HTTPResponseWriter,
which is used to send data back to the client.
Our class just adds a slightly more convenient send function. Right now it
can only send text back to the browser.
GitHub: ServerResponse.swift
// File: ServerResponse.swift - create this in Sources/MicroExpress

import HTTP

open class ServerResponse {

  /// Feel free to set an own response status here,
  /// defaults to 200 .ok.
  public var status  = HTTPResponseStatus.ok

  /// Response headers. Feel free to add more.
  public var headers = HTTPHeaders()

  /// Our connection to the client/browser.
  fileprivate var writer : HTTPResponseWriter

  /// Flag to track whether we wrote the response header
  private var didWriteHeader = false

  init(writer: HTTPResponseWriter) {
    self.writer = writer
  }

  /// An Express like `send()` function.
  open func send(_ s: String) throws {
    try flushHeader()   // make sure the response header is out
    writer.writeBody(s) // we ignore the result :->
    writer.done()       // tell the API we are done
  }

  /// Check whether we already wrote the response header.
  /// If not, do so.
  func flushHeader() throws {
    guard !didWriteHeader else { return } // done already
    didWriteHeader = true
    writer.writeHeader(status: status, headers: headers)
  }
}
We do not handle errors here and assume all goes well. It always does, right?
How do you use it, simple:
try response.send("Hello World!")
Want to set the HTTP status and add a header?
response.status = .notFound
response.headers["X-Powered-By"] =
  "MicroExpress/0.13.37"
try response.send("404 - Not Found")
Step 2: Middleware
The term “middleware” has many meanings, but in the context of Connect / Express.js it is simply a closure/function which can opt in to handle a HTTP request (or not).
A middleware function gets a request, a response and
another function to call if it didn’t (completely) handle
the request (next).
Example middleware function:
func moo(req  : IncomingRequest,
         res  : ServerResponse,
         next : () -> ())
{
  res.send("Moooo!")
}
Usually you don’t write the middleware as a regular function, but you pass it over as a trailing closure when adding it to a router:
app.use { req, res, next in
  print("We got a request:", req)
  next() // do not stop here
}
In Swift a middleware can be expressed by a simple typealias:
GitHub: Middleware.swift
// File: Middleware.swift - create this in Sources/MicroExpress

public typealias Middleware =
         ( IncomingMessage,
           ServerResponse,
           () -> ()
         ) throws -> Void
That’s it. There is no magic to a middleware, it is just a simple function!
Step 3: Router
In real
Express
there is a little more to it
(mounting etc.),
but for our purposes think of a router as a simple list of
middleware functions.
Middleware is added to that list using the use() function.
When handling a request, the router just steps through its list
of middleware until one of them doesn’t call next.
And by that, finishes the request handling process.
GitHub: Router.swift
// File: Router.swift - create this in Sources/MicroExpress

open class Router {

  /// The sequence of Middleware functions.
  private var middleware = [ Middleware ]()

  /// Add another middleware (or many) to the list
  open func use(_ middleware: Middleware...) {
    self.middleware
      .append(contentsOf: middleware)
  }

  /// Request handler. Calls its middleware
  /// in sequence until one doesn't call
  /// `next()`.
  func handle(request  : IncomingMessage,
              response : ServerResponse,
              next     : () -> () = {})
         throws
  {
    var didCallNext = true // to handle the empty case

    // loop over each middleware, call it until one
    // doesn't call `next`
    for middleware in middleware {
      didCallNext = false

      try middleware(request, response) {
        didCallNext = true
      }

      // did the middleware call `next()`?
      // if not, stop, request is handled
      guard didCallNext else { break }
    }

    if !didCallNext { return } // done

    // All of the middleware called next(),
    // none handled the request.
    response.status = .internalServerError
    try response.send("No middleware handled the request!")
  }
}
Note: This leaves out Error middleware and just throws. ExExpress has an implementation of that, if you want to see how you might implement that part.
This doesn’t do any actual routing yet 😀, but we’ll get to that soon!
How do you use it - as shown before:
router.use { req, res, next in
  print("We got a request:", req)
  next() // do not stop here
}
router.use { _, res, _ in
  res.send("hello!") // response is done.
}
router.use { _, _, _ in
  // we never get here, because the
  // middleware above did not call `next`
}
OK, we are really close now! One more thing and we do the first demo :-)
Step 4: App - Express
The application object is two things: The actual HTTP server using the API, and it is itself a router. It hooks up the Swift Server API w/ our infrastructure.
GitHub: Express.swift
// File: Express.swift - create this in Sources/MicroExpress

import Foundation
import HTTP

open class Express : Router {

  override public init() {}

  /// Start the HTTP server on the given port.
  /// Note: This function never returns.
  open func listen(_ port: Int) {
    let server = HTTPServer()
    do {
      // Ask the Swift Server API to create a HTTP server,
      // and pass over the request handler function.
      try server.start(port: 1337) {
        header, writer in

        // create our API wrappers
        let req = IncomingMessage(header: header)
        let res = ServerResponse (writer: writer)

        // trigger Router
        do {
          try self.handle(request: req,
                          response: res)
        }
        catch {
          res.status = .internalServerError
          try? res.send("Swift Error:" +
                        " \(error)")
        }

        // We do not process `POST` input in MicroExpress 😎
        return .discardBody
      }
    }
    catch {
      fatalError("failed to start server:" +
                 " \(error)")
    }

    // never exits:
    RunLoop.current.run()
  }
}
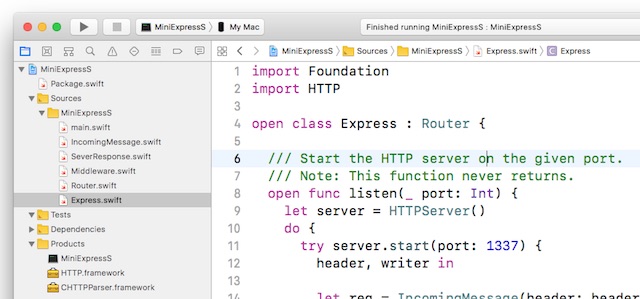
Yay! That is all we need. Your Xcode should look a little like this:
GitHub: You can find this setup in the tutorial/1-hello-world branch.
Finally! MicroExpress “Hello World”
Now we have everything in place to do an actual hello world,
using “middleware” and all that.
Open the main.swift file, which currently just has
a print("Hello, world!").
Let’s make that server side!
GitHub: main.swift
// File: main.swift - update existing file

let app = Express()

// Logging
app.use { req, res, next in
  print("\(req.header.method): " +
        "\(req.header.target)")
  next() // continue processing
}

// Request Handling
app.use { _, res, _ in
  try res.send("Hello, Schwifty world!")
}

app.listen(1337)
Compile it, run it, access it using: http://localhost:1337/ 
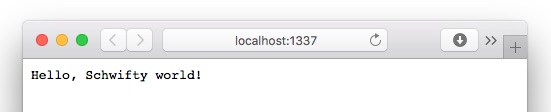
On the Xcode console your should see something like that:

Note how the logging middleware logs our request using Swift print,
and then the execution continues with the actual handler middleware.
Xcode users: If you see stops in the Xcode debugger related to
SIGPIPE, run this in the lldb shell:process handle SIGPIPE -n true -p true -s false(then presscto continue).
Step 5: Have: use(). Want: get(path)!
Above we use use() to register our middleware.
This is not what we usually do in Express,
we usually use get(), post(), delete() etc w/ a path
to register middleware,
for example:
app.get("/moo") { req, res, next in
  try res.send("Muhhh")
}
This is only triggered if the HTTP method is GET and the URL path
starts with /moo.
Suprisingly trivial to add to Router.swift:
GitHub: Router.swift
// File: Router.swift - add this to Router.swift
public extension Router {

  /// Register a middleware which triggers on a `GET`
  /// with a specific path prefix.
  func get(_ path: String = "",
           middleware: @escaping Middleware)
  {
    use { req, res, next in
      guard req.header.method == .get,
            req.header.target.hasPrefix(path)
       else { return next() }

      try middleware(req, res, next)
    }
  }
}
The trick here is that we embed the middleware within another middleware.
The enclosing middleware only runs the embedded one
when the HTTP method and path matches,
otherwise it just passes on using next.
Using this we can now actually “route”, for example:
app.get("/hello") { _, res, _ in
  res.send("Hello")
}
app.get("/moo")   { _, res, _ in
  res.send("Moo!")
}
Step 6: Reusable Middleware
Middleware functions can do anything you like,
but quite often reusable middleware
extracts data from the request and passes on a parsed form to the actual
“handler” middleware.
It could be some form of Auth, or JSON body parsing, or:
One thing you often want to do: parse query parameters.
Let’s do a reusable middleware for that!
GitHub: QueryString.swift
// File: QueryString.swift - create this in Sources/MicroExpress

import Foundation

fileprivate let paramDictKey =
                  "de.zeezide.µe.param"

/// A middleware which parses the URL query
/// parameters. You can then access them
/// using:
///
///     req.param("id")
///
public
func querystring(req  : IncomingMessage,
                 res  : ServerResponse,
                 next : () -> ())
{
  // use Foundation to parse the `?a=x`
  // parameters
  if let queryItems = URLComponents(string: req.header.target)?.queryItems {
    req.userInfo[paramDictKey] =
      Dictionary(grouping: queryItems, by: { $0.name })
        .mapValues { $0.flatMap({ $0.value })
	               .joined(separator: ",") }
  }

  // pass on control to next middleware
  next()
}

public extension IncomingMessage {

  /// Access query parameters, like:
  ///
  ///     let userID = req.param("id")
  ///     let token  = req.param("token")
  ///
  func param(_ id: String) -> String? {
    return (userInfo[paramDictKey]
       as? [ String : String ])?[id]
  }
}
We use the IncomingMessage.userInfo property to persist the parsed query
parameters and pass it on to subsequent middleware.
Want to try it? You could modify the main.swift like this:
app.use(querystring) // parse query params

app.get { req, res, _ in
  let text = req.param("text")
          ?? "Schwifty"
  try res.send("Hello, \(text) world!")
}
Then call it like this: http://localhost:1337/?text=Awesome.
Step 7: JSON API using Codable
So far we just sent plain texts to the browser. Let’s enhance our microframework to support a JSON API, and implement the read part of the famous Todo-Backend API:

First thing we need is a model containing the data we want to deliver to the API client. In this case a list of todos (the real API has more fields, but it is enough to get going):
GitHub: TodoModel.swift
// File: TodoModel.swift - create this in Sources/MicroExpress

struct Todo : Codable {
  var id        : Int
  var title     : String
  var completed : Bool
}

// Our fancy todo "database". Since it is
// immutable it is webscale and lock free,
// if not useless.
let todos = [
  Todo(id: 42,   title: "Buy beer",
       completed: false),
  Todo(id: 1337, title: "Buy more beer",
       completed: false),
  Todo(id: 88,   title: "Drink beer",
       completed: true)
]
Note that we are using the Swift 4
Codable
feature.
To deliver the JSON to the client, we enhance our ServerResponse object
with a json() function (similar to what Express does).
It can deliver any Codable object as JSON:
GitHub: ServerResponse.swift
// File: ServerResponse.swift - add this to ServerResponse.swift

import Foundation

public extension ServerResponse {

  /// Send a Codable object as JSON to the
  /// client.
  func json<T: Codable>(_ model: T) throws {
    // create a Data struct from the object
    let data =
          try JSONEncoder().encode(model)

    // setup headers
    headers["Content-Type"]   =
               "application/json"
    headers["Content-Length"] =
               "\(data.count)"

    // send the headers and the data
    try flushHeader()
    writer.writeBody(data)
    writer.done()
  }
}
Finally, let’s create a middleware which sends our todos to the client:
GitHub: main.swift
// File: main.swift - add this to main.swift

app.get("/todomvc") { _, res, _ in
  // send JSON to the browser
  try res.json(todos)
}
To check whether it works, rebuild and rerun the project. Then open http://localhost:1337/todomvc/ in the browser. You should see the proper JSON:
[ { "id": 42,   "title": "Buy beer",
    "completed": false },
  { "id": 1337, "title": "Buy more beer",
    "completed": false },
  { "id": 88,   "title": "Drink beer",
    "completed": true  } ]
Let’s try our API with the actual TodoBackend client:
http://todobackend.com/client/index.html?http://localhost:1337/todomvc/
If we do this, the todo list in the client shows up empty! 🤔 If you open the JavaScript console in the browser debugger, you’ll see an error like this:
Origin http://todobackend.com \
  is not allowed by \
  Access-Control-Allow-Origin. \
  http://localhost:1337/todomvc/
We did nothing less but run a cross-site scripting attack on ourselves! Because our API and todobackend.com are different hosts, the browser denies access to our API.
CORS
To make this work we need to implement Cross-Origin Resource Sharing aka CORS. Let’s quickly make a reusable middleware function which sets up the proper CORS headers, it is just a few lines of code:
GitHub: CORS.swift
// File: CORS.swift - create this in Sources/MicroExpress

public func cors(allowOrigin origin: String)
            -> Middleware
{
  return { req, res, next in
    res.headers["Access-Control-Allow-Origin"]  = origin
    res.headers["Access-Control-Allow-Headers"] = "Accept, Content-Type"
    res.headers["Access-Control-Allow-Methods"] = "GET, OPTIONS"

    // we handle the options
    if req.header.method == .options {
      res.headers["Allow"] = "GET, OPTIONS"
      try res.send("")
    }
    else { // we set the headers
      next()
    }
  }
}
To use it, add the cors middleware above your TodoMVC middleware in
main.swift,
e.g. like this:
GitHub: main.swift
// File: main.swift - change this in main.swift

app.use(querystring,
        cors(allowOrigin: "*"))
Note: For
cors()we use a common pattern done in JavaScript,cors()itself is not a middleware function, but it returns one (as a closure).
Rerun the server, and the TodoBackend client should now show our beautiful
todos:
http://todobackend.com/client/index.html?http://localhost:1337/todomvc/
Step 8: Turn it into a library
So far we built the whole thing as a tool (an executable) for convenience reasons. Let’s split our package into the library which can be consumed by other SPM packages, and our demo server.
Create a new folder MicroHelloServer in the Sources directory,
which will carry our test server.
Then move the main.swift and the TodoModel.swift out of our
MicroExpress library and into the test server:
$ mkdir Sources/MicroHelloServer
$ mv Sources/MicroExpress/main.swift      \
     Sources/MicroExpress/TodoModel.swift \
     Sources/MicroHelloServer/
The next step is to add a new target for MicroHelloServer to the
Package.swift.
We also need to export our library to external packages using the
products
declaration.
GitHub: Package.swift
// File: Package.swift - update existing file

products: [
  .library(name: "MicroExpress",
           targets: ["MicroExpress"]),
],
...
targets: [
  .target(
    name: "MicroExpress",
    dependencies: [ "HTTP" ]),
  .target(
    name: "MicroHelloServer",
    dependencies: [ "MicroExpress" ]),
]
After any change to Package.swift, you need to regenerate the Xcode
project:
$ swift package generate-xcodeproj
  generated: ./MicroExpress.xcodeproj

$ open MicroExpress.xcodeproj
Again, after doing this, make sure you select the right scheme
(e.g. MicroHelloServer)
and the right platform (“My Mac”) in Xcode.
Since we split the module, main.swift needs to import the new library:
// File: main.swift - update existing file

import MicroExpress
You can rebuild the tool and it should work the same as before.
GitHub: You can find this setup in the tutorial/4-package-up branch.
Publish Package using GIT
If you now upload the package to a git repository, you can start using it in other packages, that is, as an own package dependency:
dependencies: [
  .package(url:
    "https://github.com/helje5/MicroExpress.git",
    .branch("master")
  )
],
Using the Package
Micro Hello World can now be done in 2 minutes:
$ mkdir MicroHelloWorld && cd MicroHelloWorld
$ swift package init --type executable
Update Package.swift to include the dependency:
// swift-tools-version:4.0
import PackageDescription

let package = Package(
  name: "MicroHelloWorld",
  dependencies: [
    .package(url: "https://github.com/helje5/MicroExpress.git",
             branch: "master")
  ],
  targets: [
    .target(name: "MicroHelloWorld",
            dependencies: [ "MicroExpress" ])
  ]
)
Change the main.swift from print("Hello World") into:
import MicroExpress

let app = Express()
app.get("/") { _, res, _ in
  try res.send("Hello World")
}
app.listen(1337)
$ swift build
$ swift run
Started server on port 1337 with 4 serial queues of each type and 8 accept sockets
Done. Access via: http://localhost:1337/
Summary
That’s it for now. We build a micro-framework featuring middleware, routing, JSON and CORS support in about 200 lines of code. Sure, it is not everything you may need yet, but it is a pretty decent way to write Swift HTTP and JSON endpoints.
Using mod_swift you can even run this within Apache. Checkout Part 1 of our blog series to see how easy that is: Use Apache to host your Swift Server API endpoint.
Note:
This is a synchronous implementation of an
Express-like API in Swift as the Swift API 0.1.0 implementation is synchronous
(which will probably change at some point,
the API design itself is asynchronous).
Have a look at
ExExpress
(as used in ApacheExpress)
for a more complete version of a synchronous Express-like Swift API.
Noze.io also comes w/ an asynchronous variant
(closer to the original).
As usual we hope you liked this! Feedback and corrections are very welcome!
Links
- Finished MicroExpress package on GitHub (contains branches of all stages)
- Swift Server Working Group
- JavaScript Originals
- ExExpress
- SPM
- Swiftmon/S
Contact
Hey, we love feedback!
Twitter, any of those:
@helje5,
@ar_institute.
Email: me@helgehess.eu.