
Model View Controller for SwiftUI
 Overall
SwiftUI
has been well received after its introduction.
However, something most developers stumble upon quickly is how to
structure non-trivial applications.
One option is to just stick to MVC and get a reasonably clean architecture
that isn’t full of hacks.
Overall
SwiftUI
has been well received after its introduction.
However, something most developers stumble upon quickly is how to
structure non-trivial applications.
One option is to just stick to MVC and get a reasonably clean architecture
that isn’t full of hacks.
We decided to stick to the “MVC” terminology Apple came up with for UIKit. As @mpweiher correctly points out, “Apple MVC” isn’t really MVC, but more like MWC. This is what we talk about.
When asked about the architecture to use with SwiftUI
(MVC,
MVVM,
Viper,
TCA …),
Apple at the WWDC 2021 essentially said: Use whatever you like!
Which, while more guidance would be helpful, actually makes sense.
SwiftUI doesn’t force the developer into “MVC” in the same way UIKit did,
it provides the primitives to implement very different architectures.
Now that we aren’t forced to use MVC anymore, we might start to like it 🤓
This is how we do it:
class HomePage: ViewController {

  // MARK: - Actions

  func showPreferences() {
    present(Preferences())
  }

  // MARK: - View

  var view : some View {
    Button(action: self.showPreferences) {
      Label("Preferences", systemImage: "gear")
    }
  }
}
ViewControllers are like freaking zombies. Just won’t die, no matter how many times you shoot it […], or douse it in gasoline and light it on fire, or anything.
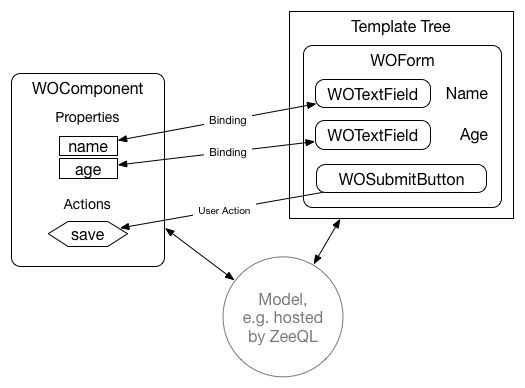
I think that SwiftUI is just another iteration of WebObjects. And hence structure SwiftUI apps in a similar way we used to. After bringing a few SwiftUI applications to the AppStore, that turned out to work really well for us.
No package/framework is needed at all to implement this! Though we will present a small one to assist the approach: called ViewController, a set of conveniences and “Ah, that I understand” stuff.
Direct access:
- The Problem
- A Solution: Model View Controller
- Optional Micro Framework: ViewController
News 2022-06-05: SwiftUI 4 (iOS 16+) has a new navigation API that fixes a lot of things. Learn about it over here. Looks like that will make SwiftUI navigation much more reliable. Not quite sure yet how I’m going to fit it into ViewController. The new approach fixes some things. But it isn’t a “presentation stack” either, i.e. it only addresses navigation (not sheets etc). We’ll see.
The Problem
Simple things are astonishingly simple to create in SwiftUI. But as soon as
even trivial things like a master-detail setups come into play,
developers seem to forget clean architectures they practiced for years.
Instead come up with a mess of
View’s
carrying state around, duplicating data, hack-patching and
breaking encapsulation on the way.
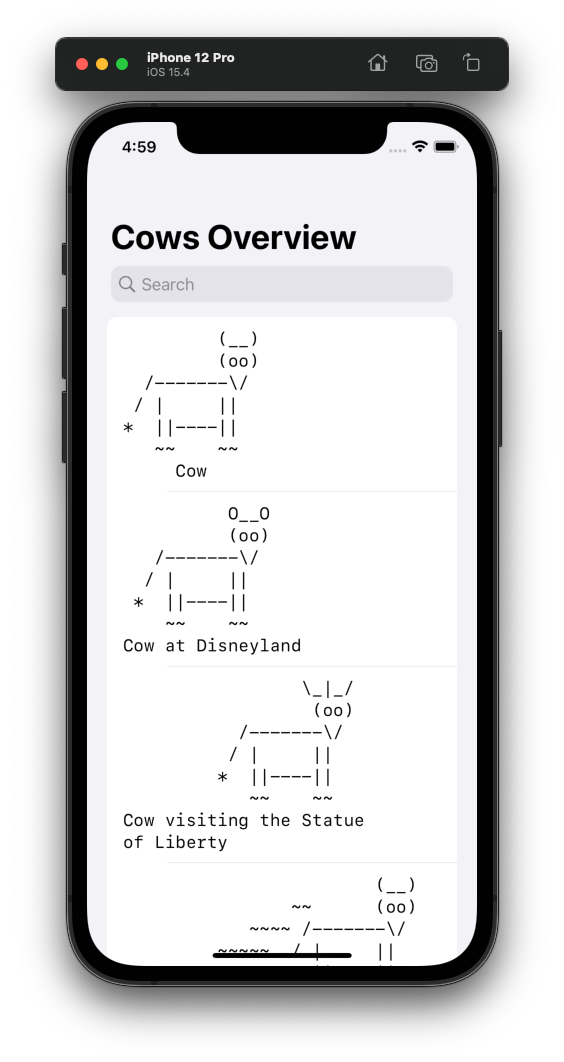
Something that can be seen a lot is a setup like this (cows module over here):
import SwiftUI
import cows // @AlwaysRightInstitute

struct ContentView: View {
  var body: some View {
    NavigationView {
      CowsOverview()
    }
  }
}

struct CowsOverview: View {

  @StateObject private var viewModel = CowsViewModel()

  var body: some View {
    List(viewModel.cows, id: \.self) { cow in
      Text(verbatim: cow)
        .font(.body.monospaced())
    }
    .searchable(text: $viewModel.search)
    .navigationTitle("Cows Overview")
  }
}

class CowsViewModel: ObservableObject {

  @Published var cows   = allCows
  @Published var search = "" {
    didSet {
      cows = allCows.filter { search.isEmpty || $0.contains(search) }
    }
  }
}
Reasonably clean, the logic is pulled out of the View to not end up with a
Massive View and to make it testable.
Looks like this:
Talking about “ViewModels”. This seems to be very common terminology for this thing in the SwiftUI world. We are not entirely sure why, those things seem quite different to ViewModels when doing MVVM in UIKit.
We call them ViewController’s, because that is what they do, they control the view holding a reference to them. Everyone is welcome to replace “ViewController” with “ViewModel” when reading this article.
Master Detail
Things start to get interesting (and problematic) when some kind of “navigation” is added to the application, e.g. showing a certain detail view when selecting a cow (could also be in a sheet or NavigationView, we use an inline presentation for the example).
WARNING: Incorrect Code: What people often try first:
struct CowDetail: View {

  @ObservedObject var viewModel : CowDetailViewModel

  init(cow: String) { // ugh ugly
    _viewModel = ObservedObject(wrappedValue: CowDetailViewModel(cow: cow))
  }

  var body: some View {
    Text(verbatim: viewModel.cow)
      .font(.body.monospaced())
      .navigationTitle("Cow Detail")
  }
}
class CowDetailViewModel: ObservableObject {

  @Published var cow = ""
  init(cow: String) { self.cow = cow }
}
And tracking the selection in the CowsOverview:
struct CowsOverview: View {

  @StateObject private var viewModel = CowsViewModel()

  var body: some View {
    VStack {
      if let cow = viewModel.selectedCow {
        CowDetail(cow: cow)
        Text("Selection")
          .font(.footnote)
        Divider()
      }

      List(viewModel.cows, id: \.self) { cow in
        Button(action: { viewModel.selectedCow = cow }) {
          Text(verbatim: cow)
            .font(.body.monospaced())
        }
      }
    }
    .searchable(text: $viewModel.search)
    .navigationTitle("Cows Overview")
  }
}

class CowsViewModel: ObservableObject {

  @Published var search = "" {
    didSet { cows = allCows.filter { search.isEmpty || $0.contains(search) } }
  }
  @Published var cows = allCows

  @Published var selectedCow : String?
}
WARNING: Incorrect Code.
Strange things will happen, it has at least two issues:
@ObservedObjectdoesn’t “own” the object, so it might actually go away (because the parent also doesn’t hold a reference to it, it is View-local, but only has storage for the OO’s Publisher assigned).- A new instance of the
CowDetailViewModelis created everytime the body of the parent view refreshes. (This very often results in confusion. Remember that a View’s body can be evaluated arbitrary number of times as the framework sees fit.)
Using a
@StateObject
addresses parts of the issue:
struct CowDetail: View {
  @StateObject var viewModel : CowDetailViewModel
  init(cow: String) { // ugh ugly
    _viewModel = .init(wrappedValue: CowDetailViewModel(cow: cow))
  }
Slightly better. This will make sure that the CowDetail View (i.e. someone)
is actually going to own the associated ViewModel.
But now a funny thing happens when another cow is selected:
Nothing happens in the UI, the selection sticks to the first selected cow.
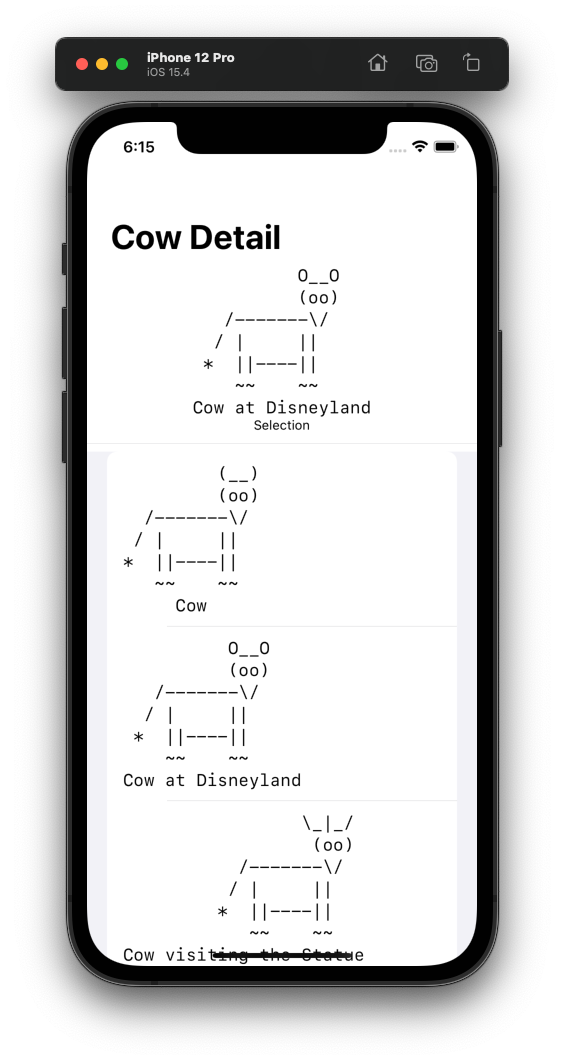
Click another cow, the displayed selection won’t ever change anymore.
Why is that, the selectedCow in the parent ViewModel is properly updating,
the CowDetail is re-initialized?
The reason is that for a StateObject the wrappedValue closure only runs
once, if the state is first initialized. All subsequent calls to init
will just drop the input on the floor.
Often people do a hodgepodge of different hacks to address that, but let’s look at a common one:
struct CowDetail: View {

  @StateObject var viewModel : CowDetailViewModel

  let cow : String

  init(cow: String) {
    self.cow = cow
    _viewModel = .init(wrappedValue: CowDetailViewModel(cow: cow))
  }

  var body: some View {
    Text(verbatim: viewModel.cow)
      .font(.body.monospaced())
      .navigationTitle("Cow Detail")
      .onChange(of: cow) { newCow in viewModel.cow = newCow }
  }
}
That actually works.
- Introduces a copy of the cow as an instance variable in the View itself.
- If the
Viewis refreshed, the value ofcowwill update using theinit(the VM closure will still get created and dropped w/o being used). - And if the
View’scowivar changed, the new value is (manually) pushed into the “ViewModel”
But, jeez, is that stuff ugly!
Overriding View init’s,
creating a property wrapper copy and push it into the state
(capturing a closure each time!),
duplicating all input in instance variables for API purposes,
manual tracking of arbitrary values (imagine the VM has more than one property),
…
Something is clearly going wrong here, there has to be a better way!
There are other hacks around this, and different ones for different situations (e.g. using
onAppear), but they all one thing in common: they are just that, ugly hacks.
A Solution: Model View Controller
A solution is nothing fancy or complicated,
but just sticking to what was best practice in UIKit already:
keep state out of View’s.
Instead of having the View’s own the ViewModels,
a ViewController
(again, feel free to call them ViewModels)
hierarchy is formed. It is just “drawn” by the View’s.
The View’s sole two purposes: rendering and event handling.
Let’s see what we mean using our cows example app. Again, this doesn’t require any library or framework and all apps we deploy today just use the concept, not even ViewController (yet).
class CowDetail: ObservableObject {

  @Published var cow = ""

  init(cow: String) { self.cow = cow }

  struct ContentView: View {

    @ObservedObject var viewController : CowDetail

    var body: some View {
      Text(verbatim: viewController.cow)
        .font(.body.monospaced())
        .navigationTitle("Cow Detail")
    }
  }
}
It is almost the same like the “problematic approach” shown above, just the “other way around”. Solving a ton of problems and requiring zero SwiftUI hack-a-rounds.
- The
CowDetailis now an ObservableObject representing that section of the screen, a “ViewController”. - Things you’d put into View
@Statebefore, become@Publishedproperties of the controller. Because no state belongs into Views. - The sample contains the
ContentViewas a subtype of theCowDetailcontroller. That’s fine for simple setups, in real apps it isn’t unusual to put them into separate files that are concerned only about a specific representation (e.g. like Storyboards before). There can be multiple “ContentViews”, e.g. for different themes, device sizes or types. - The associated
Viewis receiving its controller as an@ObservedObject. This is fine in this case, because the ViewController hierarchy now explictly owns the chained controllers:
class CowsOverview: ObservableObject {

  @Published var search = "" {
    didSet { cows = allCows.filter { search.isEmpty || $0.contains(search) } }
  }
  @Published var cows = allCows

  @Published var detailViewController : CowDetail?

  // MARK: - Actions

  func showDetail(_ cow: String) {
    detailViewController = CowDetail(cow: cow)
  }

  // MARK: - View

  struct ContentView: View {

    @ObservedObject var viewController : CowsOverview

    var body: some View {
      VStack {
        if let presentedViewController = viewController.detailViewController {
          CowDetail.ContentView(viewController: presentedViewController)
          Text("Selection")
            .font(.footnote)
          Divider()
        }

        List(viewController.cows, id: \.self) { cow in
          Button(action: { viewController.showDetail(cow) }) {
            Text(verbatim: cow)
              .font(.body.monospaced())
          }
        }
      }
      .searchable(text: $viewController.search)
      .navigationTitle("Cows Overview")
    }
  }
}
Notice how the CowsOverview is now owning the CowDetail.
Very similar to how a
presentingViewController
is owning the
presentedViewController
in UIKit.
This call initiates the presentation:
func showDetail(_ cow: String) {
  // like `self.present(CowDetail(cow: cow))` in UIKit
  detailViewController = CowDetail(cow: cow)
}
Just sticking to this pattern produces reasonably clean SwiftUI application. It takes out the uglyness of the “problematic solution” where Views and state intermingle:
- Views can use
@ObservedObject, because it is clear who owns the associated object (ViewController). - There is no capturing of unused state initializers anymore.
- A single source of truth, no duplicated state in Views, no watching and synchronization of local values.
- No ugly
_propery wrapper inits anymore (would be nice to have synthesized class inits in Swift though).
As in UIKit additional concepts can be added around this basic one (which deals primarily with “app navigation state”). E.g. one could create view model structs to represent the state, or use Coordinators to decide on the actual presentation flow (i.e. what ViewControllers are going to be presented when).
There is one minor thing missing. The “Root ViewController” needs to be setup.
That is the sole place where we still use a
@StateObject:
struct ContentView: View {

  @StateObject var sceneViewController = CowsOverview()

  var body: some View {
    NavigationView {
      CowsOverview.ContentView(viewController: sceneViewController)
    }
  }
}
We tend to call that ContentView in the main SwiftUI application
the “Scene View”.
Each scene should have an own root, as the user might navigate
differently through each one.
ViewController
Using the general approach shown is usually fine for most apps.
But sometimes there are a lot of pages with many different presentations,
navigation, sheets, etc.
So we came up with
ViewController,
a reasonably small library formalizing the concept a little.
It can be added as a Swift package to an Xcode project:
Package URL: https://github.com/ZeeZide/ViewController.git
The main thing it adds is the
ViewController
protocol,
which is derived from
ObservableObject.
The VC variant of the CowDetail component:
import ViewController

class CowDetail: ViewController {

  @Published var cow : String

  init(cow: String) { self.cow = cow }

  var view: some View {
    Text(verbatim: cow)
      .font(.body.monospaced())
      .navigationTitle("Cow Detail")
  }
}
Pretty similar to a SwiftUI
View,
but with an important distinction:
It has a proper object identity and can track (and own!) the presentation of
other ViewController’s.
The library supports both, directly embedding the associated View construction
as shown above or using an own ContentView type. The latter either inline
or as a separate top-level type.
CowsOverview with an explicit ContentView:
class CowsOverview: ViewController {

  @Published var search = "" {
    didSet { cows = allCows.filter { search.isEmpty || $0.contains(search) } }
  }
  @Published var cows = allCows

  // MARK: - Actions

  func showDetail(_ cow: String) {
    present(CowDetail(cow: cow))
  }

  // MARK: - View

  struct ContentView: View {

    @EnvironmentObject var viewController : CowsOverview

    var body: some View {
      VStack {
        List(viewController.cows, id: \.self) { cow in
          Button(action: { viewController.showDetail(cow) }) {
            Text(verbatim: cow)
              .font(.body.monospaced())
          }
        }
      }
      .searchable(text: $viewController.search)
      .navigationTitle("Cows Overview")
    }
  }
}
The active ViewController
can be acquired
using the SwiftUI environment,
using either its concrete type, or the
AnyViewController
type-erased version.
This makes splitting up the ContentView into specific subviews easy
and straight forward.
Note how the showDetail action is calling
.present.
This will push the detail to the ViewController stack and present the
cow in a sheet. No manual tracking of the presented ViewController is
necessary anymore (though it still can be done if desirable).
The framework is keeping track of the presentation stack,
and makes it accessible using the old school
presentingViewController and presentedViewController
accessors.
There is one final piece to get things going, the root sceneViewController
needs to be setup. There are two ways to do it, the plain version:
struct ContentView: View {

  @StateObject var sceneViewController = CowsOverview()

  var body: some View {
    NavigationView {
      sceneViewController.view // Or: CowsOverview.ContentView()
        .controlled(by: sceneViewController) // activate
    }
  }
}
Or using a small helper View which does the same,
MainViewController:
struct ContentView: View {

  var body: some View {
    NavigationView {
      MainViewController(CowsOverview())
    }
  }
}
We think that this looks quite pretty!
NavigationController
Calling present (in auto mode) is always going to present a ViewController in
a
sheet.
ViewController
also provides
show
(and technically showDetail, though the SplitViewController is not finished
yet).
When using show the presentation can adapt to the container view it is in
(i.e. the container view gets a chance to decide on the presentation).
If a
NavigationController is used,
show will result in a navigation transition, instead of a sheet.
How a ViewController is presented is transparent to it
(the current mode
can be queried
from the environment).
To wrap up, this is how an automatic show version looks like:
struct ContentView: View {

  var body: some View {
    MainViewController(
      NavigationController(rootViewController: CowsOverview())
    )
  }
}
And instead of present the action should use show:
func showDetail(_ cow: String) {
  show(CowDetail(cow: cow))
}
In case you wonder, this also works:
func showDetail(_ cow: String) {
  let detail = CowDetail(cow: cow)
  detail.modalPresentationStyle = .navigation // .sheet, .custom, …
  present(detail)
}
Notes
- The approach also solves issues people have with
onAppear, when it fires and how it fires. Because navigation / component activation is explicitly encoded in the view controller presentation stack (instead of being a side effect). - Massive View Controller can still become a thing, same measures as with
UIKit apply. Use ViewController containment and the likes
(
ViewControllerdoes support child controllers). - This doesn’t fix programmatic SwiftUI navigation (aka “deep linking”), which still happens to be a buggy mess in SwiftUI. There are hacks around it, but nothing really reasonable.
ViewControllerfeatures support forrepresentedObject, i.e. associating another, usually “model”, object with the VC (also along the lines of MWC). Often helpful (e.g. the datasource of contacts being listed, or the individual contact being shown).- Along those lines, since the
ViewControlleris often the main redraw driver for a View, it has awillChange(with:)hook, to republish changes in other objects, e.g. models. - Flutter also seems to do explicit navigation, i.e. “push a route”, instead of deriving the navigation position from state.
Closing Notes
We meant to write about this, and formalize it in a small package,
for quite a while (by now years, actually 🙈).
The presented solution is used in various
of our apps in the AppStore.
ViewController isn’t deployed
yet,
but was created for a more complex application w/ multiple, stacked
presentations going on. We quite like it.
As usual all feedback is welcome.
Tell us why you hate it and why this is wrong!
@helje5 or
me@helgehess.eu.
Links
- ViewController package
- Apple Documentation
- Model Widget Controller MVC - article by @mpweiher
- An Introduction to WebObjects, in Swift
- cows package
- Cowtastic apps:
- SwiftUI
- A Better MVC by Dave DeLong
Contact
Feedback is warmly welcome: @helje5, @helge@mastodon.social, me@helgehess.eu. GitHub.
Want to support our work? Buy an app: Past for iChat, SVG Shaper, Shrugs, HMScriptEditor. You don’t have to use it! 😀