
Chat with your Raspi - SwiftyLinkerKit+NIO
 If you are like the ARI, you own some Raspberry Pi’s doing some serious work.
But you never actually used the Pi’s
GPIO,
because you don’t want to solder nor have any clue about electronics.
Let’s change that with the easy to use LinkerKit,
and drive it using Swift!
If you are like the ARI, you own some Raspberry Pi’s doing some serious work.
But you never actually used the Pi’s
GPIO,
because you don’t want to solder nor have any clue about electronics.
Let’s change that with the easy to use LinkerKit,
and drive it using Swift!
The GPIO is the thing with that stack of pins on your Raspi, you can use it
to attach sensors, displays and other stuff:

As it happens no one at the ARI has any clue about hardware/electronics. Sure, we have a rough idea what digital and analog means, and yes, we did learn how to solder in school. But that is no fun. Yet we absolutely want to be able to use those neat and cheap electronic components you can attach to a Raspi! Enter:

Recently we stumbled upon a system called LinkerKit. Its core is a “shield” you connect to the GPIO. That shield then exposes the GPIO pins as 4-pin sockets to which you can connect readymade LinkerKit cables. Which in turn connect to a wide range of LinkerKit components. This is how it looks:
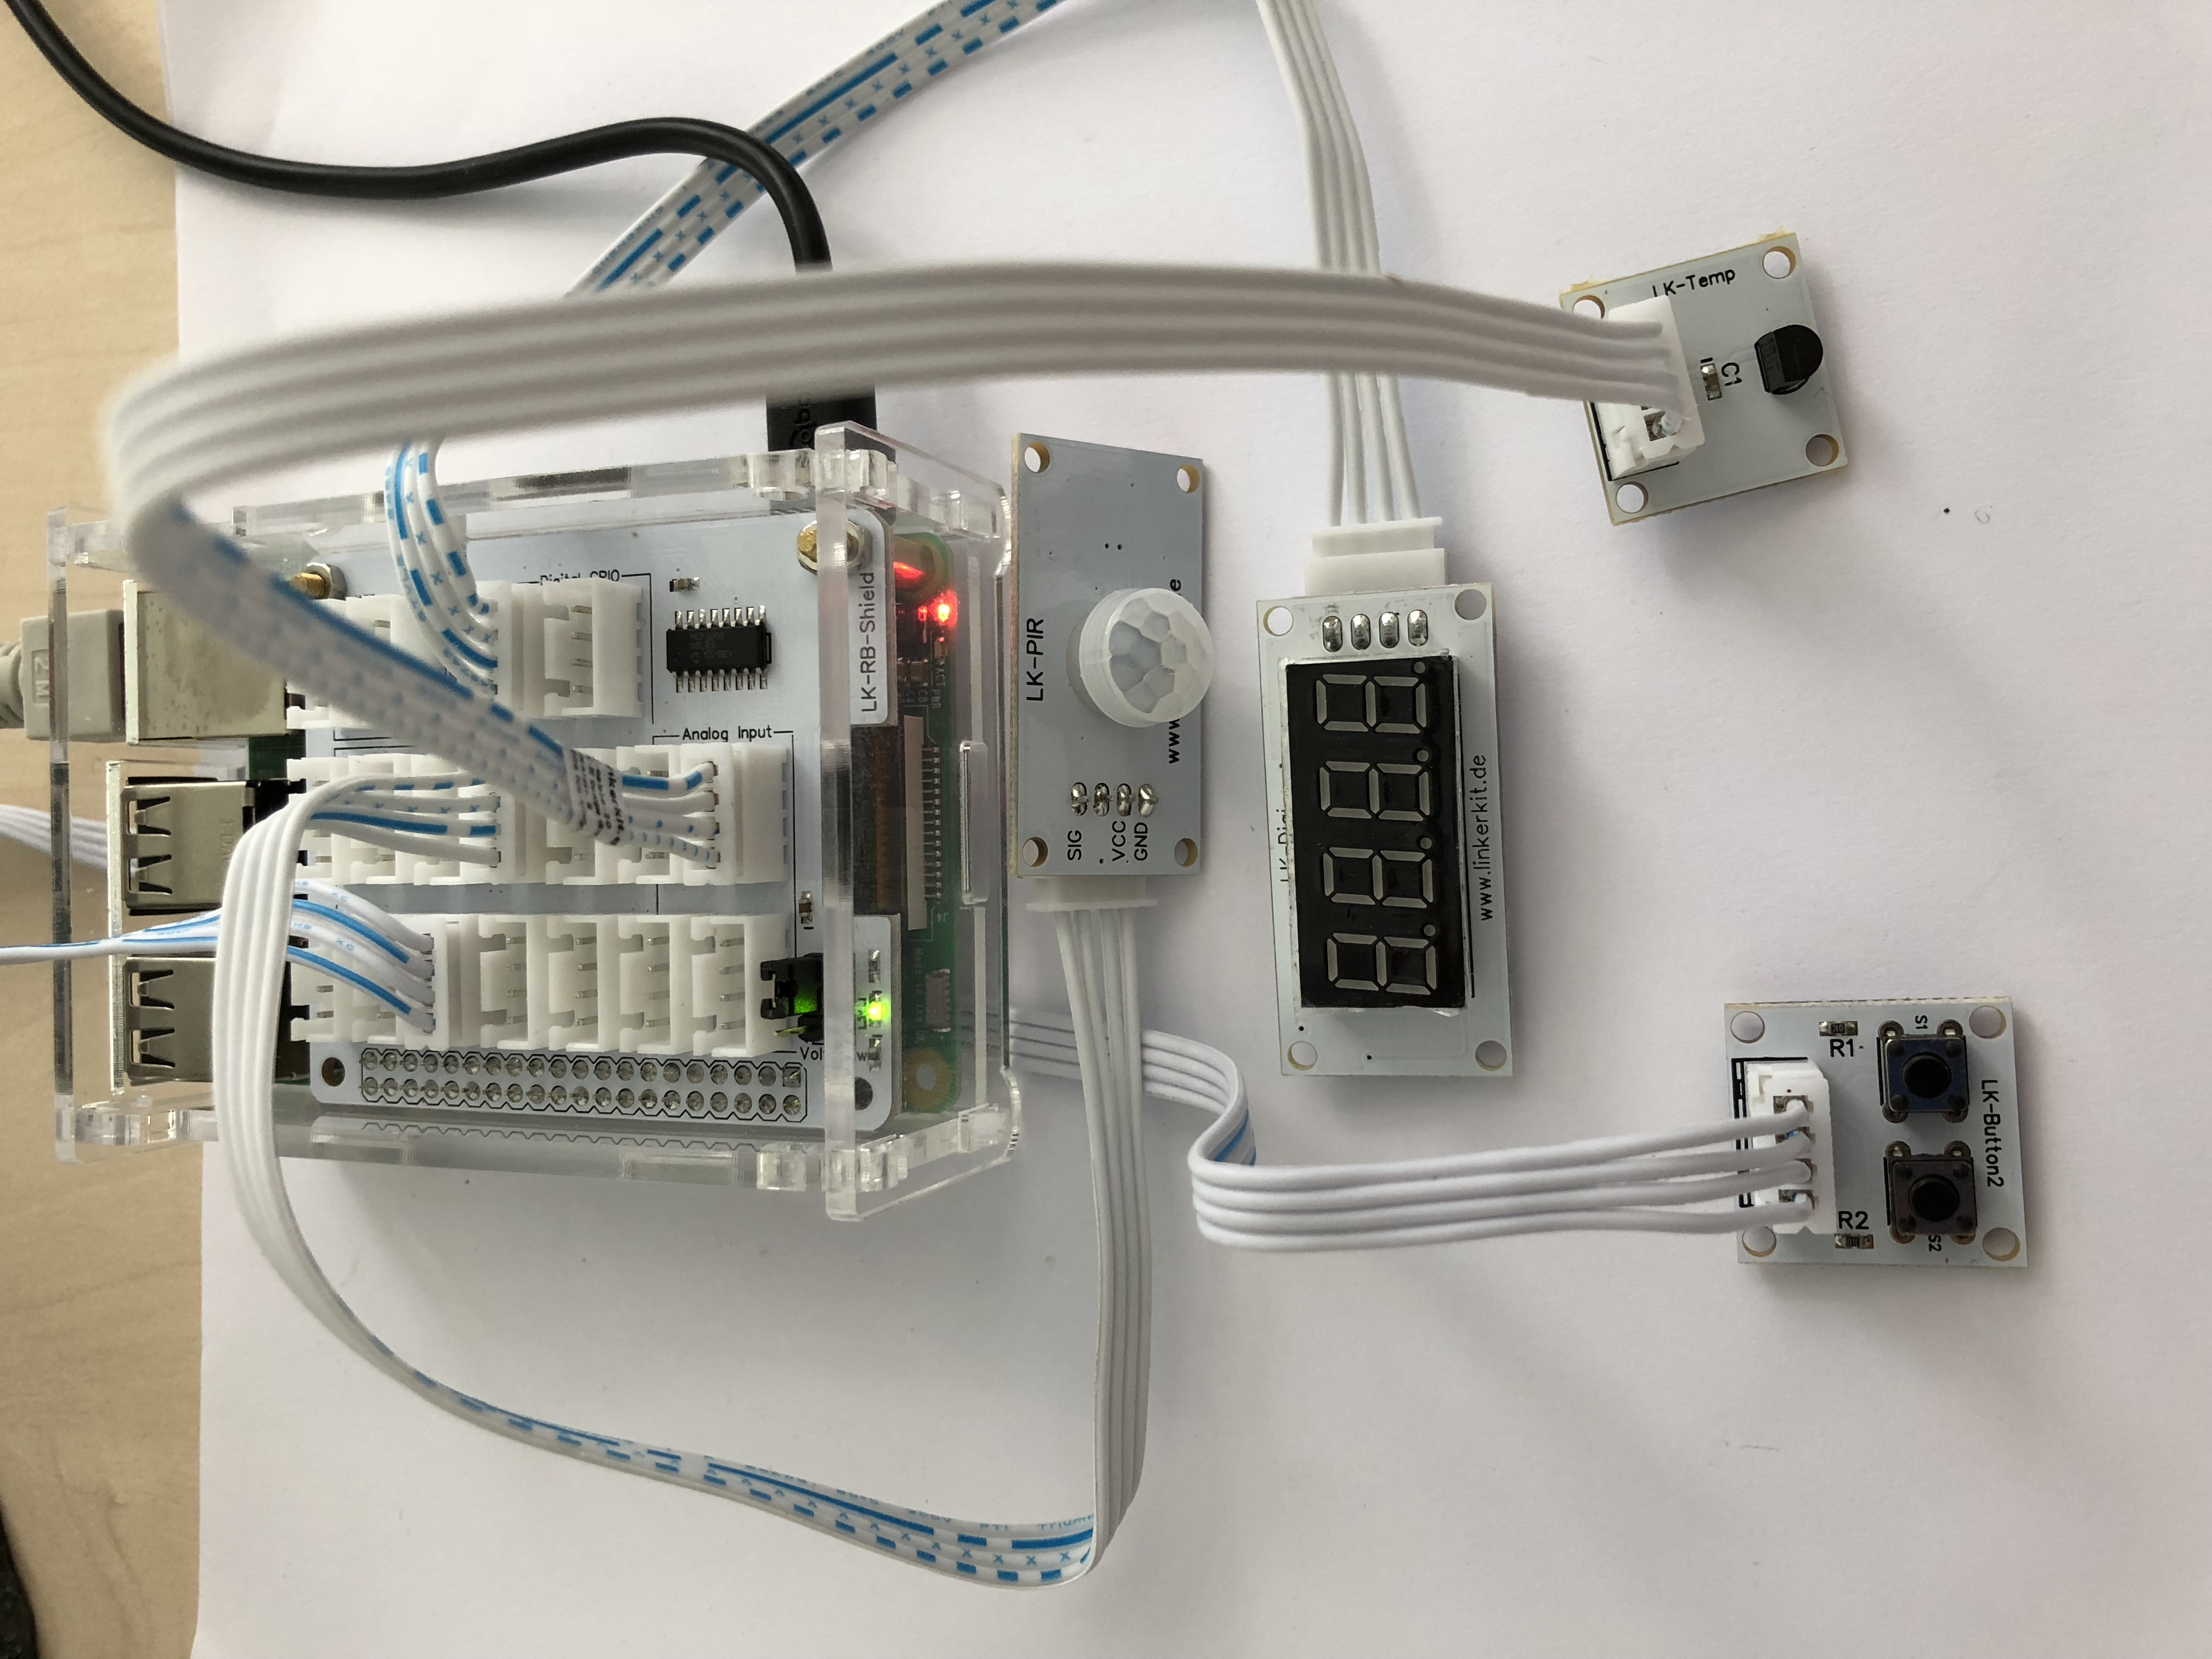
LinkerKit makes the hardware part easy, you connect digital accessories like buttons, the display or the motion detector to digital sockets, and you connect analog accessories like the temperature sensor to analog sockets (the shield includes an ADC, which is driven via SPI - don’t be afraid, you don’t have to deal with the terms).
Want to skip all the text and jump right to the video?
SwiftyGPIO
![]()
LinkerKit usually includes examples on how to drive the respective accessories,
but those are either written in Python or in the
Yet this still deals with GPIO pins, and you have to have some understanding on how the electronics work. Which is way to complicated for us! So just like LinkerKit makes the GPIO easier to use for noobs like us, we wrote SwiftyLinkerKit to make LinkerKit stuff even easier to use from within Swift.
SwiftyLinkerKit
In
SwiftyLinkerKit
you don’t have to deal with GPIO pins anymore and you don’t need to know how
the LinkerKit devices have to be controlled.
It provides ready made objects matching the LinkerKit accessories.
Want to handle button presses on the
LK-Button2
component? Instantiate an
LKButton2
object in Swift, and hook it up to
the
LKRBShield
object representing the shield. Like so:

LKRBShield.default
  .connect(LKButton2(), to: .digital2122)
  .onPress1 {
    print("Button 1 was pressed!")
  }
  .onPress2 {
    print("Button 2 was pressed!")
  }
The .digital2122 refers to the digital docket on the shield labeled 21/22.
Or if you want (and can’t read the tiny labels), you can also address
the sockets by position, for example:
.connect(LKButton2(), to: .init(row: 3, column: 3))
The digital 21/22 socket is in the 3rd row of the shield, the 3rd socket. To which we connected our LK-Button-2 component.
Intermission: Setting up the Environment
Before we can get started, we need to have a development environment. You can install a Swift 4.1 drop directly on your Raspi, or do the thing we prefer: run your stuff as Docker containers.
HypriotOS
A great Docker distro for Raspi is HypriotOS. Setup is trivial. Grab the flash tool, then insert your empty SD card into your Mac and do:
$ flash --hostname zpi3 \
  https://github.com/hypriot/image-builder-rpi/releases/download/v1.8.0/hypriotos-rpi-v1.8.0.img.zip
Boot your Raspi and you should be able to reach it via zpi3.local.
You may also want to use docker-machine (e.g. see here) to remote control the Pi, but that is not strictly necessary.
Now that you have the host system running, starting a Swift container is as easy as this (it needs a few more options since we want to access the GPIO stuff of the host):
$ docker run \
  --cap-add SYS_RAWIO --privileged --device /dev/mem \
  -it \
  helje5/rpi-swift-dev:4.1.0 /bin/bash
$ swift@b681a350031f:~$ swift --version
Swift version 4.1 (swift-4.1-RELEASE)
Target: armv7-unknown-linux-gnueabihf
SPI (you don’t wanna know)
One more thing: to be able to use analog devices like the thermometer or the potentiometer (that is the shields ADC), you need to enable the SPI support of the Raspi.
Very easy, on the HypriotOS host system (or your regular system if not
using Docker), add this line to the /boot/config.txt file and reboot:
dtparam=spi=on
First Project: Simple Clock
 The
LK-Digi
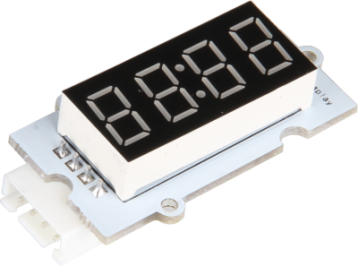
LinkerKit component is a 7-segment display with 4 character/digit fields,
each of which can also display a dot.
We want to use this to display the current time:
The
LK-Digi
LinkerKit component is a 7-segment display with 4 character/digit fields,
each of which can also display a dot.
We want to use this to display the current time:
First create a new Swift Package Manager project:
$ mkdir dclock && cd dclock && swift package init --type executable
Creating executable package: dclock
Creating Package.swift
Creating README.md
Creating .gitignore
Creating Sources/
Creating Sources/dclock/main.swift
Creating Tests/
Then edit (vi/emacs/…) the Package.swift file to look like this:
// swift-tools-version:4.0

import PackageDescription

let package = Package(
    name: "dclock",
    dependencies: [
        .package(url: "https://github.com/SwiftyLinkerKit/SwiftyLinkerKit.git",
                 from: "0.1.3"),
    ],
    targets: [
        .target(
            name: "dclock",
            dependencies: [ "SwiftyLinkerKit" ]),
    ]
)
Note how we import the
SwiftyLinkerKit
module and make our clock tool “depend” on it.
Edit the Sources/dclock/main.swift with the following Swift code. In the
example the LK-Digi is connected to the Digital-4/5 slot of the LK-RB-Shield,
adjust accordingly!
import Dispatch
import SwiftyLinkerKit

let shield  = LKRBShield.default
let display = LKDigi()

shield.connect(display, to: .digital45)

let timer = DispatchSource.makeTimerSource()

timer.setEventHandler {
    display.showTime()
}

timer.schedule(deadline  : .now(),
               repeating : .seconds(1),
               leeway    : .milliseconds(1))
timer.resume()

dispatchMain()
So what are we doing:
- we grab the object representing the shield
(
LKRBShield) - we create an object representing our display
(
LKDigi) - we tell the shield that the display is connected to port digital 4/5
- then we schedule a timer using Grand Central Dispatch
- and within the timer, we just tell the
LKDigito display the current time - finally, we call
dispatchMain, which keeps GCD up and running
Build everything:
$ swift build
Fetching https://github.com/SwiftyLinkerKit/SwiftyLinkerKit.git
Fetching https://github.com/uraimo/SwiftyGPIO.git
Fetching https://github.com/AlwaysRightInstitute/SwiftyTM1637.git
Cloning https://github.com/SwiftyLinkerKit/SwiftyLinkerKit.git
Resolving https://github.com/SwiftyLinkerKit/SwiftyLinkerKit.git at 0.1.0
Cloning https://github.com/uraimo/SwiftyGPIO.git
Resolving https://github.com/uraimo/SwiftyGPIO.git at 1.0.5
Cloning https://github.com/AlwaysRightInstitute/SwiftyTM1637.git
Resolving https://github.com/AlwaysRightInstitute/SwiftyTM1637.git at 0.1.2
Compile Swift Module 'SwiftyGPIO' (10 sources)
Compile Swift Module 'SwiftyTM1637' (5 sources)
Compile Swift Module 'SwiftyLinkerKit' (5 sources)
Compile Swift Module 'dclock' (1 sources)
Linking /home/swift/dclock/.build/armv7-unknown-linux-gnueabihf/debug/dclock
You need to run it using sudo (password in the Docker is swift):
$ sudo .build/armv7-unknown-linux-gnueabihf/debug/dclock
And the display should show the time and a blinking dot to display the seconds:
Very nice!
LinkerKit IRC Bot
But in the blog title you said “chat with your Raspi” and “SwiftyLinkerKit+NIO”!
Indeed! With the clock example we learned how we can talk to the LinkerKit stuff using a commandline tool. But we don’t really want to login to the Raspi everytime we want to get a sensor reading or want to change what the display shows. In short: we need some kind of service exposing our accessories to the Internet.
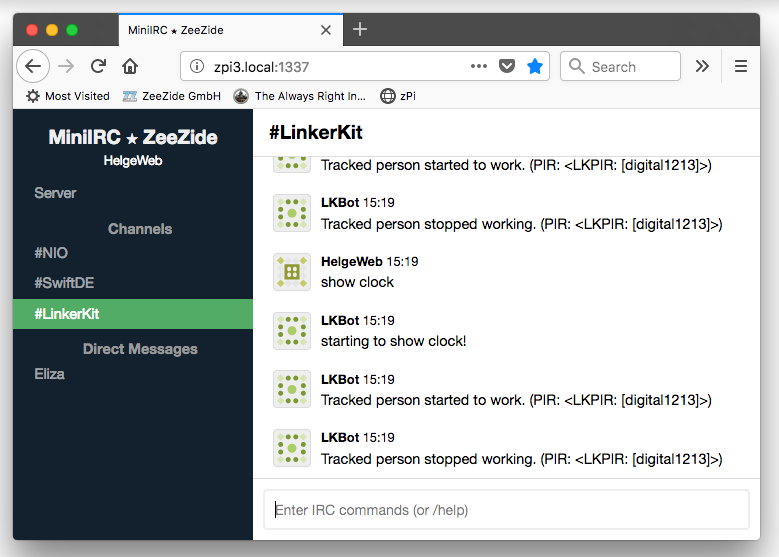
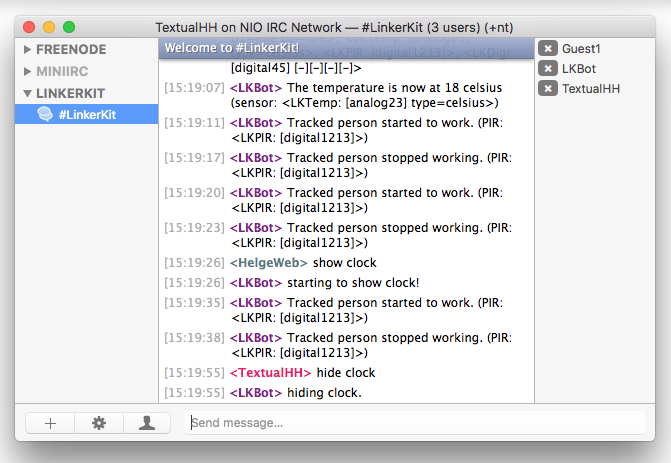
How are you implementing network services in Swift? Using Swift NIO, what else! And we want to chat with the LinkerKit components, so we need a chat protocol. Let’s do IRC using the SwiftNIO IRC Server. It gives us a web interface:
as well as a variety of native applications, including Irrsi, Textual and Mutter:
If you are interested you may want to have a look at the NIO-IRC Server Overview, we are only interested in the actual bot here.
Getting the Package
To run the LinkerKitIRCBot on your Pi, simply clone it, configure it, and run it:
$ git clone https://github.com/SwiftyLinkerKit/LinkerKitIRCBot.git
Cloning into 'LinkerKitIRCBot'...
remote: Counting objects: 19, done.
remote: Compressing objects: 100% (15/15), done.
remote: Total 19 (delta 2), reused 19 (delta 2), pack-reused 0
Unpacking objects: 100% (19/19), done.
Checking connectivity... done.
$ cd LinkerKitIRCBot
$ swift build
Fetching https://github.com/uraimo/SwiftyGPIO.git
Fetching https://github.com/apple/swift-nio.git
Fetching https://github.com/NozeIO/swift-nio-irc.git
... 4 minutes ...
Linking ./.build/armv7-unknown-linux-gnueabihf/debug/lkircbot
On a Raspi 3 this needs about 4 minutes - with the dependencies it is a pretty large project (320 files, ~65k lines of Swift code). In a way it demonstrates that a Raspi is capable of running large Swift projects 🤓
The bot Swift package provides two things: the actual bot, and a tool which starts the IRC server and the HTML IRC client. Before you start running the server tool, make sure the LinkerKit setup matches your configuration:
File: lkircbot.swift (Sources/lkircbot/main.swift)
let shield = LKRBShield.default

let lkDigi    = LKDigi()
let lkButtons = LKButton2()
let lkPIR     = LKPIR()
let lkTemp    = LKTemp(interval: 60, valueType: .celsius)

shield.connect(lkDigi,    to: .digital45)
shield.connect(lkButtons, to: .digital2122)
shield.connect(lkPIR,     to: .digital1213)
shield.connect(lkTemp,    to: .analog23)
Should be self explanatory.
When running
lkircbotin Docker, remember that you have to forward/expose the required ports, that is1337for the webserver and6667if you want to connect using a real IRC client. So add those options “-p 6667:6667 -p 1337:1337” to yourdocker runcall.
Once ready, you can start the server. Note the extweb option, that is required
to tell the Web client where to find the WebSocket gateway (it defaults to
localhost, but needs to point to your Raspi):
$ sudo ./.build/armv7-unknown-linux-gnueabihf/debug/lkircbot \
       --extweb ws://zpi3.local:1337/
Next let’s have a look how it works!
The Bot
The bot
itself is really simple and uses the
swift-nio-irc
module.
It acts as a client to the IRC server, i.e. it registers like a regular IRC
client with the nickname lkbot, which you can message like another IRC user
(e.g. /msg lkbot start countdown).
Both the bot client and the Swift NIO IRC server are running as part of the same Swift NIO process here, but they don’t have to!
Initialization
When the bot is initialized, it grabs the components from the shield:
shield.getAccessories { accessories in
  for accessory in accessories.values {
    self.registerWithAccessory(accessory)
  }
}
and hooks up to them, for example:
switch accessory {
  ...
  case let accessory as LKTemp:
    print("register thermometer:", accessory)
    accessory.onChange { [weak self, weak accessory] value in
      guard let me = self, let accessory = accessory else { return }
      me.onTemperature(value, accessory: accessory)
    }
  ...
Reporting Changes
When the sensor reports a temperature change, it calls into:
func onTemperature(_ value: Double, accessory: LKTemp) {
  let message = "The temperature is now at \(Int(value)) \(accessory.valueType)"
  let target  = IRCMessageRecipient.channel(linkerKitChannel)

  ircClient.sendMessage(message + " (sensor: \(accessory))", to: target)
}
That is, it sends a message into the #linkerkit channel of the IRC server,
reporting the new temperature.
Processing Commands
The other way around, when a user either sends a private message to
lkbot or a message into the #linkerkit channel, the
IRCClient callback
will get called and invoke
userSentMessage(_,from:,to:),
our advanced NLS:
// Our super-advanced NLS
func userSentMessage(_ message: String,
                     from user: IRCUserID, to recipient: IRCMessageRecipient)
{
...
  if let digi = digi { // grab 7-segment display
    if let idx = words.index(where: { $0.lowercased() == "show" }),
       words.index(after: idx) < words.endIndex
    {
      let text = words[words.index(after: idx)]
      clockMode = .off                // if a clock is running, stop it
      digi.show(text)                 // show on hardware
      return reply("did show: \"\(text)\"") // IRC feedback
    }
  }
}
If the user sends a message show 1337 in the #linkerkit channel,
we show that text on the 7-segment.
SwiftyLinkerKit components run on their own serial DispatchQueue. That is, write or read operations won’t block other threads.
Video
And this is how it looks (you may want to expand the video to the full size). Chat with your LinkerKit! Using SwiftyLinkerKit and Swift NIO IRC!
Links
- SwiftyLinkerKit
- LinkerKit Wiki
- Swift NIO
- Platform
- AlwaysRightInstitute
Acknowledgements
Many thanks go to @uraimo for both, providing SwiftyGPIO and for helping us to understand the components, SPI and all the stuff. And of course many thanks to the Swift-ARM Community, which provides Swift builds for Raspberry Pis (and other ARM boards).
Contact
Hey, we hope you liked the article and we love feedback!
Twitter, any of those:
@helje5,
@ar_institute.
Email: me@helgehess.eu.